> ## Documentation Index
> Fetch the complete documentation index at: https://docs.scanoss.com/llms.txt
> Use this file to discover all available pages before exploring further.
# Installation & Quick Start
> Get started with SBOM Workbench — installation, initial configuration, and creating your first project.
## What is SBOM Workbench?
**SBOM Workbench** is a graphical user interface (GUI) desktop application that scans and audits
source code using the SCANOSS API. It enables developers to identify open-source components in
their projects, analyse licence compliance, detect vulnerabilities and cryptographic usage, and
generate Software Bills of Materials (SBOMs).
## Installation
1. Download the [installer](https://github.com/scanoss/sbom-workbench/releases).
2. Select the appropriate installer for your platform:
* **macOS**: `.dmg` file
* **Windows**: `.exe` installer
* **Linux**: `.AppImage` or `.deb` package
3. Run the installer.
## Initial Configuration
1. Open **SBOM Workbench**.
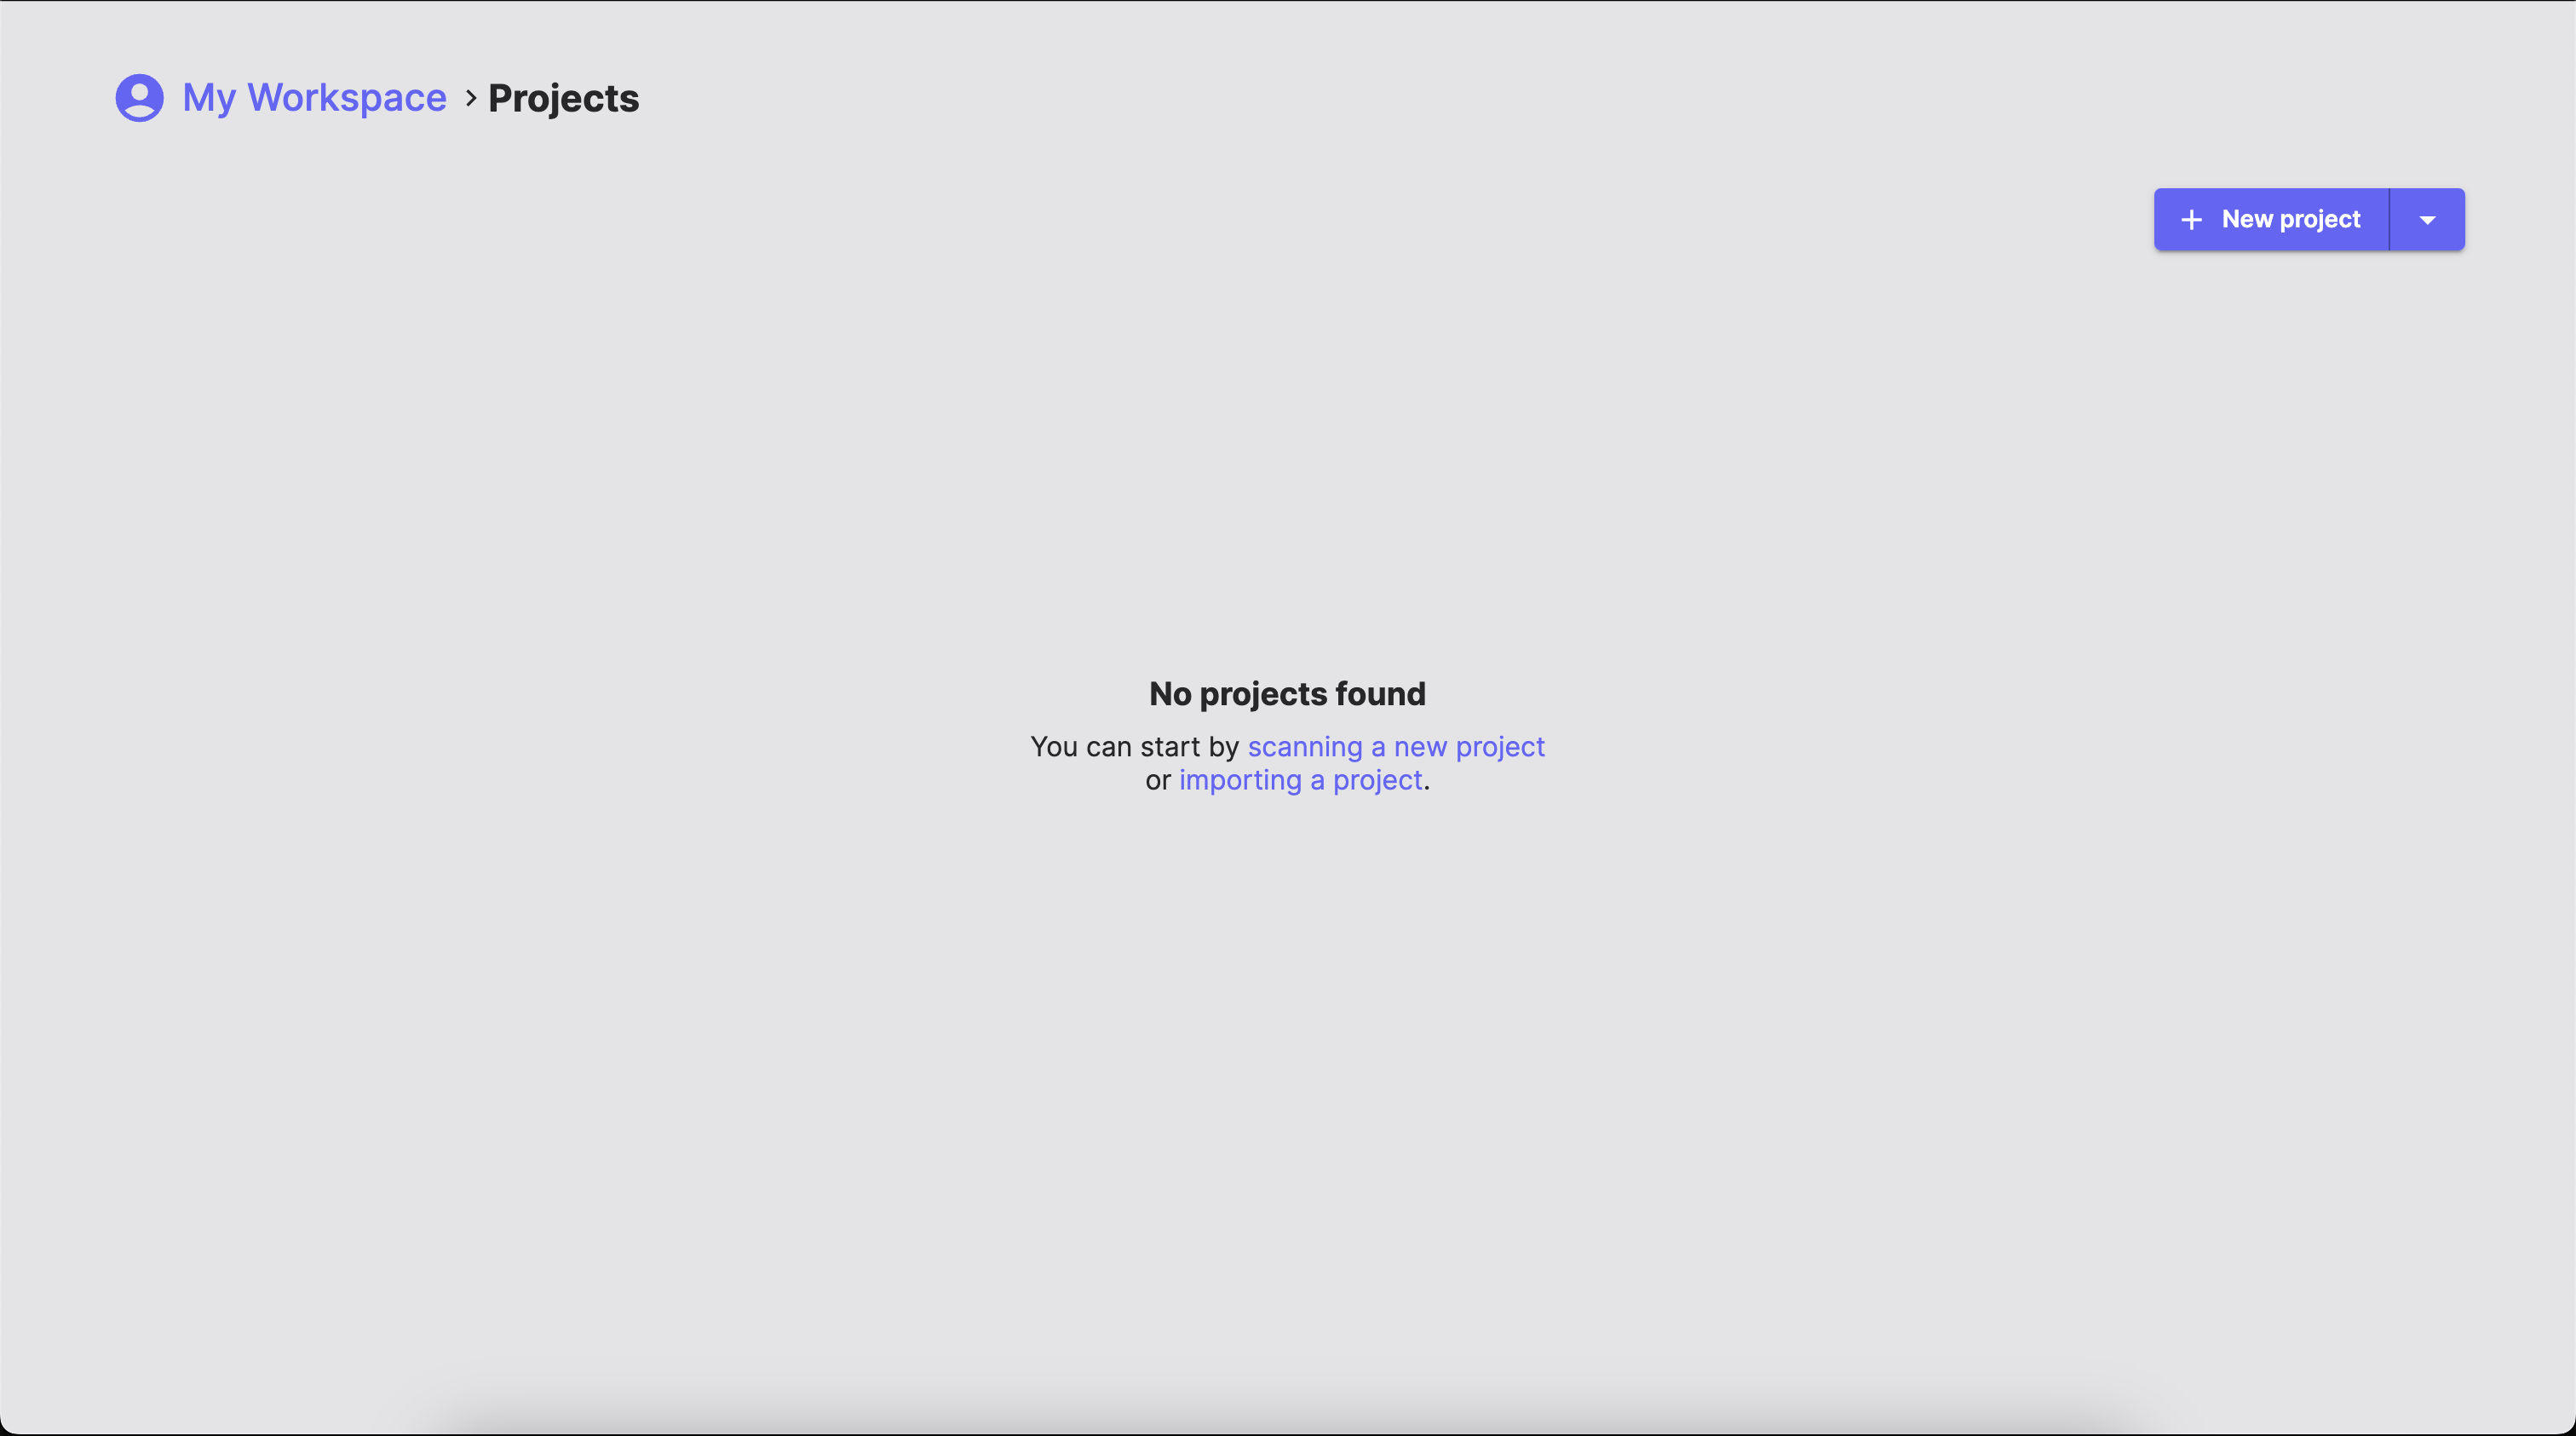 2. Go to **File** → **Settings**.
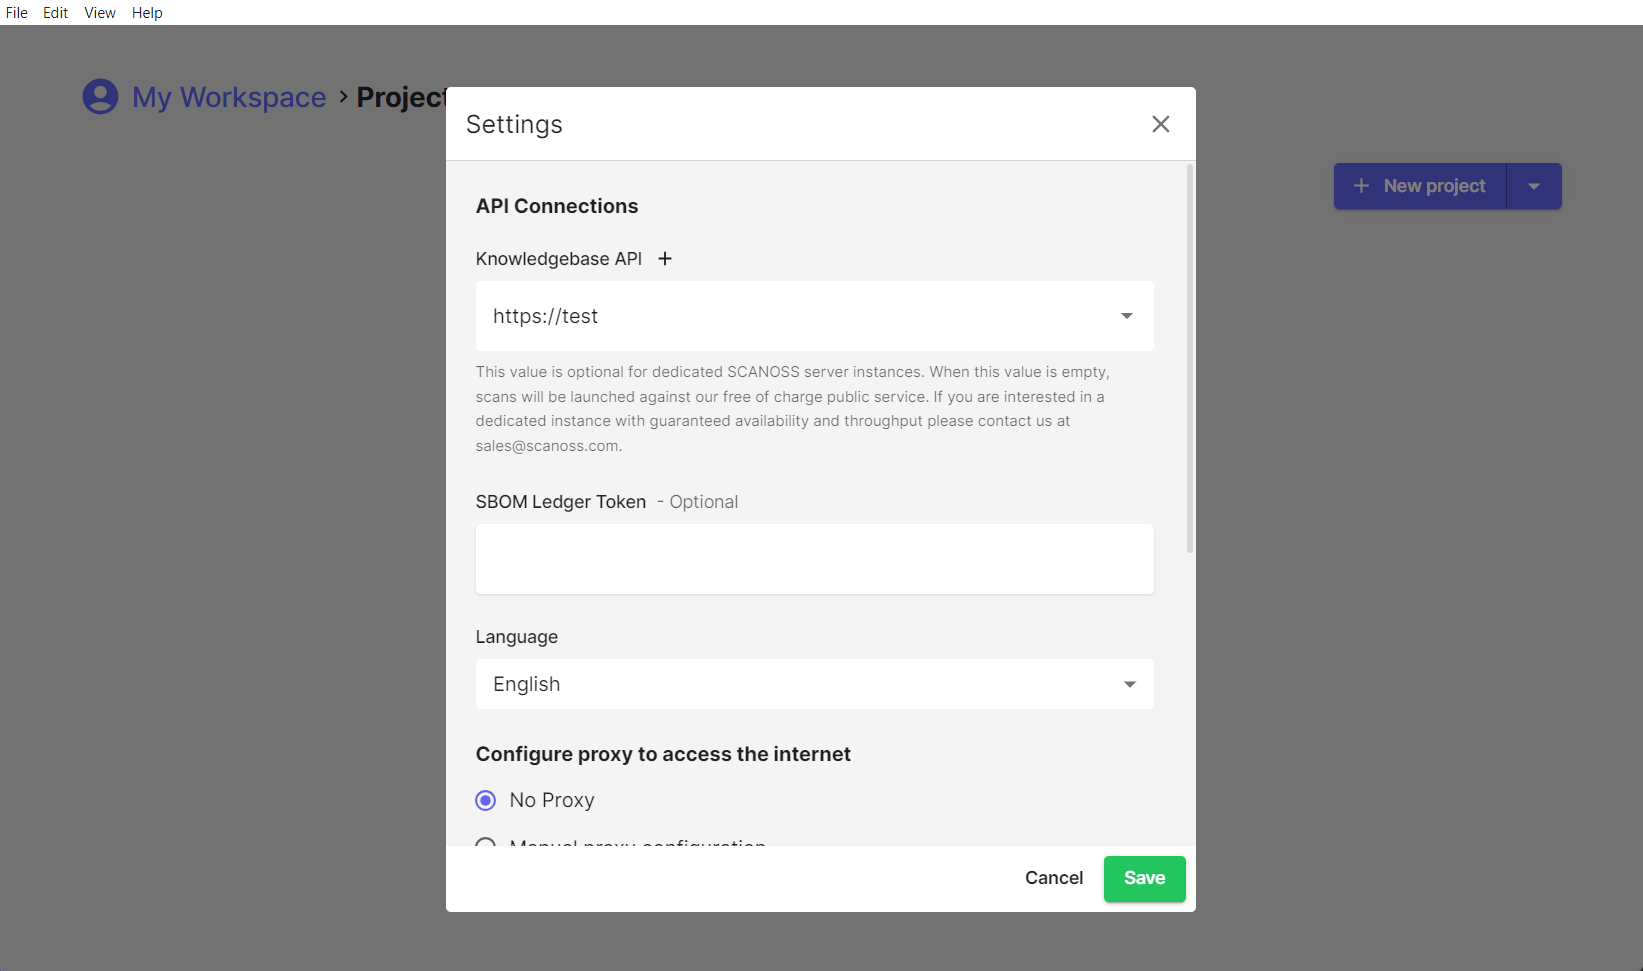 3. Click the **"+"** button next to **Knowledgebase API**.
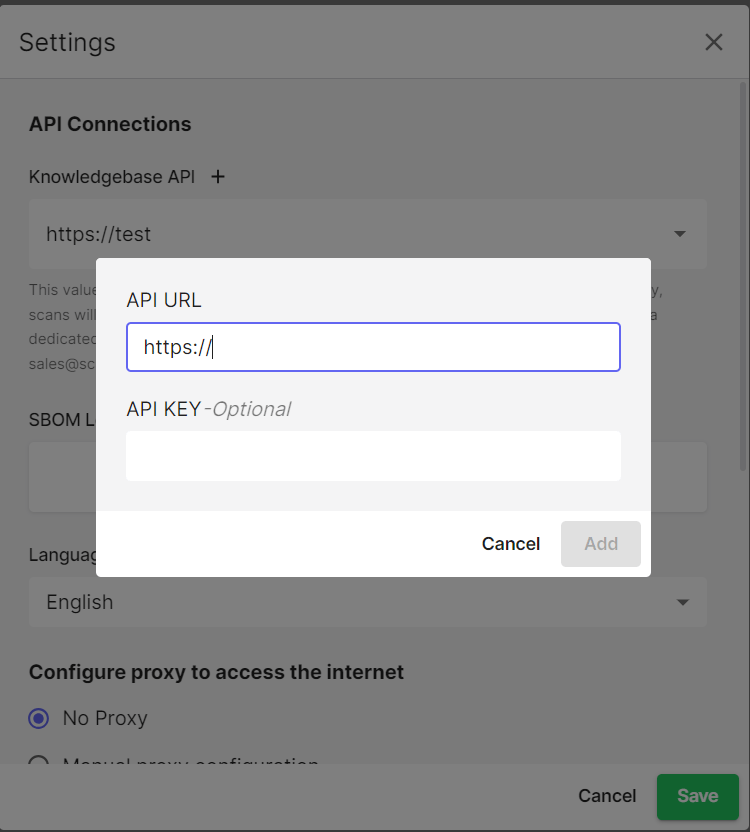 4. Enter your API key and endpoint details.
* Free tier: leave the default URL unchanged
* Enterprise: replace the URL with `https://api.scanoss.com`
5. Click **Add** → **Save**.
## Workspaces
### Local Workspaces
By default, **SBOM Workbench** stores projects in a local workspace on your machine. This is
where scan results, project configurations, and identification decisions are saved.
### Shared Workspaces
**SBOM Workbench** supports shared workspaces, enabling teams to collaborate on projects from a
common network location with centralised scan results and project configurations. Team members
with read and write access can make identifications, add notes, and share decisions across the
team.
4. Enter your API key and endpoint details.
* Free tier: leave the default URL unchanged
* Enterprise: replace the URL with `https://api.scanoss.com`
5. Click **Add** → **Save**.
## Workspaces
### Local Workspaces
By default, **SBOM Workbench** stores projects in a local workspace on your machine. This is
where scan results, project configurations, and identification decisions are saved.
### Shared Workspaces
**SBOM Workbench** supports shared workspaces, enabling teams to collaborate on projects from a
common network location with centralised scan results and project configurations. Team members
with read and write access can make identifications, add notes, and share decisions across the
team.
 #### Setting Up a Shared Workspace
To configure a shared workspace:
1. Create a shared network folder using [Samba](https://www.samba.org/), with read/write
permissions configured for the relevant team members.
2. Mount the network share on each team member's machine using the operating system's native
file-sharing tools.
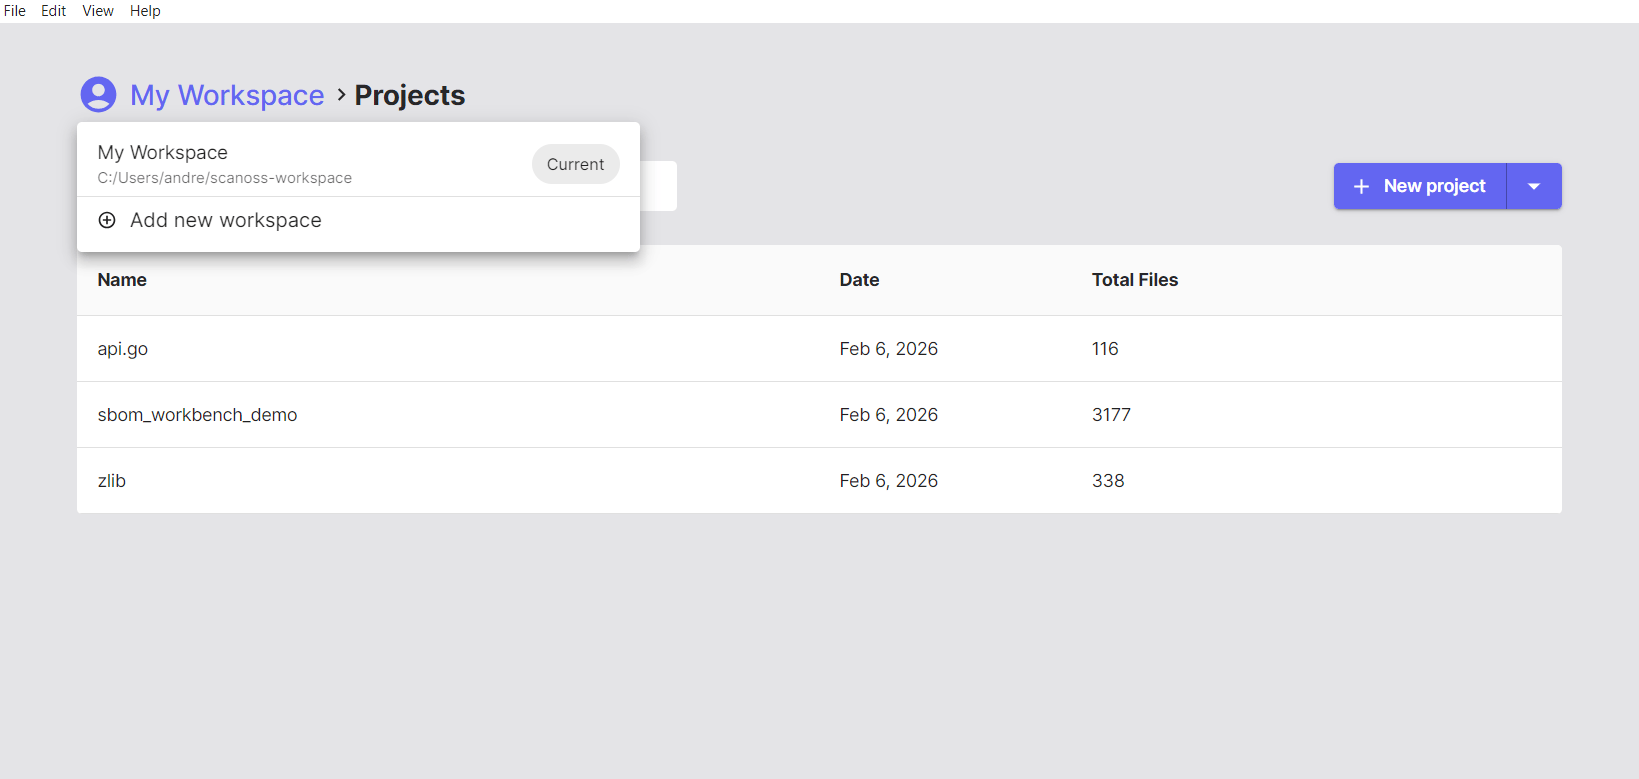
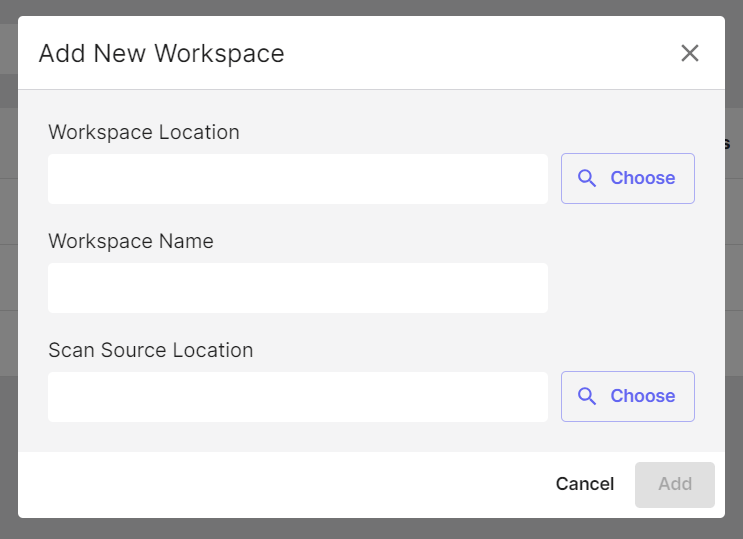
3. In **SBOM Workbench**, go to **My Workspace** → **Add New Workspace**.
4. Browse to the mounted share, select the workspace directory, and click **Add**.
The shared workspace will appear in your workspace list and can be selected at any time to access
projects stored there.
#### Setting Up a Shared Workspace
To configure a shared workspace:
1. Create a shared network folder using [Samba](https://www.samba.org/), with read/write
permissions configured for the relevant team members.
2. Mount the network share on each team member's machine using the operating system's native
file-sharing tools.
3. In **SBOM Workbench**, go to **My Workspace** → **Add New Workspace**.
4. Browse to the mounted share, select the workspace directory, and click **Add**.
The shared workspace will appear in your workspace list and can be selected at any time to access
projects stored there.
 ## Getting Started with Your First Project
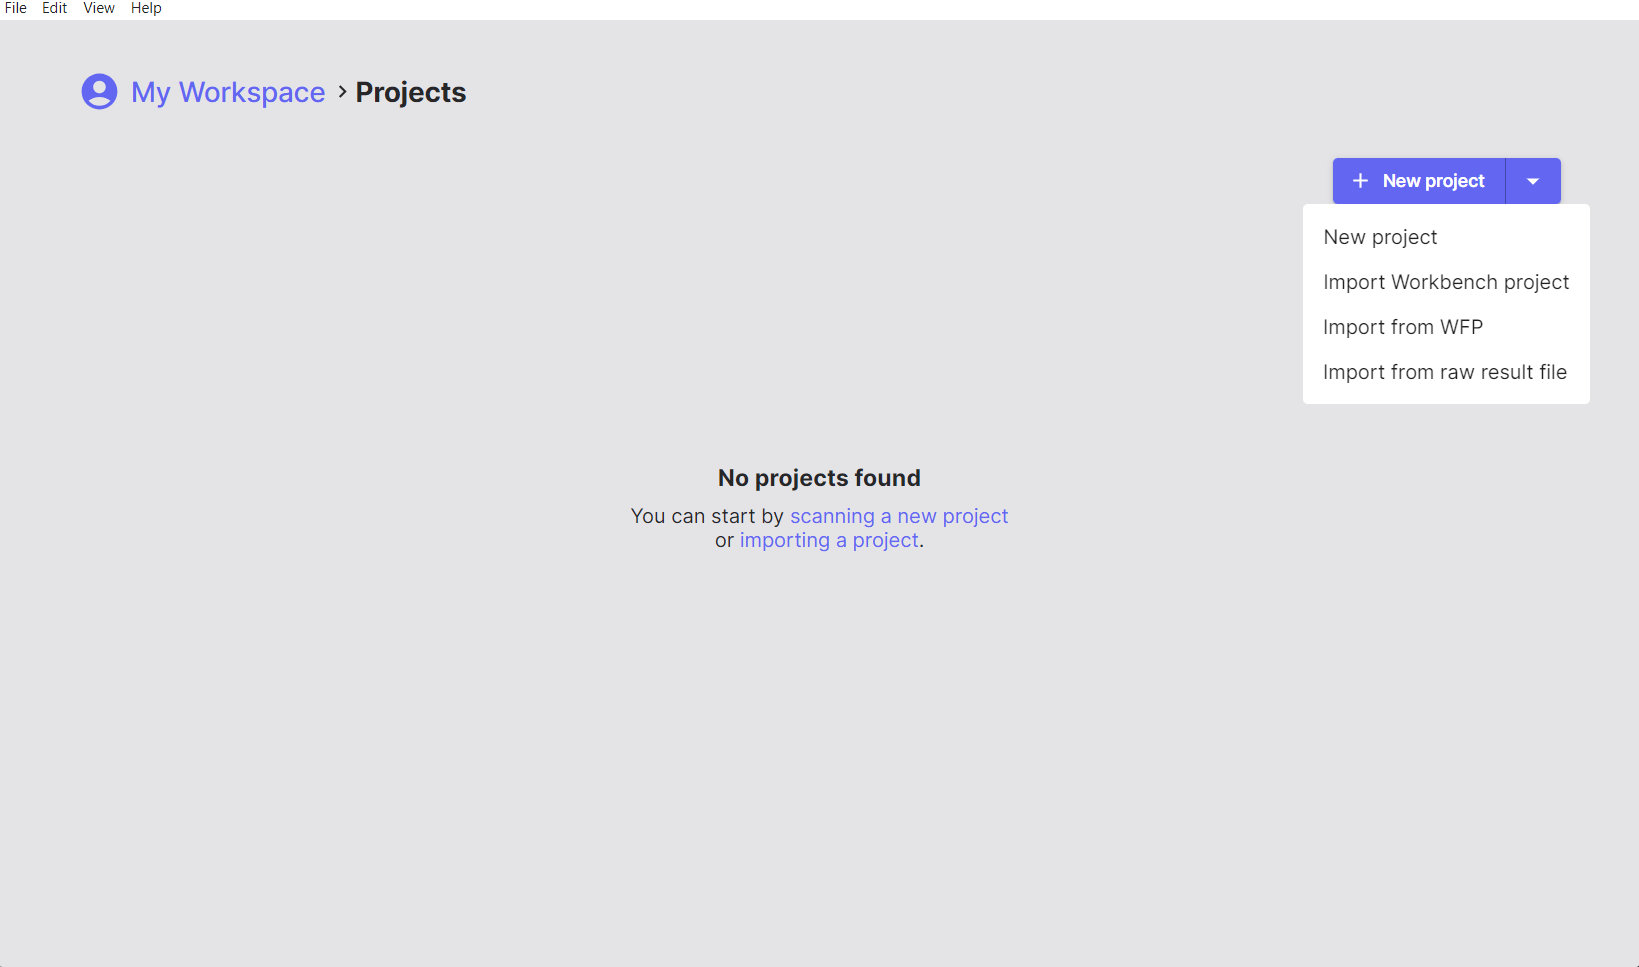
Once **SBOM Workbench** is configured, you can scan your first project. On the right-hand side
of the home screen, select **New Project**, or use the dropdown arrow to choose from the
following options:
## Getting Started with Your First Project
Once **SBOM Workbench** is configured, you can scan your first project. On the right-hand side
of the home screen, select **New Project**, or use the dropdown arrow to choose from the
following options:
 ### Project Options
* **New Project**: Select the directory of the project you want to scan.
* **Import Workbench Project**: Load a previously scanned project exported as a `.zip` file.
* **Import from WFP**: Import a Winnowing fingerprint (`.wfp`) file.
* **Import from Raw Result File**: Load the output from a previous scan saved as a `.json` file.
### Scanning Your First Project
1. Click **New Project** and select the root folder of your source code.
### Project Options
* **New Project**: Select the directory of the project you want to scan.
* **Import Workbench Project**: Load a previously scanned project exported as a `.zip` file.
* **Import from WFP**: Import a Winnowing fingerprint (`.wfp`) file.
* **Import from Raw Result File**: Load the output from a previous scan saved as a `.json` file.
### Scanning Your First Project
1. Click **New Project** and select the root folder of your source code.
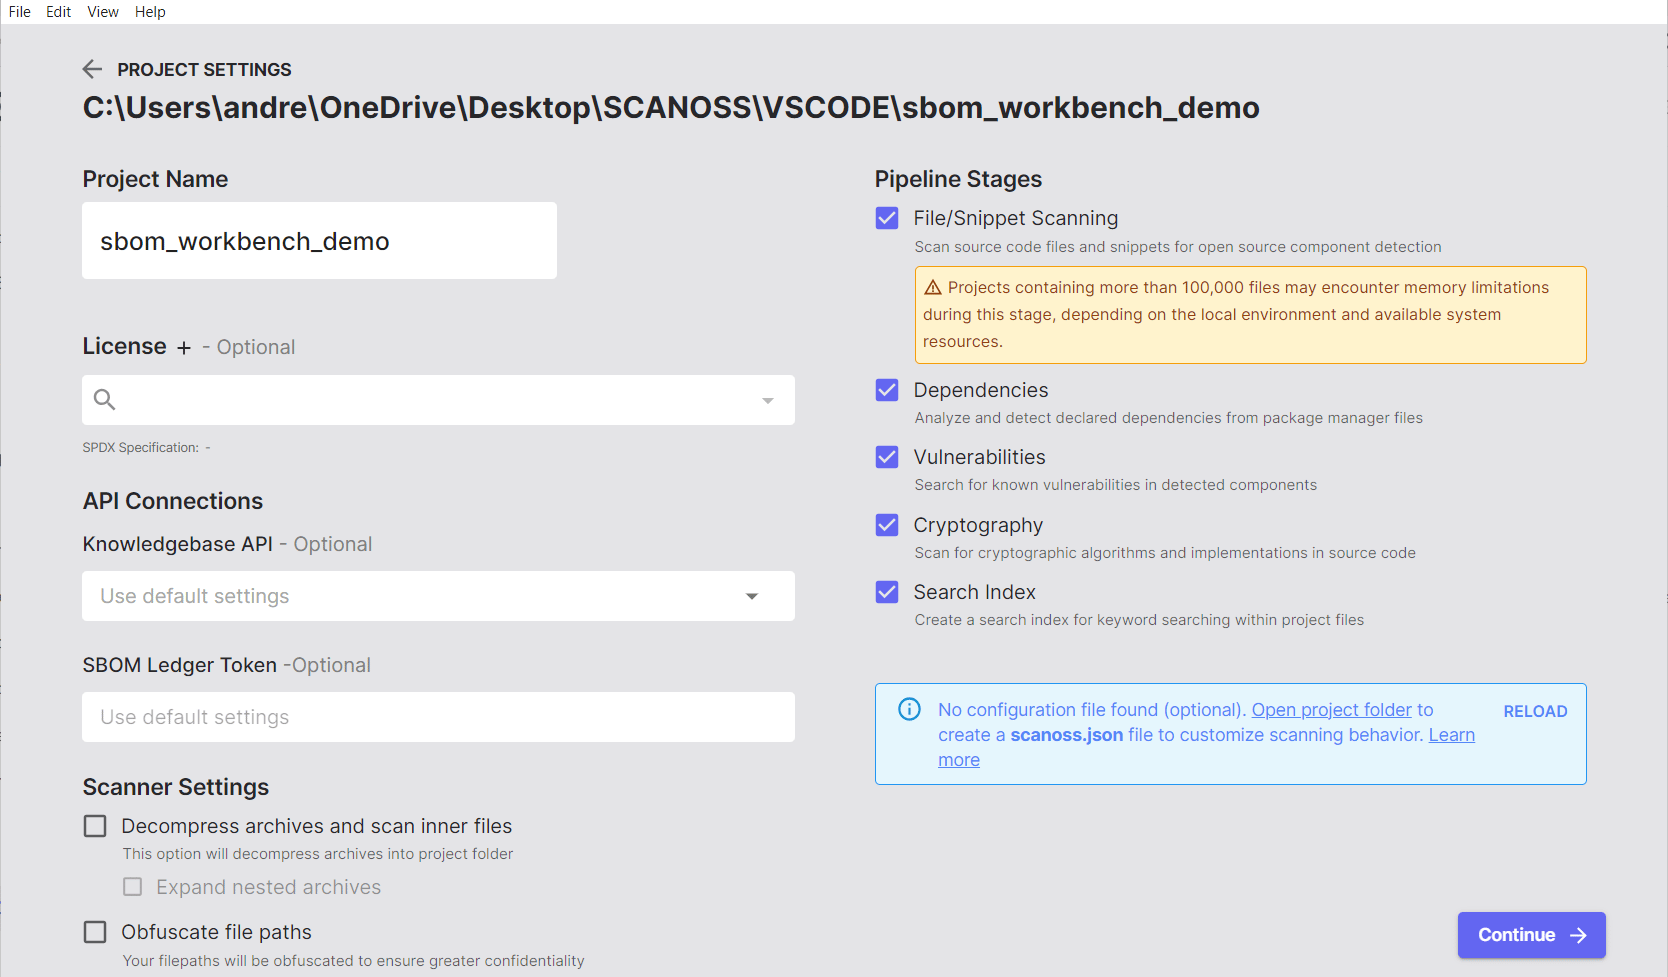 2. After selecting your project folder, configure the scan settings as needed:
* **Project name**: Enter a descriptive name for the project.
* **Default licence**: Set a default licence for your project, if applicable.
* **SCANOSS API**: Configure your API key and endpoint (see [Initial Configuration](#initial-configuration)).
* **SBOM Ledger**: Enable integration with [SBOM Ledger](#) for advanced SBOM tracking, if required.
* **Decompress Archives**: When enabled, compressed archives are decompressed and their
contents scanned individually.
* **Unpack Nested Archives**: Enables scanning of archives contained within other archives. By default, the scanner descends up to 3 levels deep, though you can configure the maximum depth from this setting.
* **Obfuscate File Paths**: When enabled, file paths are hashed before being transmitted
to the SCANOSS API.
* **High Precision Snippet Matching (HPSM)**: When enabled, applies a more granular
fingerprinting algorithm for increased match accuracy at the cost of additional scan time.
* **Include All File Types**: When enabled, bypasses the default file extension filter so
that all files, including configuration files, documentation, and other non-source
extensions are included in the scan.
3. Click **Continue** at the bottom right of the screen to start the scan.
### Understanding the Scanning Process
When a project folder is selected, **SBOM Workbench** processes the source files through the
following stages.
#### Filtering
The application first filters the project directory, excluding build artefacts, binary files,
empty files, and common metadata files. Only source files eligible for analysis are passed to
the subsequent stages. This behaviour can be overridden by enabling **Include All File Types**
in the scan settings, which passes all files regardless of extension.
#### Fingerprinting
**SBOM Workbench** generates fingerprints of the source files using the
[Winnowing](https://github.com/scanoss/wfp) algorithm. These fingerprints are transmitted to the
SCANOSS API over an encrypted connection and matched against a database of open-source
components. This approach allows the tool to detect reused code at both the file and
snippet level.
#### Analysis
In parallel with fingerprinting, the tool parses dependency manifests
and scans for cryptographic usage and known vulnerabilities. Scoped dependency files, such as
`dev-requirements.txt` or Poetry dev dependency groups, are detected and classified
automatically.
#### Results
When the scan is complete, **SBOM Workbench** generates a report containing matched components,
licences, vulnerabilities, and dependencies. Results are stored in your active workspace and can
be exported in **SPDX**, **CycloneDX**, **CSV**, or **HTML** format.
### Archive Support
**SBOM Workbench** can scan compressed and archived files by automatically decompressing them
during the filtering stage. This behaviour is controlled by the **Decompress Archives** setting
described above.
## Next Steps
After scanning your project, you can:
* Review scan results in the **Reports** tab.
* Audit detected components and dependencies.
* Export your SBOM in the required format.
* Analyse vulnerabilities and cryptographic usage.
For detailed information on these workflows, refer to the relevant sections in this documentation.
2. After selecting your project folder, configure the scan settings as needed:
* **Project name**: Enter a descriptive name for the project.
* **Default licence**: Set a default licence for your project, if applicable.
* **SCANOSS API**: Configure your API key and endpoint (see [Initial Configuration](#initial-configuration)).
* **SBOM Ledger**: Enable integration with [SBOM Ledger](#) for advanced SBOM tracking, if required.
* **Decompress Archives**: When enabled, compressed archives are decompressed and their
contents scanned individually.
* **Unpack Nested Archives**: Enables scanning of archives contained within other archives. By default, the scanner descends up to 3 levels deep, though you can configure the maximum depth from this setting.
* **Obfuscate File Paths**: When enabled, file paths are hashed before being transmitted
to the SCANOSS API.
* **High Precision Snippet Matching (HPSM)**: When enabled, applies a more granular
fingerprinting algorithm for increased match accuracy at the cost of additional scan time.
* **Include All File Types**: When enabled, bypasses the default file extension filter so
that all files, including configuration files, documentation, and other non-source
extensions are included in the scan.
3. Click **Continue** at the bottom right of the screen to start the scan.
### Understanding the Scanning Process
When a project folder is selected, **SBOM Workbench** processes the source files through the
following stages.
#### Filtering
The application first filters the project directory, excluding build artefacts, binary files,
empty files, and common metadata files. Only source files eligible for analysis are passed to
the subsequent stages. This behaviour can be overridden by enabling **Include All File Types**
in the scan settings, which passes all files regardless of extension.
#### Fingerprinting
**SBOM Workbench** generates fingerprints of the source files using the
[Winnowing](https://github.com/scanoss/wfp) algorithm. These fingerprints are transmitted to the
SCANOSS API over an encrypted connection and matched against a database of open-source
components. This approach allows the tool to detect reused code at both the file and
snippet level.
#### Analysis
In parallel with fingerprinting, the tool parses dependency manifests
and scans for cryptographic usage and known vulnerabilities. Scoped dependency files, such as
`dev-requirements.txt` or Poetry dev dependency groups, are detected and classified
automatically.
#### Results
When the scan is complete, **SBOM Workbench** generates a report containing matched components,
licences, vulnerabilities, and dependencies. Results are stored in your active workspace and can
be exported in **SPDX**, **CycloneDX**, **CSV**, or **HTML** format.
### Archive Support
**SBOM Workbench** can scan compressed and archived files by automatically decompressing them
during the filtering stage. This behaviour is controlled by the **Decompress Archives** setting
described above.
## Next Steps
After scanning your project, you can:
* Review scan results in the **Reports** tab.
* Audit detected components and dependencies.
* Export your SBOM in the required format.
* Analyse vulnerabilities and cryptographic usage.
For detailed information on these workflows, refer to the relevant sections in this documentation.