> ## Documentation Index
> Fetch the complete documentation index at: https://docs.scanoss.com/llms.txt
> Use this file to discover all available pages before exploring further.
# Setting Up Your Workspace
> How to sign in with your company's SSO and complete the six-step wizard that takes a new Earnie workspace from empty to running its first scan.
## Signing In
Earnie normally uses your company's single sign-on, so there's no separate Earnie password to create, forget, or rotate.
Select **Sign in with corporate SSO**. You'll be sent to your organisation's identity provider, and returned to Earnie once it confirms who you are.
* If you've never signed in before, Earnie takes you straight into setup below.
* If your workspace is already running, you land on the Dashboard of your default project.
**See an email and password form instead?** Some workspaces are set up
without an identity provider to federate against. Those show an email and
password form below the SSO button, and your administrator gives you the
password directly. Everything after sign-in is identical, the same members,
roles, and audit trail. If you don't see the form, your workspace is
SSO-only, and that's deliberate.
**"Access was denied"?** That means your identity provider hasn't been given
permission to release you to Earnie, or your account hasn't been added as a
member yet. That's an administrator task.
## The Setup Wizard
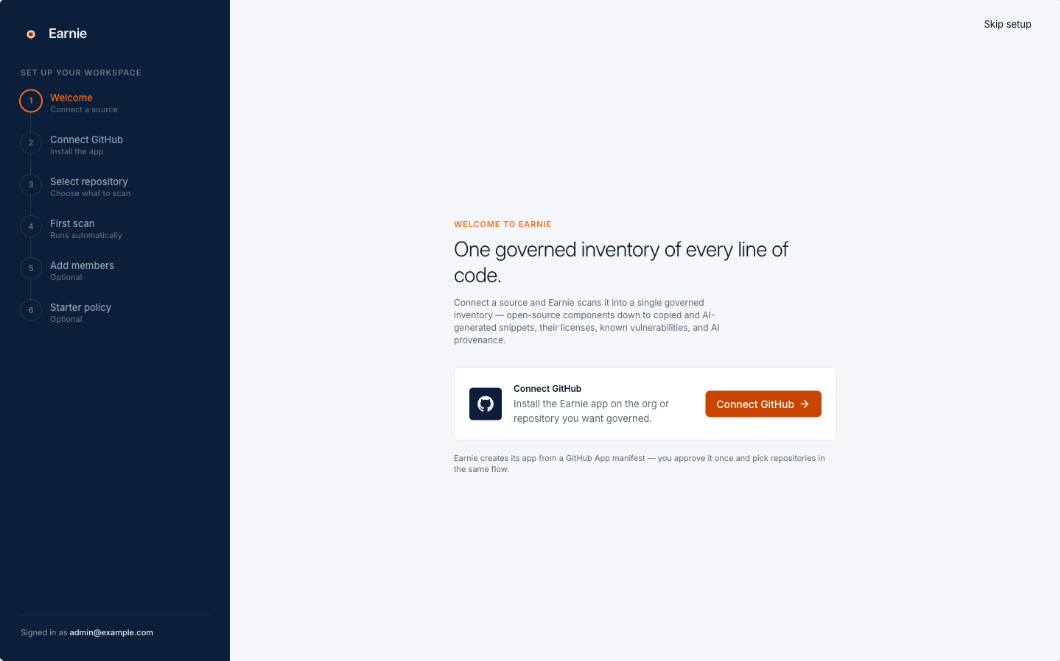 The first person into a new workspace gets a six-step wizard. It takes a few minutes, and only the first three steps are required. The rail on the left tracks your progress, you can leave and come back, nothing is lost.
### 1. Welcome
A short statement of what you're about to build, one governed inventory of every line of code covering open-source components, copied snippets, their licences, known vulnerabilities, and provenance. Select **Connect GitHub** to begin.
### 2. Connect GitHub
Earnie shows you exactly what it's asking for before you grant anything. You authorise it once, choose which organisation owns the connection, and install the app.
### 3. Select Repository
Pick the repository this project will govern, and give the project a name your team will recognise, name it after the service or the team that owns the code. Then choose the scanners and intelligence layers for the first scan.
If cryptography scanning is enabled for your workspace, it's selected by default and can be turned off when another scanner remains selected. Every source scan runs at least one scanner; the choice isn't saved for later scans.
| Layer | What it adds |
| --------------- | -------------------------------------------------------------------- |
| Vulnerabilities | Matches components against known CVE and advisory data. |
| License | Extracts and normalises licence identifiers from files and metadata. |
Both are on by default. These optional PURL enrichments run only when the OSS scanner produces component PURLs; file and snippet matching always runs. Turning a layer off shortens the first scan, and you can re-run later with more. A crypto-only scan can leave both enrichments off, in that case the First Scan step confirms that no optional enrichments were selected.
This is the last required step. The remaining two are optional.
### 4. First Scan
Starts on its own the moment the repository is imported. You don't have to wait on this page, it keeps running while you finish the last two steps.
### 5. Add Members (Optional)
Add the people who will triage findings. Developers and automated agents don't need seats, they interact through CI and the API instead.
### 6. Starter Policy (Optional)
Pick one template to begin with. Starting from a template is the fastest way to see the gate work end to end.
**Skipped something?** A Finish setup card sits at the bottom of the sidebar
with whatever is still outstanding, and disappears once you're done or dismiss
it.
## What's Next
With your workspace running, the next step is understanding exactly what access you granted when you [connected your repository](/en/latest/earnie/getting-started/connecting-a-repository), before watching your first scan run to completion.
The first person into a new workspace gets a six-step wizard. It takes a few minutes, and only the first three steps are required. The rail on the left tracks your progress, you can leave and come back, nothing is lost.
### 1. Welcome
A short statement of what you're about to build, one governed inventory of every line of code covering open-source components, copied snippets, their licences, known vulnerabilities, and provenance. Select **Connect GitHub** to begin.
### 2. Connect GitHub
Earnie shows you exactly what it's asking for before you grant anything. You authorise it once, choose which organisation owns the connection, and install the app.
### 3. Select Repository
Pick the repository this project will govern, and give the project a name your team will recognise, name it after the service or the team that owns the code. Then choose the scanners and intelligence layers for the first scan.
If cryptography scanning is enabled for your workspace, it's selected by default and can be turned off when another scanner remains selected. Every source scan runs at least one scanner; the choice isn't saved for later scans.
| Layer | What it adds |
| --------------- | -------------------------------------------------------------------- |
| Vulnerabilities | Matches components against known CVE and advisory data. |
| License | Extracts and normalises licence identifiers from files and metadata. |
Both are on by default. These optional PURL enrichments run only when the OSS scanner produces component PURLs; file and snippet matching always runs. Turning a layer off shortens the first scan, and you can re-run later with more. A crypto-only scan can leave both enrichments off, in that case the First Scan step confirms that no optional enrichments were selected.
This is the last required step. The remaining two are optional.
### 4. First Scan
Starts on its own the moment the repository is imported. You don't have to wait on this page, it keeps running while you finish the last two steps.
### 5. Add Members (Optional)
Add the people who will triage findings. Developers and automated agents don't need seats, they interact through CI and the API instead.
### 6. Starter Policy (Optional)
Pick one template to begin with. Starting from a template is the fastest way to see the gate work end to end.
**Skipped something?** A Finish setup card sits at the bottom of the sidebar
with whatever is still outstanding, and disappears once you're done or dismiss
it.
## What's Next
With your workspace running, the next step is understanding exactly what access you granted when you [connected your repository](/en/latest/earnie/getting-started/connecting-a-repository), before watching your first scan run to completion.