> ## Documentation Index
> Fetch the complete documentation index at: https://docs.scanoss.com/llms.txt
> Use this file to discover all available pages before exploring further.
# Continuous Monitoring
> This guide walks you through establishing ongoing monitoring and compliance for your open source dependencies.
```mermaid theme={null}
graph TD
Start{Choose an Approach}
Start -->|Real-time Monitoring| DT[Dependency Track]
Start -->|Compliance Reports| ORT[ORT Integration]
style Start fill:#42A5F5,stroke:#1976D2,stroke-width:3px,color:#fff
style DT fill:#66BB6A,stroke:#43A047,stroke-width:3px,color:#fff
style ORT fill:#AB47BC,stroke:#8E24AA,stroke-width:3px,color:#fff
click DT "#dependency-track-integration" "Jump to Dependency Track"
click ORT "#ort-integration" "Jump to ORT Integration"
```
## Overview
Continuous monitoring ensures your applications remain secure and compliant as new vulnerabilities are discovered and dependencies evolve. This guide demonstrates two approaches:
* **[Dependency Track](#dependency-track-integration)** - Real-time vulnerability monitoring and risk management
* **[ORT Integration](#ort-integration)** - Policy automation and compliance reporting
## Dependency Track Integration
[Dependency Track](https://dependencytrack.org/) provides continuous monitoring of your Software Bill of Materials (SBOM) for vulnerabilities, license risks and policy violations.
### Prerequisites
Before you begin, ensure you have:
* Completed [CI/CD Integration](cicd-integration) to understand GitHub Actions workflows
* A running Dependency Track instance
* GitHub repository with Actions enabled
* SCANOSS API key
* Dependency Track API key (from Administration → Access Management → Teams → API Keys)
### Configure GitHub Secrets
Navigate to your GitHub repository and add the required secrets:
**Settings → Secrets and variables → Actions**
Click **New repository secret** and add each of the following:
| Secret Name | Description | Example |
| ----------------- | ------------------------- | ---------------------------------------------------------------------------- |
| `DT_API_KEY` | Dependency Track API key | abc123... |
| `DT_SERVER_URL` | Dependency Track base URL | [https://your-dependencytrack-url.com](https://your-dependencytrack-url.com) |
| `SCANOSS_API_KEY` | SCANOSS API key | xyz789... |
### Create Monitoring Workflow
Open your project in your IDE (for example, [VS Code](https://code.visualstudio.com/)), then open the terminal in your project folder.
If you haven't already created the `.github/workflows` directory from the [CI/CD Integration](cicd-integration) guide, create it now:
```bash theme={null}
your-project/
└── .github/
└── workflows/
```
Create a workflow file at `.github/workflows/scanoss-monitoring.yml`:
```yaml theme={null}
name: SCANOSS with Dependency Track
on:
push:
branches:
- "main"
pull_request:
branches:
- "*"
permissions:
contents: read
pull-requests: write
checks: write
actions: read
jobs:
scanoss-code-scan:
name: SCANOSS Code Scan
runs-on: ubuntu-latest
steps:
- name: Checkout code
uses: actions/checkout@v6
- name: Run SCANOSS Code Scan
id: scanoss-code-scan-step
uses: scanoss/gha-code-scan@v1
with:
policies: copyleft, undeclared, dt
scanMode: "full"
dependencies.enabled: true
deptrack.upload: true
deptrack.url: ${{ secrets.DT_SERVER_URL }}
deptrack.apikey: ${{ secrets.DT_API_KEY }}
deptrack.projectname: "my-project"
deptrack.projectversion: "1.0.0"
api.key: ${{ secrets.SCANOSS_API_KEY }}
- name: Print stdout scan command
run: echo "${{ steps.scanoss-code-scan-step.outputs.stdout-scan-command }}"
- name: Print Results
run: cat "${{ steps.scanoss-code-scan-step.outputs.result-filepath }}"
```
**Key Workflow Features:**
* **Event Triggers**: Executes on pushes and pull requests for continuous validation
* **Automatic Upload**: Sends SBOM to Dependency Track for ongoing monitoring
* **Policy Enforcement**: Validates copyleft, undeclared components, and Dependency Track policies
### Commit and Push Workflow
Open your terminal and execute these commands:
```bash theme={null}
# Stage the workflow file
git add .github/workflows/scanoss-monitoring.yml
# Commit the workflow
git commit -m "Add SCANOSS continuous monitoring workflow"
# Push to your repository
git push origin main
```
### Monitor Your Scan
1. Go to your GitHub repository
2. Click **Actions** tab
3. Select your **SCANOSS with Dependency Track** workflow
4. Monitor the execution
### Review Pipeline Summary
After the workflow completes, navigate to the **Summary** page to review results.
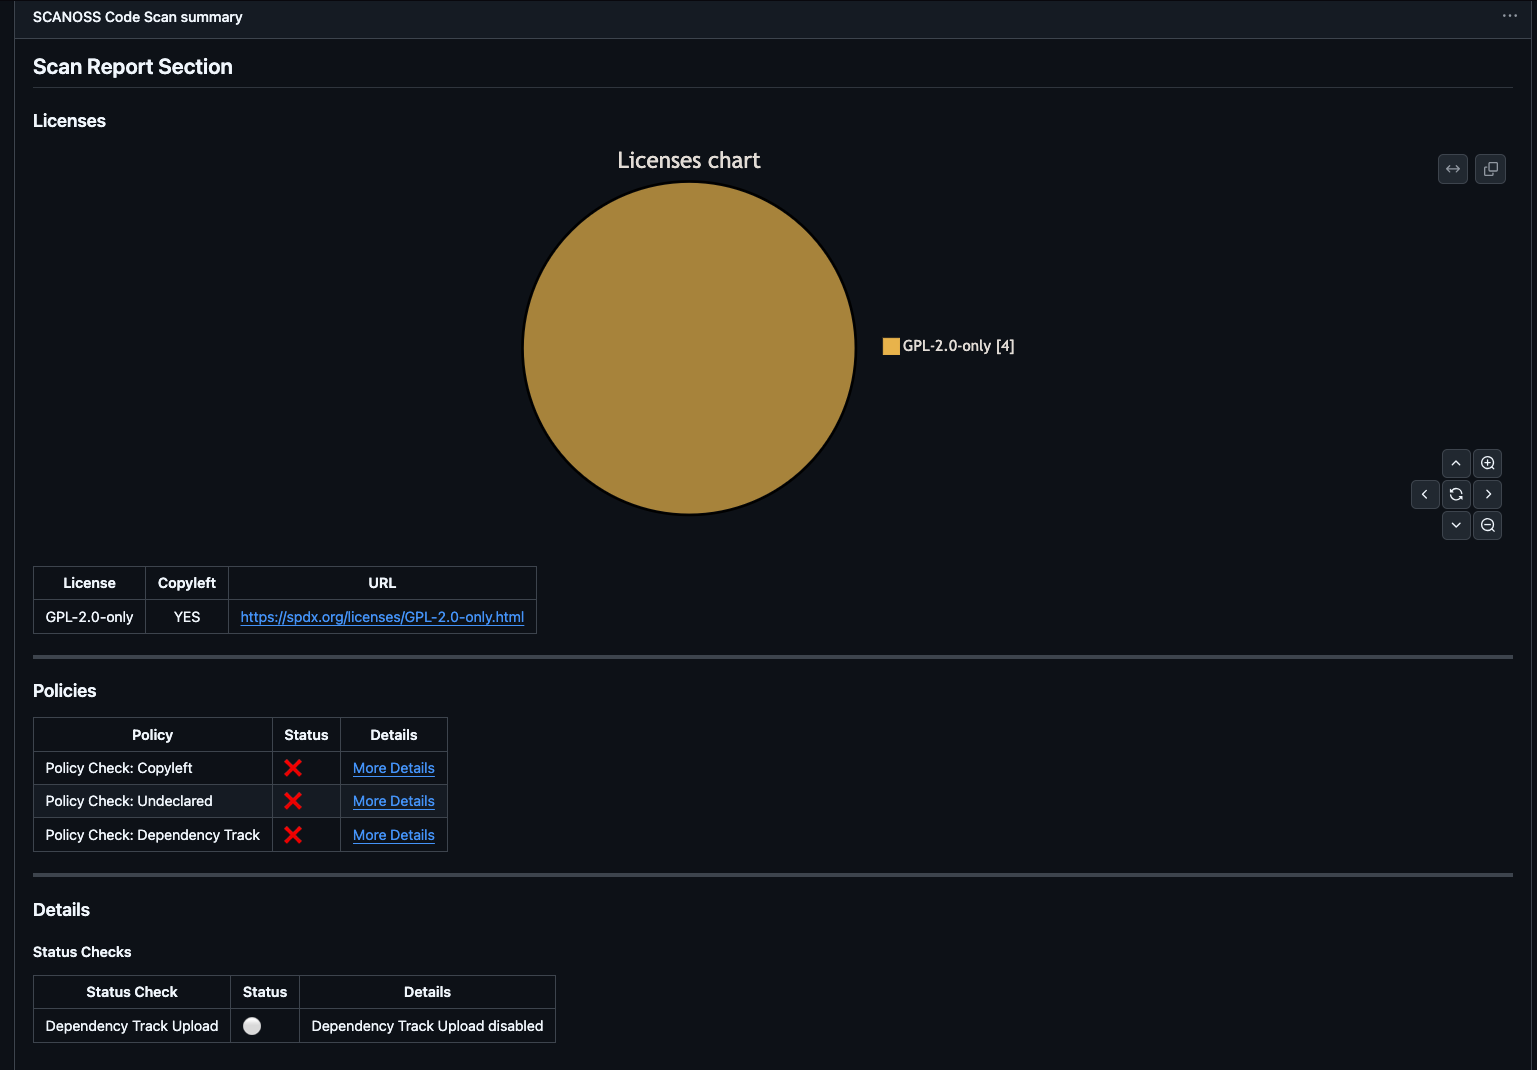 **Understanding the Summary:**
* **Scan Report**: License distribution pie chart and detailed license table
* **Policies**: Compliance check results (copyleft, undeclared, Dependency Track)
* **Details**: Upload status with direct link to Dependency Track project
* **Artifacts**: Downloadable reports, SBOMs, and policy results
### Access Dependency Track Dashboard
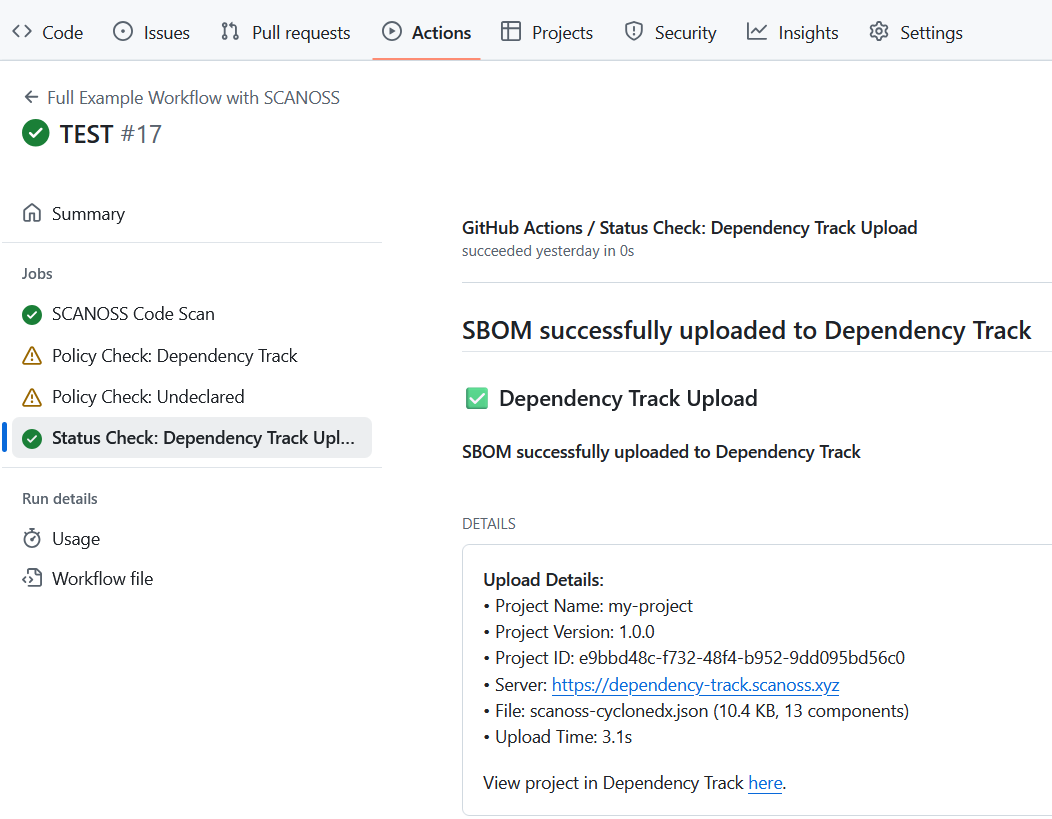
Once the scan uploads to Dependency Track, access the full dashboard for deeper analysis.
In the pipeline summary's **Details** section, click the **View Project** link to open your project in Dependency Track.
**Understanding the Summary:**
* **Scan Report**: License distribution pie chart and detailed license table
* **Policies**: Compliance check results (copyleft, undeclared, Dependency Track)
* **Details**: Upload status with direct link to Dependency Track project
* **Artifacts**: Downloadable reports, SBOMs, and policy results
### Access Dependency Track Dashboard
Once the scan uploads to Dependency Track, access the full dashboard for deeper analysis.
In the pipeline summary's **Details** section, click the **View Project** link to open your project in Dependency Track.
 ### Explore Dashboard Sections
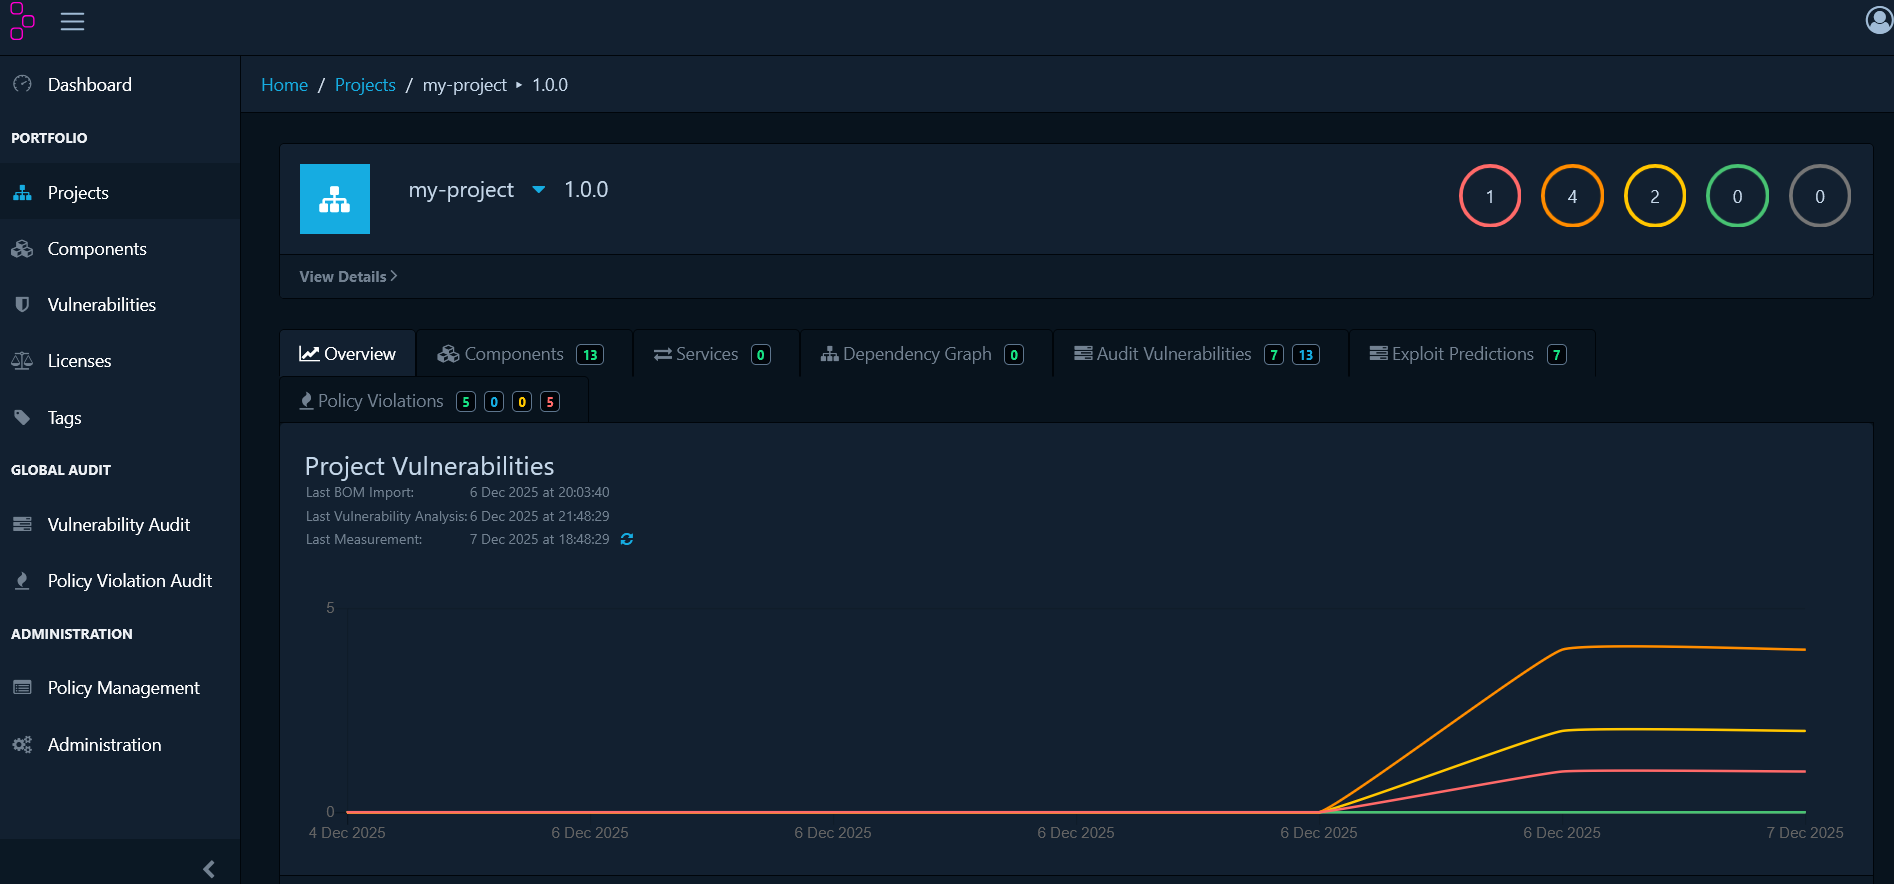
The Dependency Track dashboard provides several key views for managing your open-source dependencies:
* **Components**: Complete inventory of detected components with their licenses, versions, and risk scores
* **Dependency Graph**: Visual representation of direct and transitive dependency relationships
* **Audit Vulnerabilities**: List of all components with known security vulnerabilities, organized by severity
### Manage Vulnerabilities
Click on any vulnerability to open its details panel and assess its actual risk.
### Explore Dashboard Sections
The Dependency Track dashboard provides several key views for managing your open-source dependencies:
* **Components**: Complete inventory of detected components with their licenses, versions, and risk scores
* **Dependency Graph**: Visual representation of direct and transitive dependency relationships
* **Audit Vulnerabilities**: List of all components with known security vulnerabilities, organized by severity
### Manage Vulnerabilities
Click on any vulnerability to open its details panel and assess its actual risk.
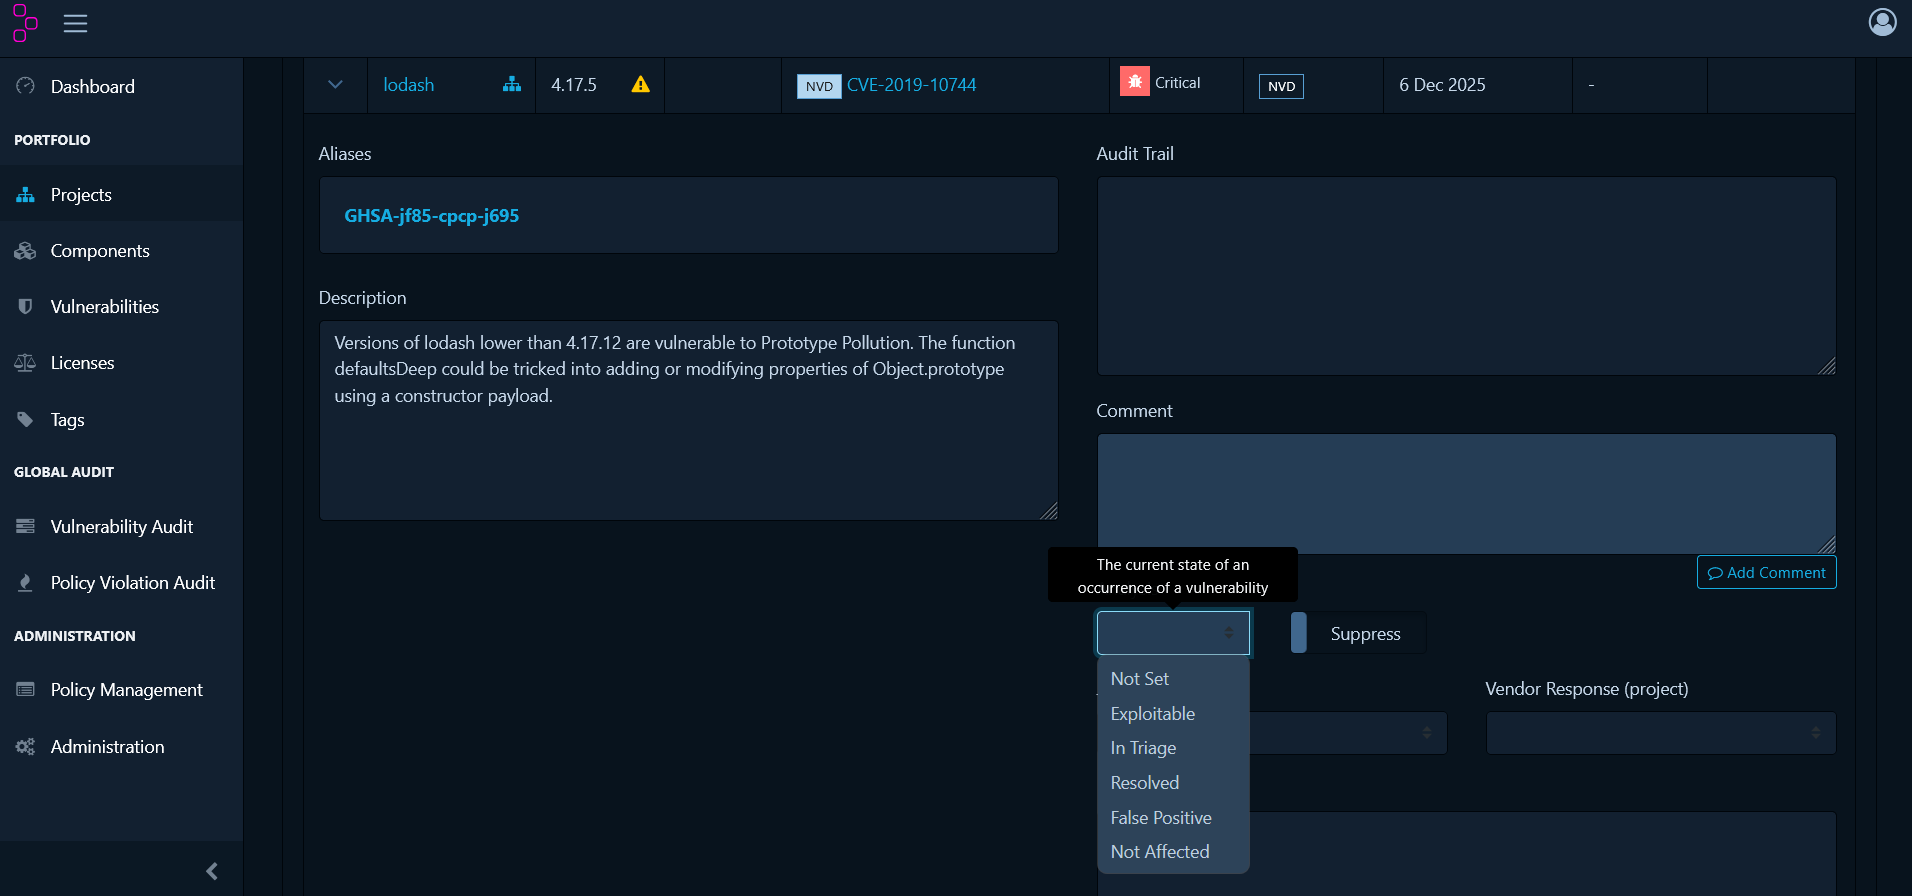 **Analysis States:**
* **Not Set** - Default state requiring review
* **Exploitable** - Confirmed risk to your application
* **In Triage** - Currently under investigation
* **False Positive** - Doesn't apply to your usage
* **Not Affected** - Your configuration isn't vulnerable
* **Resolved** - Fixed (usually by upgrading)
**To Manage a Vulnerability:**
1. Click the vulnerability in the **Audit Vulnerabilities** tab
2. Review the CVE details, affected versions and remediation advice
3. Select an analysis state from the dropdown
4. Add a comment explaining your decision
5. Click **Save**
### Define Organisational Policies
While vulnerability management handles security threats reactively, policy management takes a proactive approach by defining rules that automatically identify compliance issues.
Navigate to **Policy Management** from the main menu to create policies.
#### Create License Policies
**Block Specific Licenses:**
1. Click **Create Policy**
2. Add a **Condition** and select **License**
3. Choose the specific license to block (e.g., GPL-3.0)
4. Set violation state to **FAIL**
5. Save the policy
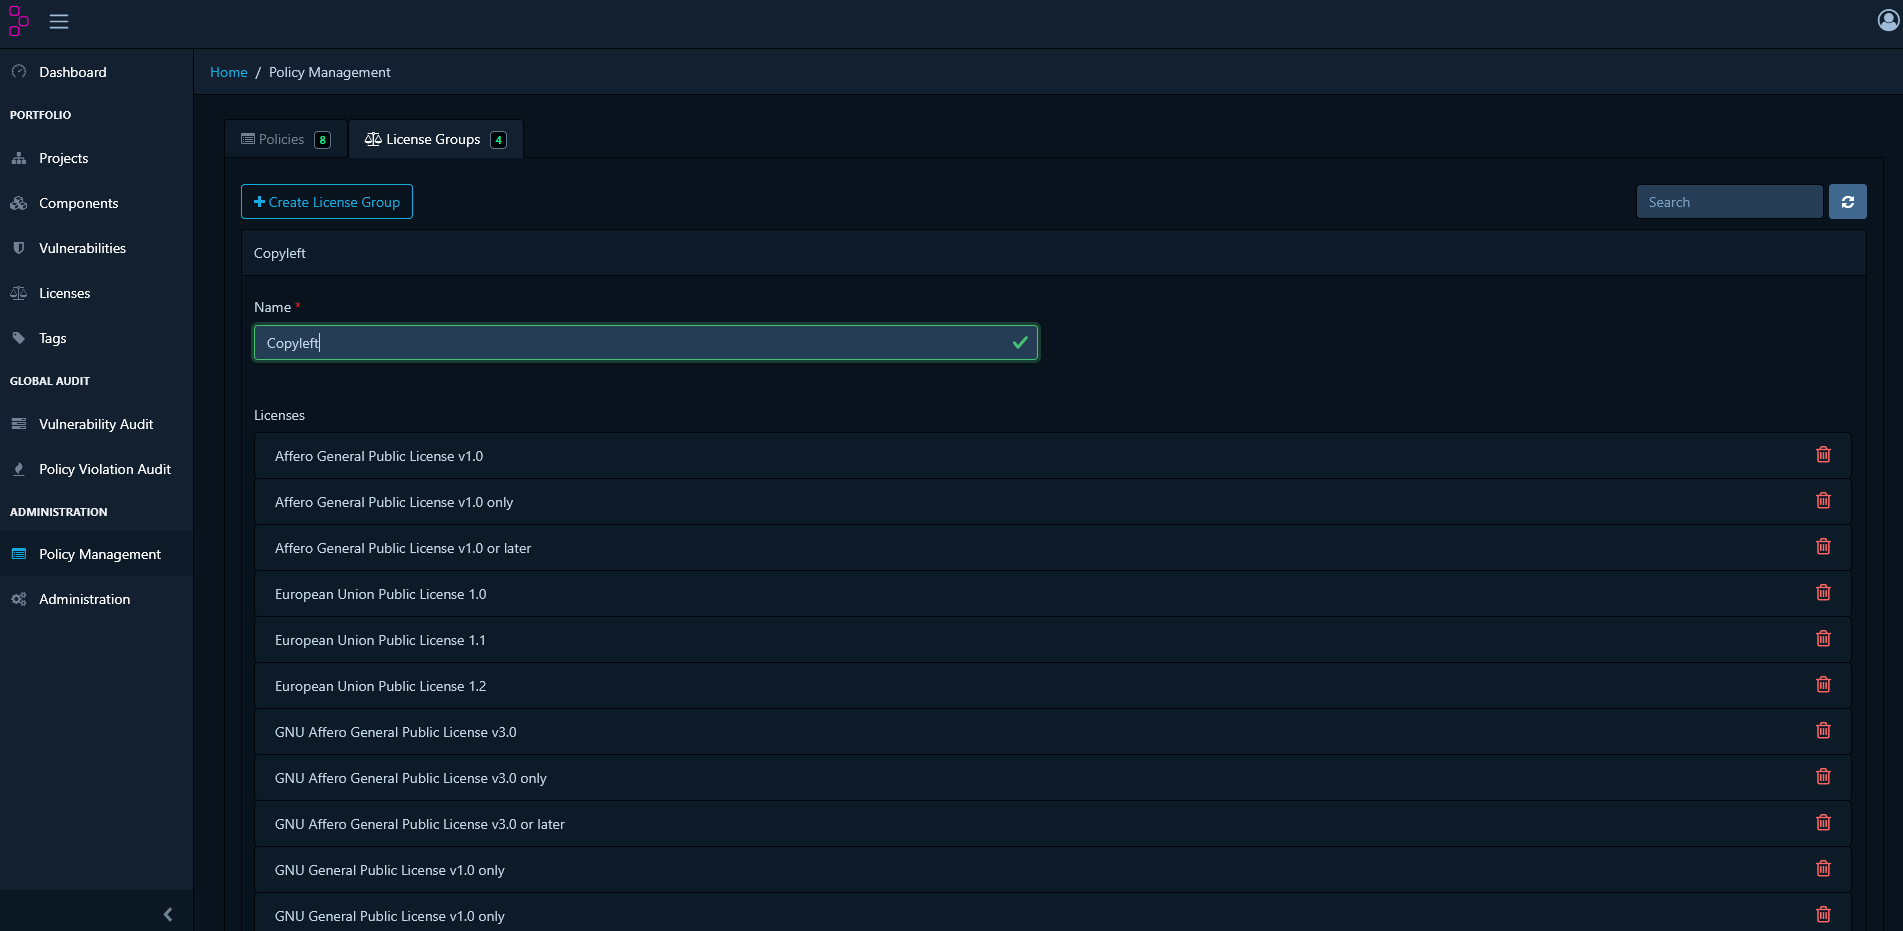
**Block License Groups:**
For broader control, create license groups:
1. Go to **License Groups** tab
2. Click **Create License Group**
3. Name it (e.g., "Copyleft Licenses")
4. Add licenses: GPL-2.0, GPL-3.0, AGPL-3.0
5. Save the group
**Analysis States:**
* **Not Set** - Default state requiring review
* **Exploitable** - Confirmed risk to your application
* **In Triage** - Currently under investigation
* **False Positive** - Doesn't apply to your usage
* **Not Affected** - Your configuration isn't vulnerable
* **Resolved** - Fixed (usually by upgrading)
**To Manage a Vulnerability:**
1. Click the vulnerability in the **Audit Vulnerabilities** tab
2. Review the CVE details, affected versions and remediation advice
3. Select an analysis state from the dropdown
4. Add a comment explaining your decision
5. Click **Save**
### Define Organisational Policies
While vulnerability management handles security threats reactively, policy management takes a proactive approach by defining rules that automatically identify compliance issues.
Navigate to **Policy Management** from the main menu to create policies.
#### Create License Policies
**Block Specific Licenses:**
1. Click **Create Policy**
2. Add a **Condition** and select **License**
3. Choose the specific license to block (e.g., GPL-3.0)
4. Set violation state to **FAIL**
5. Save the policy
**Block License Groups:**
For broader control, create license groups:
1. Go to **License Groups** tab
2. Click **Create License Group**
3. Name it (e.g., "Copyleft Licenses")
4. Add licenses: GPL-2.0, GPL-3.0, AGPL-3.0
5. Save the group
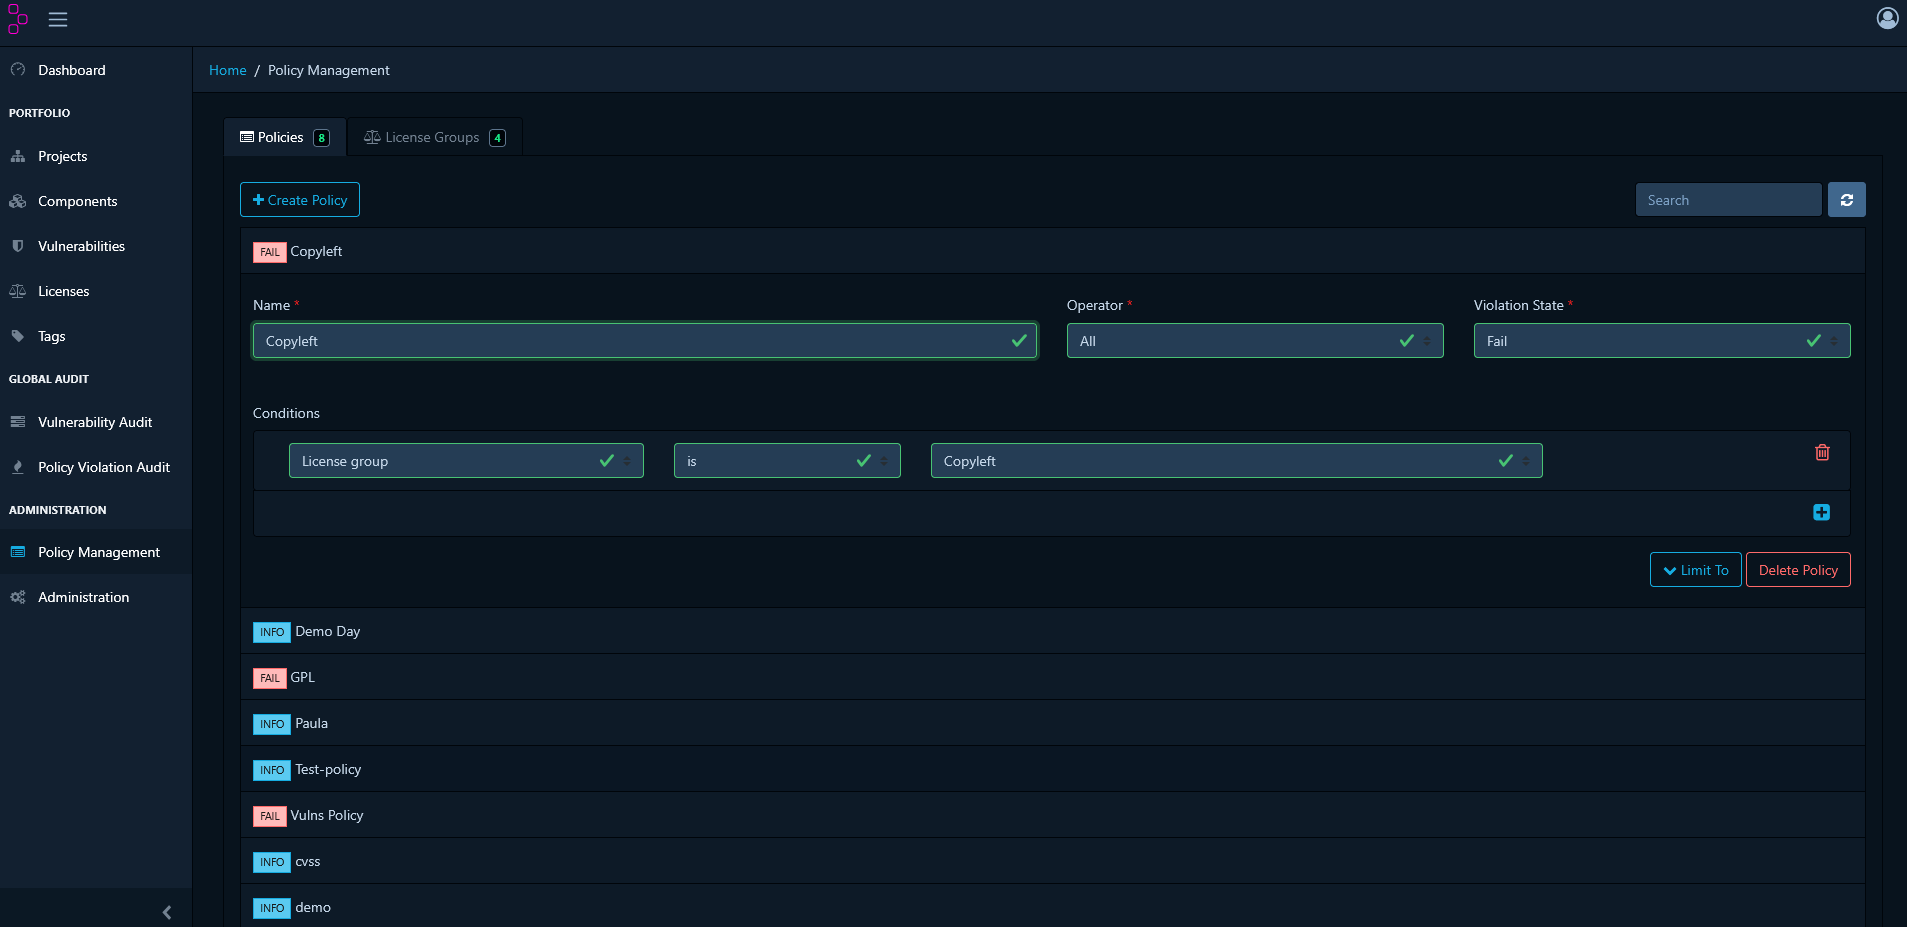
 Then create a policy using the group:
1. **Create Policy** → Add **Condition**
2. Select **License Group**
3. Choose your license group
4. Set violation state
5. Save the policy
Then create a policy using the group:
1. **Create Policy** → Add **Condition**
2. Select **License Group**
3. Choose your license group
4. Set violation state
5. Save the policy
 #### Create Vulnerability Policies
**Flag High-Severity Vulnerabilities:**
1. Click **Create Policy**
2. Add a **Condition** and select **Severity**
3. Select severity levels: CRITICAL, HIGH
4. Set violation state to **FAIL**
5. Save the policy
**Block Specific CVEs:**
1. Click **Create Policy**
2. Add a **Condition** and select **Vulnerability ID**
3. Enter CVE identifier (e.g., CVE-2024-1234)
4. Set violation state to **FAIL**
5. Save the policy
#### Create Component Age Policies
Flag outdated components that may lack security updates:
1. Click **Create Policy**
2. Add a **Condition** and select **Age**
3. Set operator to **greater than**
4. Specify age threshold in days
5. Set violation state to **WARN**
6. Save the policy
### Review Policy Violations
Navigate to your project's **Policy Violations** tab to see all policy breaches:
#### Create Vulnerability Policies
**Flag High-Severity Vulnerabilities:**
1. Click **Create Policy**
2. Add a **Condition** and select **Severity**
3. Select severity levels: CRITICAL, HIGH
4. Set violation state to **FAIL**
5. Save the policy
**Block Specific CVEs:**
1. Click **Create Policy**
2. Add a **Condition** and select **Vulnerability ID**
3. Enter CVE identifier (e.g., CVE-2024-1234)
4. Set violation state to **FAIL**
5. Save the policy
#### Create Component Age Policies
Flag outdated components that may lack security updates:
1. Click **Create Policy**
2. Add a **Condition** and select **Age**
3. Set operator to **greater than**
4. Specify age threshold in days
5. Set violation state to **WARN**
6. Save the policy
### Review Policy Violations
Navigate to your project's **Policy Violations** tab to see all policy breaches:
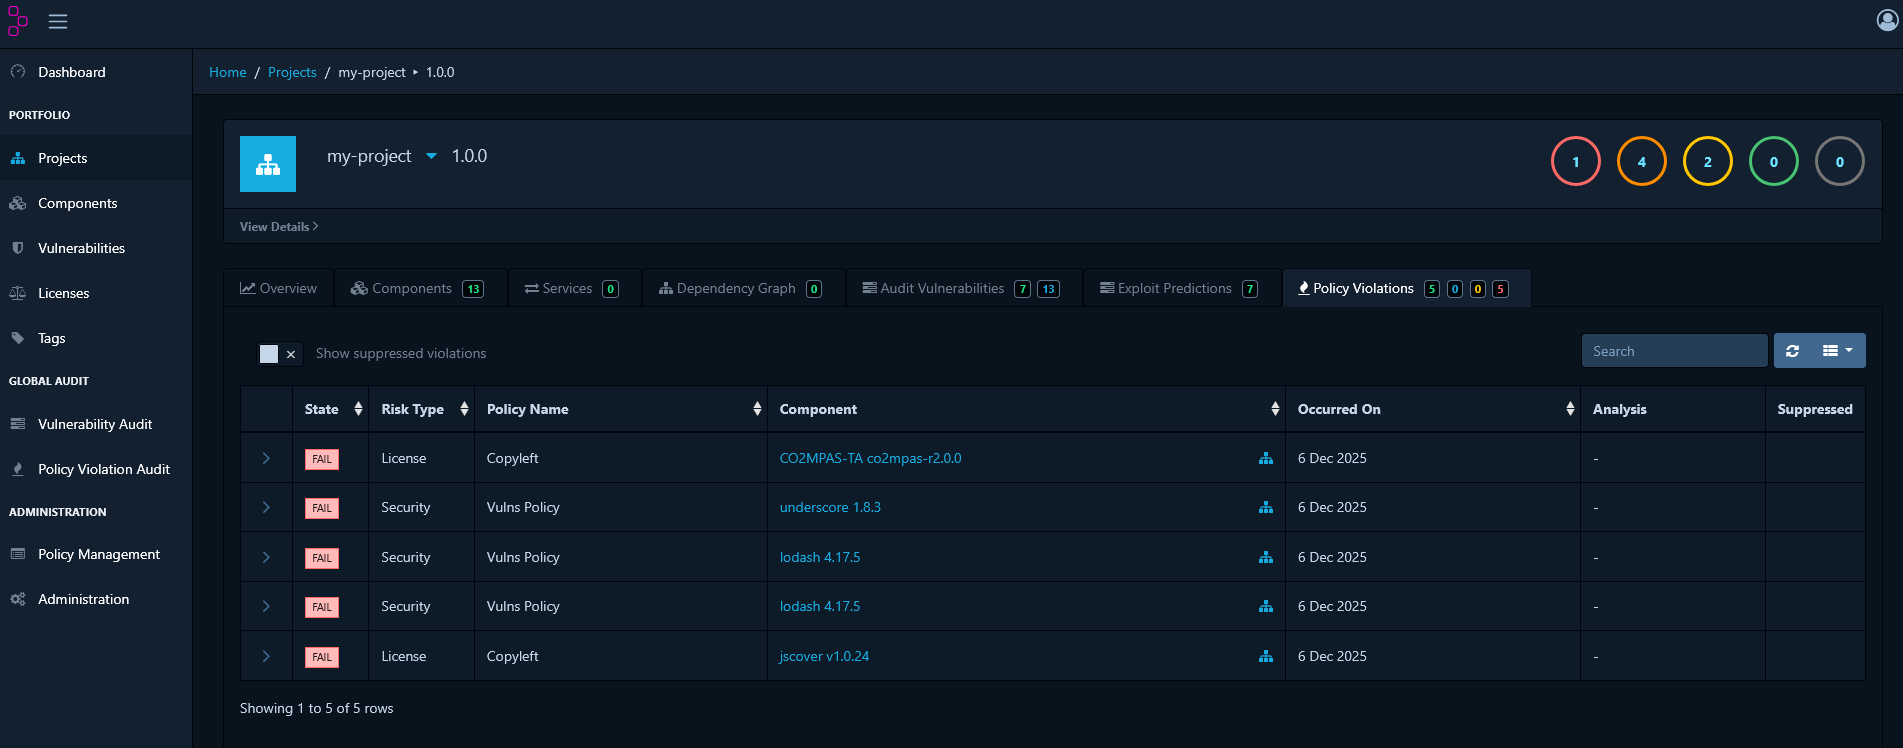 **Violation States:**
* **INFO** - Informational only, doesn't block releases
* **WARN** - Requires review before release
* **FAIL** - Must be resolved before release
### Triage Policy Violations
When a violation is technically accurate but acceptable in your context:
1. Navigate to **Policy Violations** tab
2. Select the violation to triage
3. Click **Analysis**
4. Select an analysis state:
* **Not Set** - No decision made yet
* **Approved** - Reviewed and accepted as known exception
* **Rejected** - Not accepted, requires remediation
5. Add a comment explaining the justification
6. Save your decision
Triaged violations remain visible for audit purposes but no longer block releases when marked as **Approved**.
## ORT Integration
[OSS Review Toolkit (ORT)](https://github.com/oss-review-toolkit/ort) is an enterprise-grade FOSS policy automation and orchestration toolkit.
### Prerequisites
Before you begin, ensure you have:
* [Java](https://www.oracle.com/es/java/technologies/downloads/): JDK 21 or later
* [Git](https://git-scm.com/)
* SCANOSS API key
* A shell environment:
* **Windows**: PowerShell, Command Prompt, or Git Bash
* **macOS/Linux**: Terminal (Bash/Zsh)
* A text editor of your choice (VS Code, Notepad++, nano, vim, etc.)
### Install ORT
**For Windows:**
```powershell theme={null}
# Clone ORT repository
git clone https://github.com/oss-review-toolkit/ort.git
cd ort
# Build ORT using Gradle
.\gradlew.bat installDist
# Add ORT to your PATH (temporarily for this session)
$env:PATH = "$PWD\cli\build\install\ort\bin;$env:PATH"
# To add permanently, use System Properties > Environment Variables
# Or add to your PowerShell profile:
# notepad $PROFILE
# Add this line to the profile:
# $env:PATH = "C:\path\to\ort\cli\build\install\ort\bin;$env:PATH"
# Verify installation
ort --help
```
**Configure Java Memory (Windows):**
Set via System Properties > Environment Variables:
* Variable name: `JAVA_OPTS`
* Variable value: `-Xmx8g`
Or set temporarily in PowerShell:
```powershell theme={null}
$env:JAVA_OPTS = "-Xmx8g"
```
**For macOS/Linux:**
```bash theme={null}
# Clone ORT repository
git clone https://github.com/oss-review-toolkit/ort.git
cd ort
# Build ORT using Gradle
./gradlew installDist
# Configure Java memory (8GB recommended)
echo 'export JAVA_OPTS="-Xmx8g"' >> ~/.bashrc
source ~/.bashrc
# Add ORT to your PATH
echo "export PATH=\"$(pwd)/cli/build/install/ort/bin:\$PATH\"" >> ~/.bashrc
source ~/.bashrc
# Verify installation
ort --help
```
### Configure SCANOSS Integration
Create the ORT configuration directory and file:
**For Windows:**
```powershell theme={null}
# Create config directory
New-Item -ItemType Directory -Force -Path "$env:USERPROFILE\.ort\config"
# Create configuration file using your preferred text editor
# For example, using Notepad:
notepad "$env:USERPROFILE\.ort\config\config.yml"
# Or using VS Code if installed:
# code "$env:USERPROFILE\.ort\config\config.yml"
```
Add the following content to `config.yml`:
```yaml theme={null}
ort:
scanner:
scanners:
SCANOSS:
options:
apiUrl: "https://api.scanoss.com"
secrets:
apiKey: "your-scanoss-api-key-here"
```
Replace `your-scanoss-api-key-here` with your actual SCANOSS API key.
**For macOS/Linux:**
```bash theme={null}
# Create config directory
mkdir -p ~/.ort/config
# Create configuration file using your preferred text editor
# Options include: nano, vim, code (VS Code), or any text editor
nano ~/.ort/config/config.yml
# Or use cat to create the file directly:
cat > ~/.ort/config/config.yml << 'EOF'
ort:
scanner:
scanners:
SCANOSS:
options:
apiUrl: "https://api.scanoss.com"
secrets:
apiKey: "your-scanoss-api-key-here"
EOF
```
Replace `your-scanoss-api-key-here` with your actual SCANOSS API key.
### Analyse Your Project
Navigate to your project directory and run the analyser:
```bash theme={null}
# Navigate to your project
cd /path/to/your/project
# Run dependency analysis
ort analyze -i . -o ort-results
```
### Scan with SCANOSS
Run SCANOSS scanner through ORT:
```bash theme={null}
# Scan for licenses and vulnerabilities
ort scan --ort-file ort-results/analyzer-result.yml --output-dir ort-results --scanners SCANOSS
```
### Define Policy Rules
Create custom compliance policies using ORT's policy rules.
**For Windows:**
```powershell theme={null}
# Create policy rules file using your preferred text editor
# For example, using Notepad:
notepad "$env:USERPROFILE\.ort\config\rules.kts"
# Or using VS Code if installed:
# code "$env:USERPROFILE\.ort\config\rules.kts"
```
Add the following content to `rules.kts`:
```kotlin theme={null}
/**
* Minimal ORT Policy Rules
*/
import org.ossreviewtoolkit.model.*
ruleSet(ortResult, licenseInfoResolver) {
// Simple rule: warn about packages without declared licenses
packageRule("DECLARED_LICENSE_CHECK") {
require {
pkg.metadata.declaredLicenses.isNotEmpty()
}
warning(
message = "Package ${pkg.metadata.id.toCoordinates()} has no declared license",
howToFix = "Add license information to the package"
)
}
}
```
**For macOS/Linux:**
```bash theme={null}
# Create policy rules file using your preferred text editor
# Options include: nano, vim, code (VS Code), or any text editor
nano ~/.ort/config/rules.kts
# Or use cat to create the file directly:
cat > ~/.ort/config/rules.kts << 'EOF'
/**
* Minimal ORT Policy Rules
*/
import org.ossreviewtoolkit.model.*
ruleSet(ortResult, licenseInfoResolver) {
// Simple rule: warn about packages without declared licenses
packageRule("DECLARED_LICENSE_CHECK") {
require {
pkg.metadata.declaredLicenses.isNotEmpty()
}
warning(
message = "Package ${pkg.metadata.id.toCoordinates()} has no declared license",
howToFix = "Add license information to the package"
)
}
}
EOF
```
### Run Evaluation
**For macOS/Linux:**
```bash theme={null}
# Evaluate policies
ort evaluate \
--ort-file ort-results/scan-result.yml \
--output-dir ort-results \
--rules-file ~/.ort/config/rules.kts
# Generate report with evaluation
ort report \
--ort-file ort-results/evaluation-result.yml \
--output-dir ort-results \
--report-formats StaticHtml
```
**For Windows (PowerShell):**
```powershell theme={null}
# Evaluate policies
ort evaluate `
--ort-file ort-results/scan-result.yml `
--output-dir ort-results `
--rules-file "$env:USERPROFILE\.ort\config\rules.kts"
# Generate report with evaluation
ort report `
--ort-file ort-results/evaluation-result.yml `
--output-dir ort-results `
--report-formats StaticHtml
```
**For Windows (Command Prompt):**
```cmd theme={null}
rem Evaluate policies
ort evaluate ^
--ort-file ort-results/scan-result.yml ^
--output-dir ort-results ^
--rules-file "%USERPROFILE%\.ort\config\rules.kts"
rem Generate report with evaluation
ort report ^
--ort-file ort-results/evaluation-result.yml ^
--output-dir ort-results ^
--report-formats StaticHtml
```
### Generate Compliance Reports
Generate comprehensive reports in multiple formats:
```bash theme={null}
# Generate HTML report
ort report \
--ort-file ort-results/evaluation-result.yml \
--output-dir ort-results \
--report-formats StaticHtml
# Generate SPDX SBOM
ort report \
--ort-file ort-results/evaluation-result.yml \
--output-dir ort-results \
--report-formats SpdxDocument
# Generate CycloneDX SBOM
ort report \
--ort-file ort-results/evaluation-result.yml \
--output-dir ort-results \
--report-formats CycloneDx
# Generate all formats at once
ort report \
--ort-file ort-results/evaluation-result.yml \
--output-dir ort-results \
--report-formats StaticHtml,SpdxDocument,CycloneDx
```
### View Reports
Open the generated HTML report in your browser:
**For Windows:**
```powershell theme={null}
# PowerShell
Start-Process ort-results\scan-report-web-app.html
# Command Prompt
start ort-results\scan-report-web-app.html
```
**For macOS:**
```bash theme={null}
open ort-results/scan-report-web-app.html
```
**For Linux:**
```bash theme={null}
xdg-open ort-results/scan-report-web-app.html
```
Need help? [Contact our AI assistant](?assistant=open)
**Violation States:**
* **INFO** - Informational only, doesn't block releases
* **WARN** - Requires review before release
* **FAIL** - Must be resolved before release
### Triage Policy Violations
When a violation is technically accurate but acceptable in your context:
1. Navigate to **Policy Violations** tab
2. Select the violation to triage
3. Click **Analysis**
4. Select an analysis state:
* **Not Set** - No decision made yet
* **Approved** - Reviewed and accepted as known exception
* **Rejected** - Not accepted, requires remediation
5. Add a comment explaining the justification
6. Save your decision
Triaged violations remain visible for audit purposes but no longer block releases when marked as **Approved**.
## ORT Integration
[OSS Review Toolkit (ORT)](https://github.com/oss-review-toolkit/ort) is an enterprise-grade FOSS policy automation and orchestration toolkit.
### Prerequisites
Before you begin, ensure you have:
* [Java](https://www.oracle.com/es/java/technologies/downloads/): JDK 21 or later
* [Git](https://git-scm.com/)
* SCANOSS API key
* A shell environment:
* **Windows**: PowerShell, Command Prompt, or Git Bash
* **macOS/Linux**: Terminal (Bash/Zsh)
* A text editor of your choice (VS Code, Notepad++, nano, vim, etc.)
### Install ORT
**For Windows:**
```powershell theme={null}
# Clone ORT repository
git clone https://github.com/oss-review-toolkit/ort.git
cd ort
# Build ORT using Gradle
.\gradlew.bat installDist
# Add ORT to your PATH (temporarily for this session)
$env:PATH = "$PWD\cli\build\install\ort\bin;$env:PATH"
# To add permanently, use System Properties > Environment Variables
# Or add to your PowerShell profile:
# notepad $PROFILE
# Add this line to the profile:
# $env:PATH = "C:\path\to\ort\cli\build\install\ort\bin;$env:PATH"
# Verify installation
ort --help
```
**Configure Java Memory (Windows):**
Set via System Properties > Environment Variables:
* Variable name: `JAVA_OPTS`
* Variable value: `-Xmx8g`
Or set temporarily in PowerShell:
```powershell theme={null}
$env:JAVA_OPTS = "-Xmx8g"
```
**For macOS/Linux:**
```bash theme={null}
# Clone ORT repository
git clone https://github.com/oss-review-toolkit/ort.git
cd ort
# Build ORT using Gradle
./gradlew installDist
# Configure Java memory (8GB recommended)
echo 'export JAVA_OPTS="-Xmx8g"' >> ~/.bashrc
source ~/.bashrc
# Add ORT to your PATH
echo "export PATH=\"$(pwd)/cli/build/install/ort/bin:\$PATH\"" >> ~/.bashrc
source ~/.bashrc
# Verify installation
ort --help
```
### Configure SCANOSS Integration
Create the ORT configuration directory and file:
**For Windows:**
```powershell theme={null}
# Create config directory
New-Item -ItemType Directory -Force -Path "$env:USERPROFILE\.ort\config"
# Create configuration file using your preferred text editor
# For example, using Notepad:
notepad "$env:USERPROFILE\.ort\config\config.yml"
# Or using VS Code if installed:
# code "$env:USERPROFILE\.ort\config\config.yml"
```
Add the following content to `config.yml`:
```yaml theme={null}
ort:
scanner:
scanners:
SCANOSS:
options:
apiUrl: "https://api.scanoss.com"
secrets:
apiKey: "your-scanoss-api-key-here"
```
Replace `your-scanoss-api-key-here` with your actual SCANOSS API key.
**For macOS/Linux:**
```bash theme={null}
# Create config directory
mkdir -p ~/.ort/config
# Create configuration file using your preferred text editor
# Options include: nano, vim, code (VS Code), or any text editor
nano ~/.ort/config/config.yml
# Or use cat to create the file directly:
cat > ~/.ort/config/config.yml << 'EOF'
ort:
scanner:
scanners:
SCANOSS:
options:
apiUrl: "https://api.scanoss.com"
secrets:
apiKey: "your-scanoss-api-key-here"
EOF
```
Replace `your-scanoss-api-key-here` with your actual SCANOSS API key.
### Analyse Your Project
Navigate to your project directory and run the analyser:
```bash theme={null}
# Navigate to your project
cd /path/to/your/project
# Run dependency analysis
ort analyze -i . -o ort-results
```
### Scan with SCANOSS
Run SCANOSS scanner through ORT:
```bash theme={null}
# Scan for licenses and vulnerabilities
ort scan --ort-file ort-results/analyzer-result.yml --output-dir ort-results --scanners SCANOSS
```
### Define Policy Rules
Create custom compliance policies using ORT's policy rules.
**For Windows:**
```powershell theme={null}
# Create policy rules file using your preferred text editor
# For example, using Notepad:
notepad "$env:USERPROFILE\.ort\config\rules.kts"
# Or using VS Code if installed:
# code "$env:USERPROFILE\.ort\config\rules.kts"
```
Add the following content to `rules.kts`:
```kotlin theme={null}
/**
* Minimal ORT Policy Rules
*/
import org.ossreviewtoolkit.model.*
ruleSet(ortResult, licenseInfoResolver) {
// Simple rule: warn about packages without declared licenses
packageRule("DECLARED_LICENSE_CHECK") {
require {
pkg.metadata.declaredLicenses.isNotEmpty()
}
warning(
message = "Package ${pkg.metadata.id.toCoordinates()} has no declared license",
howToFix = "Add license information to the package"
)
}
}
```
**For macOS/Linux:**
```bash theme={null}
# Create policy rules file using your preferred text editor
# Options include: nano, vim, code (VS Code), or any text editor
nano ~/.ort/config/rules.kts
# Or use cat to create the file directly:
cat > ~/.ort/config/rules.kts << 'EOF'
/**
* Minimal ORT Policy Rules
*/
import org.ossreviewtoolkit.model.*
ruleSet(ortResult, licenseInfoResolver) {
// Simple rule: warn about packages without declared licenses
packageRule("DECLARED_LICENSE_CHECK") {
require {
pkg.metadata.declaredLicenses.isNotEmpty()
}
warning(
message = "Package ${pkg.metadata.id.toCoordinates()} has no declared license",
howToFix = "Add license information to the package"
)
}
}
EOF
```
### Run Evaluation
**For macOS/Linux:**
```bash theme={null}
# Evaluate policies
ort evaluate \
--ort-file ort-results/scan-result.yml \
--output-dir ort-results \
--rules-file ~/.ort/config/rules.kts
# Generate report with evaluation
ort report \
--ort-file ort-results/evaluation-result.yml \
--output-dir ort-results \
--report-formats StaticHtml
```
**For Windows (PowerShell):**
```powershell theme={null}
# Evaluate policies
ort evaluate `
--ort-file ort-results/scan-result.yml `
--output-dir ort-results `
--rules-file "$env:USERPROFILE\.ort\config\rules.kts"
# Generate report with evaluation
ort report `
--ort-file ort-results/evaluation-result.yml `
--output-dir ort-results `
--report-formats StaticHtml
```
**For Windows (Command Prompt):**
```cmd theme={null}
rem Evaluate policies
ort evaluate ^
--ort-file ort-results/scan-result.yml ^
--output-dir ort-results ^
--rules-file "%USERPROFILE%\.ort\config\rules.kts"
rem Generate report with evaluation
ort report ^
--ort-file ort-results/evaluation-result.yml ^
--output-dir ort-results ^
--report-formats StaticHtml
```
### Generate Compliance Reports
Generate comprehensive reports in multiple formats:
```bash theme={null}
# Generate HTML report
ort report \
--ort-file ort-results/evaluation-result.yml \
--output-dir ort-results \
--report-formats StaticHtml
# Generate SPDX SBOM
ort report \
--ort-file ort-results/evaluation-result.yml \
--output-dir ort-results \
--report-formats SpdxDocument
# Generate CycloneDX SBOM
ort report \
--ort-file ort-results/evaluation-result.yml \
--output-dir ort-results \
--report-formats CycloneDx
# Generate all formats at once
ort report \
--ort-file ort-results/evaluation-result.yml \
--output-dir ort-results \
--report-formats StaticHtml,SpdxDocument,CycloneDx
```
### View Reports
Open the generated HTML report in your browser:
**For Windows:**
```powershell theme={null}
# PowerShell
Start-Process ort-results\scan-report-web-app.html
# Command Prompt
start ort-results\scan-report-web-app.html
```
**For macOS:**
```bash theme={null}
open ort-results/scan-report-web-app.html
```
**For Linux:**
```bash theme={null}
xdg-open ort-results/scan-report-web-app.html
```
Need help? [Contact our AI assistant](?assistant=open)