> ## Documentation Index
> Fetch the complete documentation index at: https://docs.scanoss.com/llms.txt
> Use this file to discover all available pages before exploring further.
# End-to-End Workflow
> Set up SCANOSS pre-commit hooks to catch undeclared open source components before code leaves your workstation, integrate the GitHub Actions workflow to enforce copyleft and undeclared-component policies on pull requests, and use Dependency Track to manage vulnerabilities and define organisational licence policies.
This is the fastest way to see a complete SCANOSS license-compliance and vulnerability-monitoring loop working, from a developer's first commit through to an enforced pull-request policy and a live Dependency-Track dashboard. It's self-contained, everything you need is on this page.
This walkthrough covers license compliance and vulnerability monitoring
only. If you also want to evaluate encryption detection, see [Advanced
Analysis](/en/latest/poc/evaluation/advanced-analysis) once you're done here.
## What You'll Build
* **Pre-commit hooks** that catch undeclared open-source components before code is committed
* **A GitHub Actions workflow** that scans every pull request and enforces copyleft/undeclared-component policy
* **A Dependency-Track dashboard** tracking vulnerabilities and license policy over time
## Prerequisites
Before you begin, ensure you have:
* [Python 3.9](https://www.python.org/) or later
* [Git](https://git-scm.com/) installed and configured
* A GitHub repository with Actions enabled and workflow permissions configured
* A SCANOSS API key
* A running [Dependency-Track](https://dependencytrack.org/) instance, with its API key and base URL
## Workflow Overview
```mermaid theme={null}
graph TD
Developer[Developer]
Developer -->|On Commit| Hooks["SCANOSS Pre-Commit Hooks"]
DeclareComponents -->|Command Line| InstallPY[SCANOSS-PY]
DeclareComponents -->|Desktop GUI| InstallCC[SCANOSS-CC]
InstallPY --> ReCommit[Developer Re-Commits Code]
InstallCC --> ReCommit
ReCommit --> Hooks
Hooks --> GitCommit{Pre-Commit Scan Passed?}
GitCommit -->|Yes| CISetup[Setup Github Actions Workflow]
GitCommit -->|No| Understand[Understanding the Results]
Understand --> DeclareComponents
%% CI PIPELINE
CISetup --> Secrets[Setup GitHub Secrets]
Secrets --> Trigger[Trigger SCANOSS GitHub Workflow]
Trigger --> GHResults[Review GitHub Actions Summary]
GHResults --> DependencyTrack[Analyse in Dependency Track]
DependencyTrack --> Decision{Policy Status}
Decision -->|Workflow Violations| FixWorkflow[Fix Issues from Report]
Decision -->|Passed| Merge[Merge Pull Request]
FixWorkflow --> Trigger
%% Links
click Hooks "#setup-pre-commit-hooks"
click Understand "#understanding-the-results"
click DeclareComponents "#declare-components"
click InstallPY "#scanoss-py"
click InstallCC "#scanoss-cc"
click CISetup "#github-actions-workflow"
click Secrets "#configure-github-secrets"
click Trigger "#trigger-your-first-workflow-run"
click GHResults "#review-pipeline-summary"
click DependencyTrack "#access-dependency-track-dashboard"
%% Styling
style Developer fill:#42A5F5,stroke:#1976D2,stroke-width:3px,color:#fff
style Hooks fill:#7E57C2,stroke:#5E35B1,stroke-width:3px,color:#fff
style DeclareComponents fill:#42A5F5,stroke:#1976D2,stroke-width:2px,color:#fff
style InstallPY fill:#26A69A,stroke:#00897B,stroke-width:2px,color:#fff
style InstallCC fill:#26A69A,stroke:#00897B,stroke-width:2px,color:#fff
style ReCommit fill:#42A5F5,stroke:#1565C0,stroke-width:2px,color:#fff
style GitCommit fill:#42A5F5,stroke:#1976D2,stroke-width:2px,color:#fff
style Understand fill:#FF9800,stroke:#F57C00,stroke-width:2px,color:#fff
style CISetup fill:#66BB6A,stroke:#43A047,stroke-width:3px,color:#fff
style Secrets fill:#FFA726,stroke:#F57C00,stroke-width:2px,color:#fff
style Trigger fill:#78909C,stroke:#546E7A,stroke-width:2px,color:#fff
style GHResults fill:#FF9800,stroke:#F57C00,stroke-width:3px,color:#fff
style DependencyTrack fill:#AB47BC,stroke:#8E24AA,stroke-width:2px,color:#fff
style Decision fill:#42A5F5,stroke:#1976D2,stroke-width:2px,color:#fff
style FixWorkflow fill:#EF5350,stroke:#E53935,stroke-width:2px,color:#fff
style Merge fill:#66BB6A,stroke:#43A047,stroke-width:3px,color:#fff
```
Select any step in the diagram to jump straight to it.
## Setup Pre-Commit Hooks
SCANOSS Pre-Commit Hooks ensures that before you push any code to your repository, SCANOSS automatically checks for undeclared open source components. This shift-left approach helps you catch compliance issues early in the development process, before code reaches your team or production.
### Install Pre-Commit Framework
Open your terminal or command prompt and install the pre-commit framework:
```bash theme={null}
pip install pre-commit
```
### Configure the Hook
Navigate to your project root directory and create a new file named `.pre-commit-config.yaml`.
Add the following configuration to the file:
```yaml theme={null}
repos:
- repo: https://github.com/scanoss/pre-commit-hooks
rev: v0.4.0 # Use the latest version from https://github.com/scanoss/pre-commit-hooks/releases
hooks:
- id: scanoss-check-undeclared-code
```
**Verify Configuration:**
In your terminal, navigate to your project directory and run:
```bash theme={null}
pre-commit validate-config
```
This confirms your configuration file is valid.
### Install the Hook
In your terminal, while still in your project directory, run:
```bash theme={null}
pre-commit install
```
This installs the hook into your `.git/hooks` directory. Once installed, the hook runs automatically before every `git commit`.
You should see output like:
```bash theme={null}
pre-commit installed at .git/hooks/pre-commit
```
### Configure Environment Variables
Open your IDE or text editor and create a new file named `.env` in your project root directory.
Add your configuration:
```bash theme={null}
# .env
SCANOSS_API_KEY=your_api_key_here
SCANOSS_DEBUG=true
```
**Save the file** in your project root directory. The hook will automatically load these variables during execution.
### Configure .gitignore
Before committing, you need to configure your `.gitignore` file to exclude SCANOSS generated files from version control.
Open your `.gitignore` file (or create one if it doesn't exist) in your project root and add:
```gitignore theme={null}
# SCANOSS temporary files and cache
*.wfp
.scanoss/
.env
```
Save the `.gitignore` file in your project root directory.
## Commit Changes
Now test the hook to ensure it's working correctly.
**Stage your files:**
```bash theme={null}
git add .
```
**Attempt a commit:**
```bash theme={null}
git commit -m "Testing Pre-Commit Hooks"
```
The hook runs automatically and scans your staged files.
### Undeclared Components
If undeclared components are found, the commit will be **blocked** and you'll see a summary table in your terminal:
```bash theme={null}
SCANOSS Undeclared Check.................................................Failed
- hook id: scanoss-check-undeclared-code
- duration: 7.75s
- exit code: 1
SCANOSS detected 2 files containing potential Open Source Software:
┌──────────────┬─────────┬────────────┬─────────┬──────────────┬──────────────┐
│ File │ Status │ Match Type │ Matched │ Purl │ License │
├──────────────┼─────────┼────────────┼─────────┼──────────────┼──────────────┤
│ src/copyrig… │ pending │ snippet │ 95% │ pkg:github/… │ GPL-2.0-only │
├──────────────┼─────────┼────────────┼─────────┼──────────────┼──────────────┤
│ src/scanner… │ pending │ snippet │ 96% │ pkg:github/… │ MIT │
└──────────────┴─────────┴────────────┴─────────┴──────────────┴──────────────┘
Run 'scanoss-cc' in the terminal to view the results in more detail.
```
**What happened:**
The pre-commit hook generated a summary table in your terminal and created a detailed scan results file at `.scanoss/results.json` in your project directory.
**To resolve this:**
The commit is blocked until you review the findings and declare the components. Follow the same workflow mentioned earlier:
1. **Review the results**: The detailed findings are in `.scanoss/results.json`
See [Understanding the Results](#understanding-the-results) to understand what each field means
2. **Declare the components**: Follow the [Declare Components](#declare-components) section to properly declare the detected components
3. **Check in scanoss.json**: After updating `scanoss.json` with your component declarations, stage the file:
```bash theme={null}
git add scanoss.json
```
4. **Retry your commit**: Now retry the commit with your updated declarations:
```bash theme={null}
git commit -m "Add new features"
```
## Understanding the Results
After running a scan, SCANOSS writes a `results.json` file into a hidden `.scanoss/` directory in your project:
```bash theme={null}
/.scanoss/results.json
```
Each entry describes one detected match: the component and file involved, how confident the match is (`matched`, a similarity percentage), its licence, and its current `status`:
* `pending` — newly detected, needs your review
* `identified` — properly documented in your `scanoss.json`
For the full field-by-field schema (vulnerabilities, cryptography,
copyrights, dependencies, and more), see [Understanding Scan
Results](/en/latest/getting-started/understanding-scan-results).
**What this means for you:** any finding marked `"status": "pending"` requires a decision. Review the match and decide:
* **Include** it in your `scanoss.json` to declare intentional use
* **Dismiss** it if it's a false positive or your own code
* **Replace** it if the license is incompatible with your project
## Declare Components
After reviewing the scan results, you need to review and declare any detected components that have not yet been identified. Component declaration can be performed using either **SCANOSS-PY** or **SCANOSS-CC**.
### SCANOSS-PY
To declare components using [SCANOSS-PY](https://github.com/scanoss/scanoss.py), you must first install it. Follow the steps below in your terminal or command prompt.
**Standard Installation:**
```bash theme={null}
pip install scanoss
```
**Verify Installation:**
```bash theme={null}
scanoss-py --version
```
If the installation worked, you’ll see the tool’s version number.
**Step 1: Identify Undeclared Components**
Use the inspect command to find components that need to be declared:
```bash theme={null}
scanoss-py inspect undeclared -i .scanoss/results.json
```
This will output suggested components to add to your `scanoss.json`:
```json theme={null}
{
"bom": {
"include": [
{
"purl": "pkg:github/scanoss/engine"
},
{
"purl": "pkg:github/scanoss/scanoss.py"
}
]
}
}
```
**Step 2: Create scanoss.json**
Using the output from Step 1, create a `scanoss.json` file in your project root directory (the same directory that was scanned). This configuration file controls scanning behavior and manages component declarations, and must be created manually.
Add a `self` section to the scanoss.json file to include relevant project information. You can also expand the `bom.include` entries by adding comments for clarity.
You can view a sample `scanoss.json` [schema](https://scanoss.github.io/schema/) using the following link.
```json theme={null}
{
"self": {
"name": "my-project",
"license": "MIT",
"description": "My project"
},
"bom": {
"include": [
{
"purl": "pkg:github/scanoss/engine",
"comment": "SCANOSS engine for code analysis"
},
{
"purl": "pkg:github/scanoss/scanoss.py",
"comment": "SCANOSS Python SDK for API integration"
}
]
}
}
```
**Step 3: Rescan with Configuration**
Run the scan again. SCANOSS-PY automatically picks up `scanoss.json` from the scanned directory, so your declarations are applied without needing to reference it explicitly:
```bash theme={null}
scanoss-py scan --key $SCANOSS_API_KEY -o .scanoss/results.json /path/to/project
```
**Step 4: Validate Compliance**
Verify all components are properly declared:
```bash theme={null}
scanoss-py inspect undeclared -i .scanoss/results.json
```
Successful output:
```bash theme={null}
0 undeclared component(s) were found.
```
Learn more about the [SCANOSS Settings file format](/en/latest/getting-started/declaring-components) and [SCANOSS-PY](/en/latest/cli/scanoss-py/installation).
### SCANOSS-CC
To declare components using [SCANOSS-CC](https://github.com/scanoss/scanoss.cc), you must also have [SCANOSS-PY](#scanoss-py) installed, as it is a required dependency for SCANOSS-CC to function. Open your terminal (macOS/Linux) or PowerShell (Windows), then run the command appropriate for your operating system.
**macOS / Linux:**
```bash theme={null}
curl -fsSL https://raw.githubusercontent.com/scanoss/scanoss.cc/main/scripts/install.sh | bash
```
**Windows (PowerShell as Administrator):**
```powershell theme={null}
irm https://raw.githubusercontent.com/scanoss/scanoss.cc/main/scripts/install-windows.ps1 | iex
```
**Verify Installation:**
```bash theme={null}
scanoss-cc --version
```
Before declaring components with **SCANOSS-CC**, configure your API credentials:
```bash theme={null}
scanoss-cc configure --apiUrl https://api.scanoss.com --key $SCANOSS_API_KEY
```
Make sure you're in your project directory where the scan results are located:
```bash theme={null}
cd /path/to/your/project
```
**SCANOSS-CC** will automatically load results from `.scanoss/results.json` in the current directory.
Launch **SCANOSS-CC** to review results and make decisions interactively:
```bash theme={null}
scanoss-cc
```
**In the SCANOSS-CC interface:**
1. **Review Results**: View side-by-side code comparisons showing your code matched against the detected open source component
2. **Make Decisions**: Use the action icons at the top of the dashboard to:
* **Include**: Accept and declare the component as an intentional dependency
* **Dismiss**: Mark as false positive or your own code
* **Replace**: Flag for replacement with alternative code or different license
* **Skip**: Exclude a file, folder, or file extension from future scans entirely (takes effect on your next scan)
* **Restore**: Undo a previous decision and return the finding to a pending state
3. **Save Changes**: Your decisions are saved to `scanoss.json` at your project root. Future scans will remember these decisions.
**Keyboard Shortcuts:**
View all shortcuts by selecting **Help** → **Keyboard Shortcuts** for faster decision-making.
### Re-Commit and Verify
Now run the hook again to verify that all components have been successfully declared.
```bash theme={null}
git commit -m "Testing Pre-Commit Hooks"
```
If all components are declared the commit proceeds normally:
```bash theme={null}
SCANOSS Undeclared Check.................................................Passed
- hook id: scanoss-check-undeclared-code
- duration: 5.32s
[main 1a2b3c4] Add new features
2 files changed, 45 insertions(+), 3 deletions(-)
```
Your code is now safe to push to the repository!
## GitHub Actions Workflow
[GitHub Actions](https://github.com/features/actions) provides automated workflows that run on specific events like pushes and pull requests. We'll create a workflow that scans your code on every change.
### Create Workflow Directory
GitHub Actions expects workflow files to be stored in a specific location within your project.
In the root of your project, create a folder named `.github` and inside it, create another folder called `workflows`.
```bash theme={null}
your-project/
└── .github/
└── workflows/
```
### Create the Workflow File
Create a file named `scanoss.yml` in the `.github/workflows` directory with the following configuration. The [SCANOSS Code Scan Action](https://github.com/scanoss/gha-code-scan) enhances your software development process by automatically scanning your code for security vulnerabilities and license compliance using configurable policies.
```yaml theme={null}
name: SCANOSS with Dependency Track
on:
pull_request:
branches: [main]
permissions:
contents: read
pull-requests: write
checks: write
actions: read
jobs:
scanoss-code-scan:
name: SCANOSS Code Scan
runs-on: ubuntu-latest
steps:
- name: Checkout code
uses: actions/checkout@v6
- name: Run SCANOSS Code Scan
id: scanoss-code-scan-step
uses: scanoss/gha-code-scan@v1
with:
policies: copyleft, undeclared, depTrack
scanMode: "full"
dependencies.enabled: true
deptrack.upload: true
deptrack.url: ${{ secrets.DT_SERVER_URL }}
deptrack.apikey: ${{ secrets.DT_API_KEY }}
deptrack.projectname: "my-project"
deptrack.projectversion: "1.0.0"
api.key: ${{ secrets.SCANOSS_API_KEY }}
- name: Print stdout scan command
run: echo "${{ steps.scanoss-code-scan-step.outputs.stdout-scan-command }}"
- name: Print Results
run: cat "${{ steps.scanoss-code-scan-step.outputs.result-filepath }}"
```
**Key Workflow Features:**
* Runs on pull requests to the `main` branch
* Performs a full scan of your repository
* Sends SBOM to Dependency Track for ongoing monitoring
* Validates copyleft, undeclared components, and Dependency Track policies
### Understanding Workflow Triggers
The workflow file above uses `on: pull_request: branches: [main]` to determine when SCANOSS runs. GitHub Actions workflows can be triggered by various [events](https://docs.github.com/en/actions/how-tos/write-workflows/choose-when-workflows-run/trigger-a-workflow).
### Understanding Compliance Policies
The workflow file uses `policies: undeclared,copyleft, depTrack` to enforce compliance rules. SCANOSS can enforce these policies to fail your workflow when issues are detected:
* **`undeclared`** - Fails if open source components aren't declared in `scanoss.json`
* **`copyleft`** - Fails if copyleft-licensed components are detected
* **`depTrack`** - This policy integrates with [Dependency Track](https://dependencytrack.org/) to check for security vulnerabilities, license violations, and policy compliance
### Configure GitHub Secrets
Now that you’ve configured the GitHub workflow file in your project, navigate to your GitHub repository and add the required secrets.
**Settings → Secrets and variables → Actions**
Click **New repository secret** and add each of the following:
| Secret Name | Description | Example |
| ----------------- | ------------------------- | ---------------------------------------------------------------------------- |
| `DT_API_KEY` | Dependency Track API key | abc123... |
| `DT_SERVER_URL` | Dependency Track base URL | [https://your-dependencytrack-url.com](https://your-dependencytrack-url.com) |
| `SCANOSS_API_KEY` | SCANOSS API key | xyz789... |
### Trigger Your First Workflow Run
Now that you've created your workflow file, let's push and trigger the scan.
```bash theme={null}
# Push to your repository
git push origin
```
### Create a Pull Request
1. Go to your GitHub repository
2. You should see a prompt to **"Compare & pull request"** for your branch
3. Click **"Compare & pull request"**
4. Review the changes and click **"Create pull request"**
### Monitor the Workflow Execution
Once you create the pull request, GitHub Actions will automatically trigger your workflow:
1. In your pull request, click the **"Checks"** tab
2. You should see your "**SCANOSS Scan**" workflow running
3. Click on the workflow to see real-time progress
4. Wait for the workflow to complete
### Review Pipeline Summary
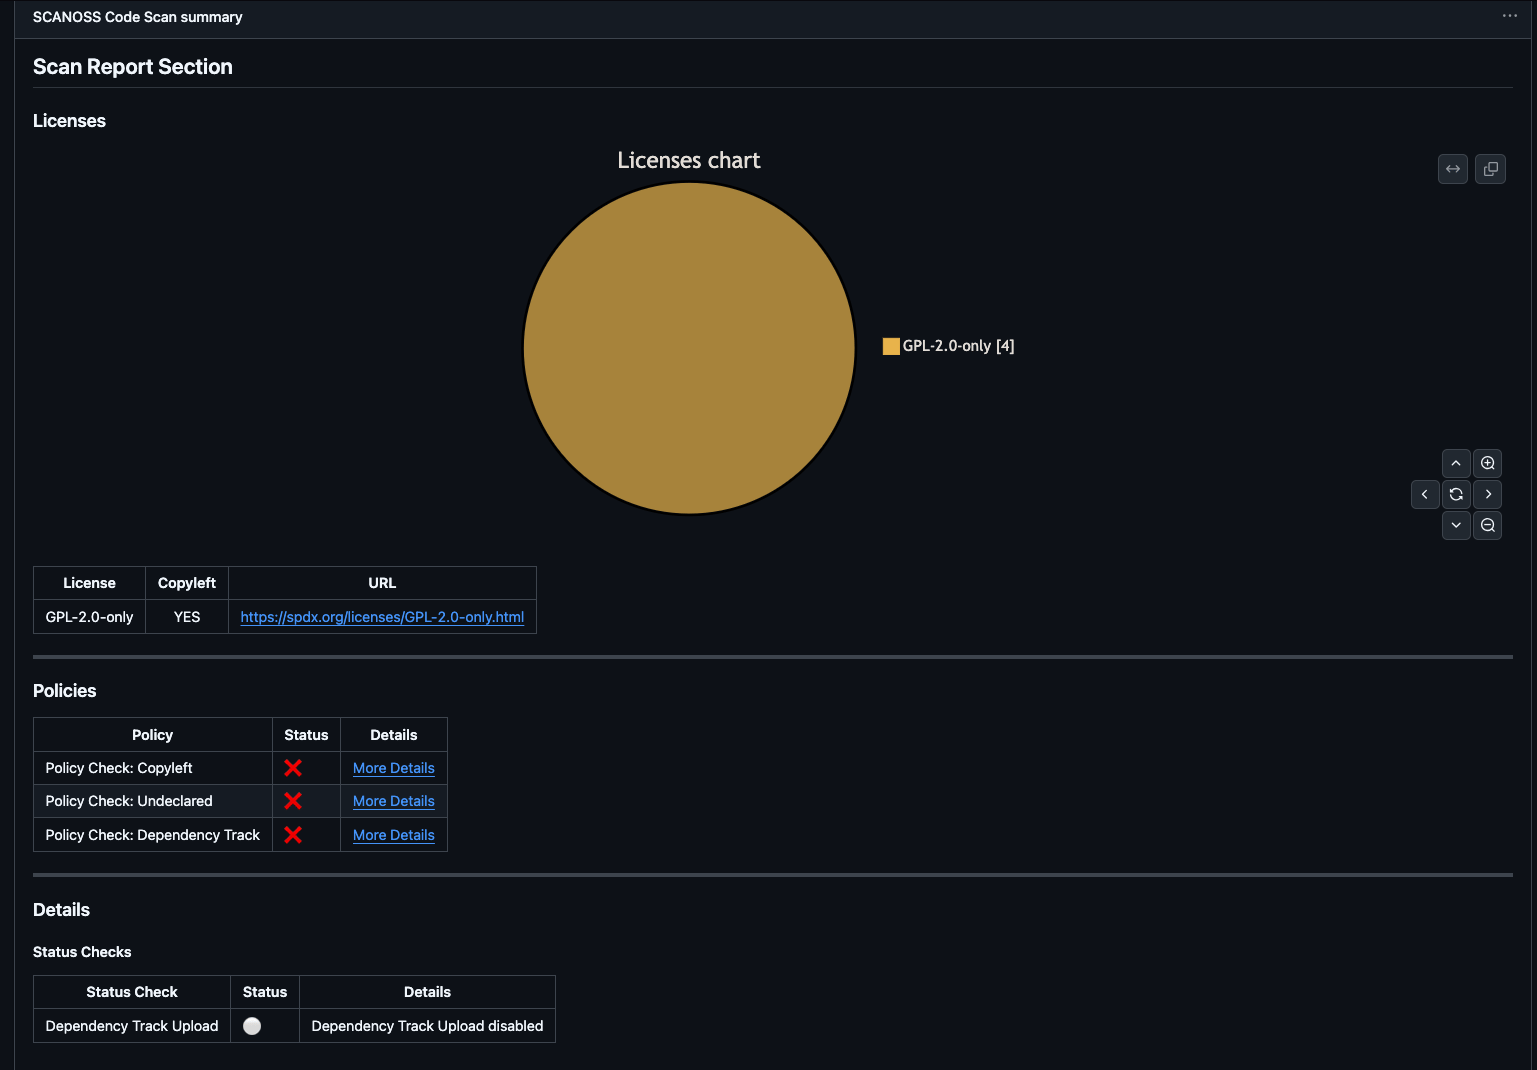
After the workflow completes, navigate to the **Summary** page to review results.
 **Understanding the Summary:**
* **Scan Report**: License distribution pie chart and detailed license table
* **Policies**: Compliance check results (copyleft, undeclared, Dependency Track)
* **Details**: Upload status with direct link to Dependency Track project
* **Artifacts**: Downloadable reports, SBOMs and policy results
### Access Dependency Track Dashboard
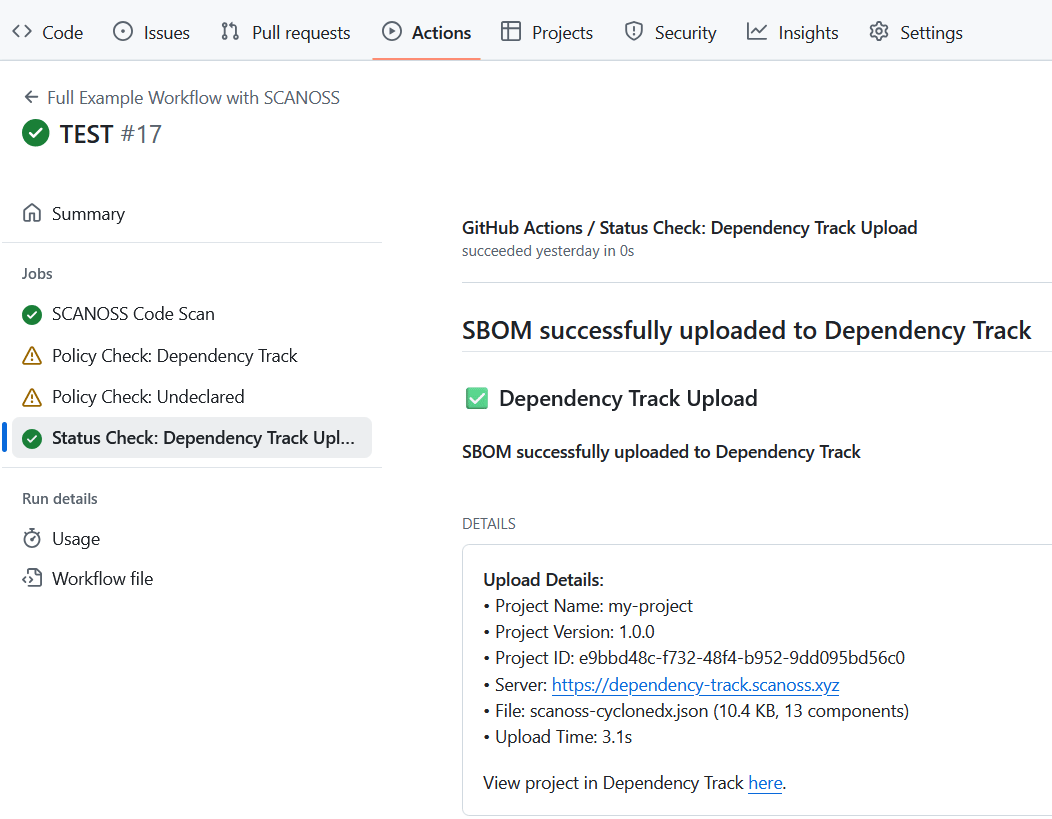
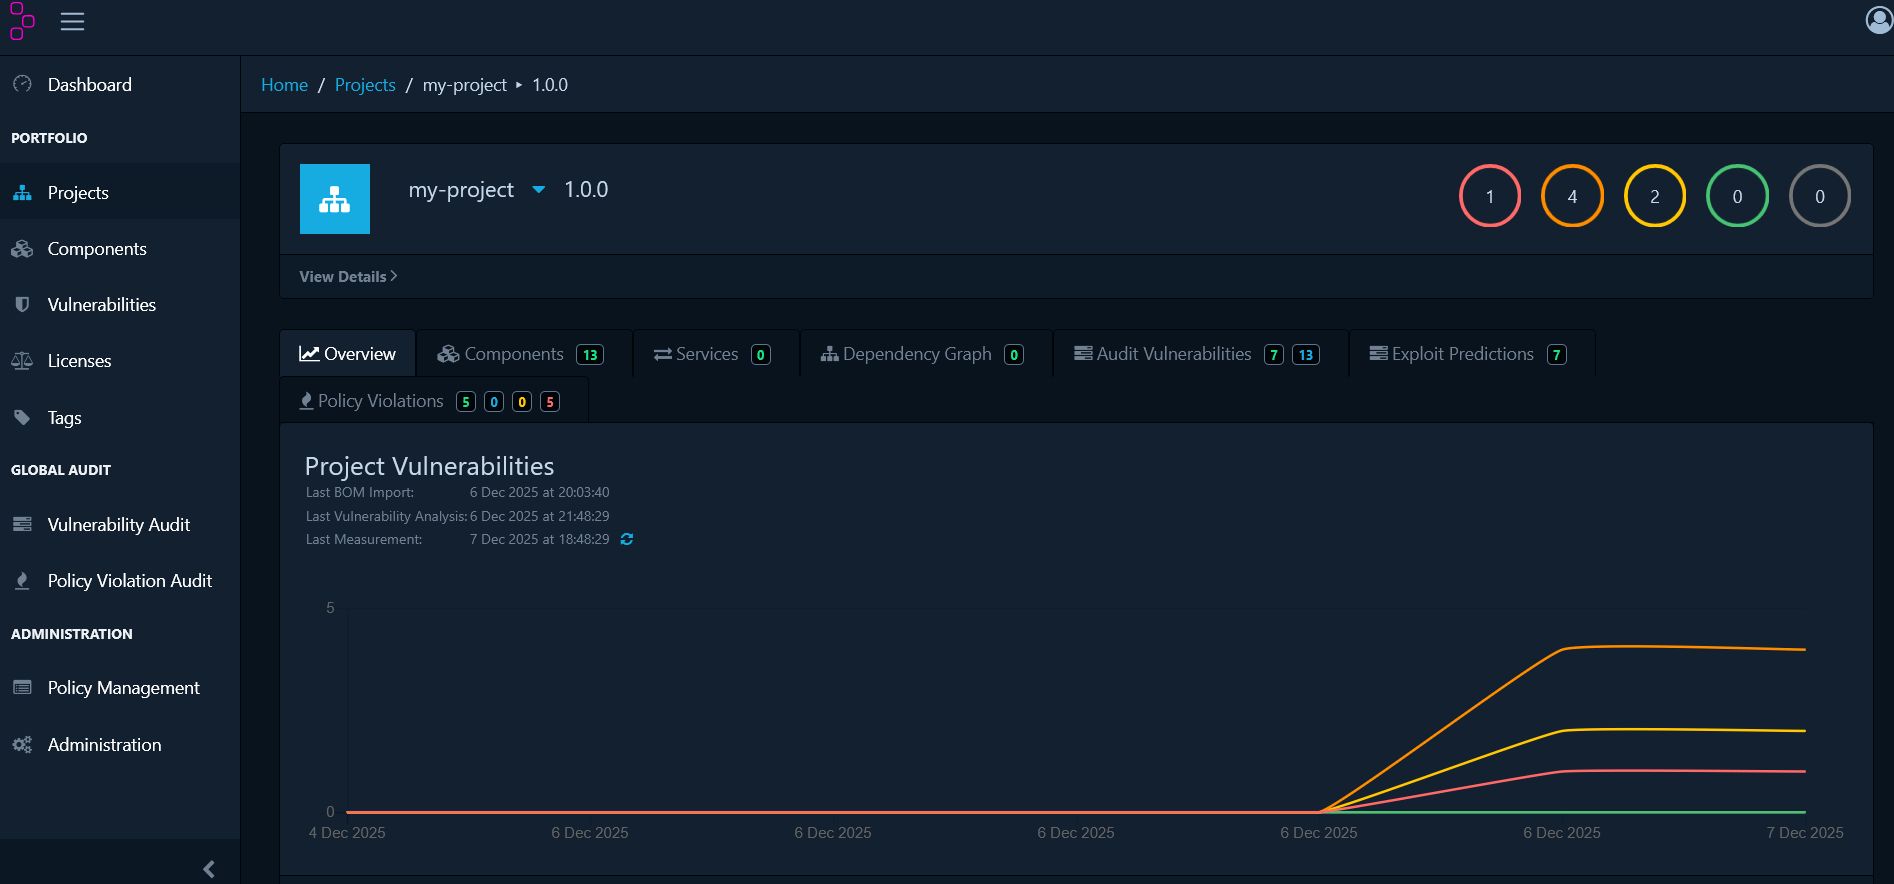
Once the scan uploads to Dependency Track, access the full dashboard for deeper analysis.
In the pipeline summary's **Details** section, click the **View Project** link to open your project in Dependency Track.
**Understanding the Summary:**
* **Scan Report**: License distribution pie chart and detailed license table
* **Policies**: Compliance check results (copyleft, undeclared, Dependency Track)
* **Details**: Upload status with direct link to Dependency Track project
* **Artifacts**: Downloadable reports, SBOMs and policy results
### Access Dependency Track Dashboard
Once the scan uploads to Dependency Track, access the full dashboard for deeper analysis.
In the pipeline summary's **Details** section, click the **View Project** link to open your project in Dependency Track.
 ### Explore Dashboard Sections
The Dependency Track dashboard provides several key views for managing your open-source dependencies:
* **Components**: Complete inventory of detected components with their licenses, versions, and risk scores
* **Dependency Graph**: Visual representation of direct and transitive dependency relationships
* **Audit Vulnerabilities**: List of all components with known security vulnerabilities, organized by severity
### Manage Vulnerabilities
Click on any vulnerability to open its details panel and assess its actual risk.
### Explore Dashboard Sections
The Dependency Track dashboard provides several key views for managing your open-source dependencies:
* **Components**: Complete inventory of detected components with their licenses, versions, and risk scores
* **Dependency Graph**: Visual representation of direct and transitive dependency relationships
* **Audit Vulnerabilities**: List of all components with known security vulnerabilities, organized by severity
### Manage Vulnerabilities
Click on any vulnerability to open its details panel and assess its actual risk.
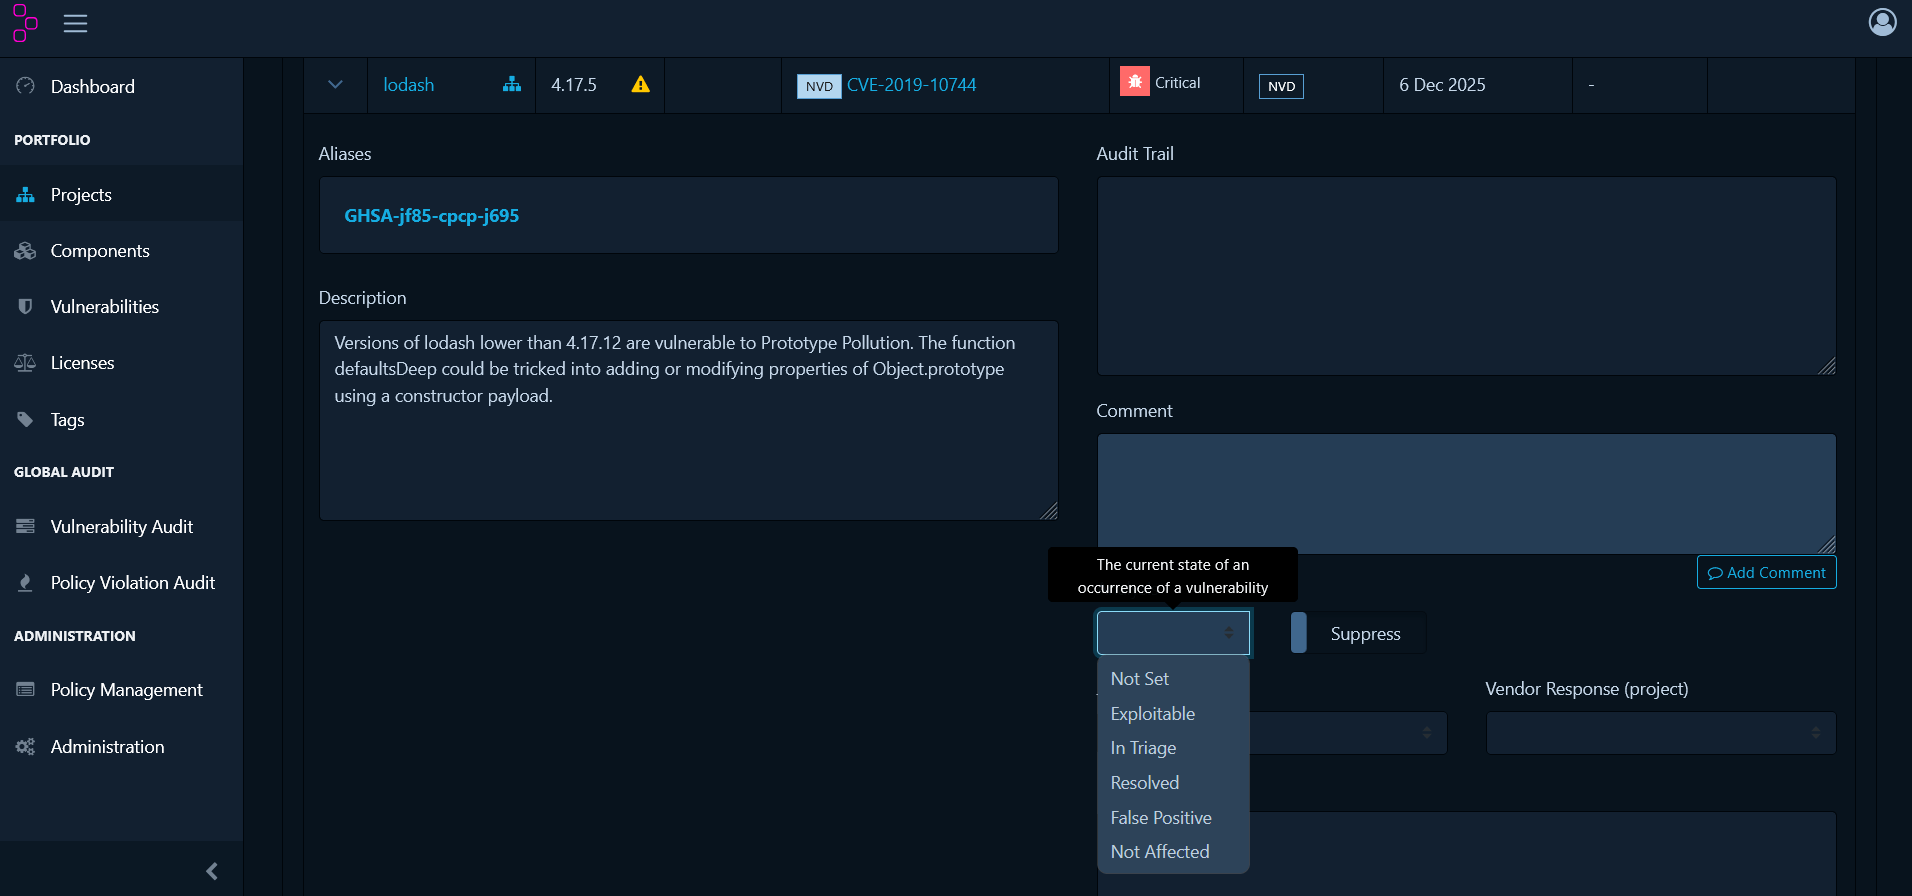 **Analysis States:**
* **Not Set** - Default state requiring review
* **Exploitable** - Confirmed risk to your application
* **In Triage** - Currently under investigation
* **False Positive** - Doesn't apply to your usage
* **Not Affected** - Your configuration isn't vulnerable
* **Resolved** - Fixed (usually by upgrading)
**To Manage a Vulnerability:**
1. Click the vulnerability in the **Audit Vulnerabilities** tab
2. Review the CVE details, affected versions and remediation advice
3. Select an analysis state from the dropdown
4. Add a comment explaining your decision
5. Click **Save**
### Define Organisational Policies
While vulnerability management handles security threats reactively, policy management takes a proactive approach by defining rules that automatically identify compliance issues.
Navigate to **Policy Management** from the main menu to create policies.
#### Create License Policies
**Block Specific Licenses:**
1. Click **Create Policy**
2. Add a **Condition** and select **License**
3. Choose the specific license to block (e.g., GPL-3.0)
4. Set violation state to **FAIL**
5. Save the policy
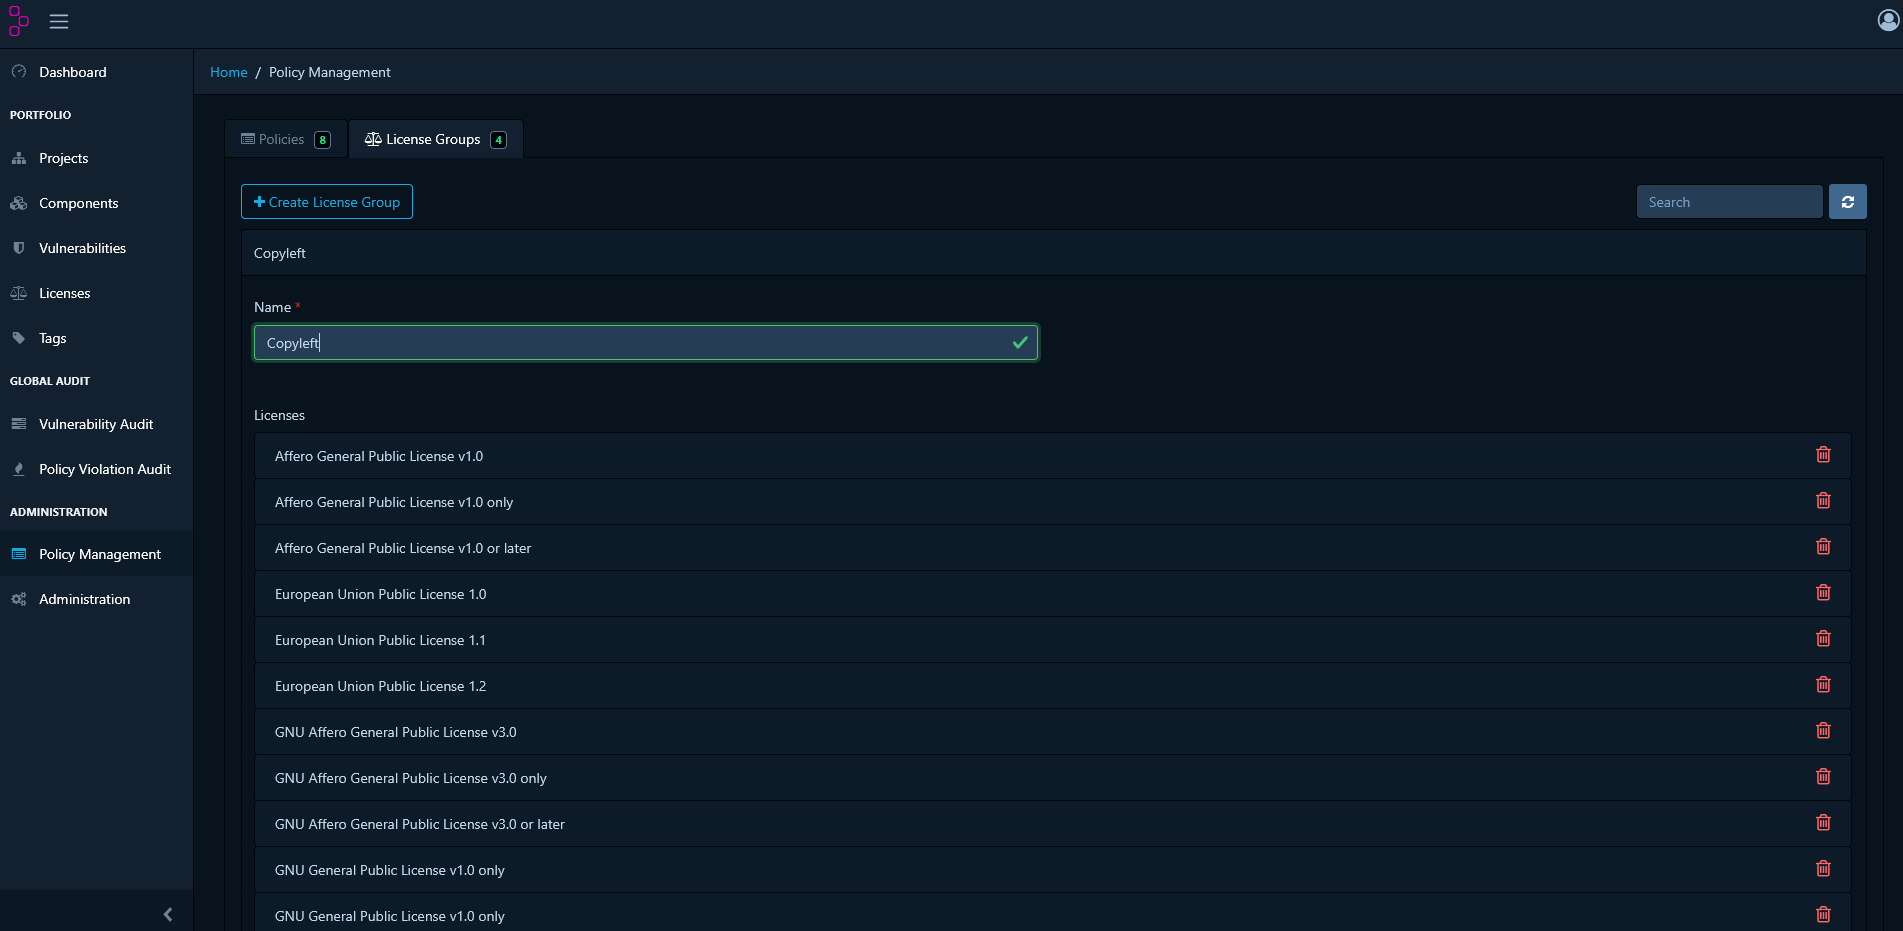
**Block License Groups:**
For broader control, create license groups:
1. Go to **License Groups** tab
2. Click **Create License Group**
3. Name it (e.g., "Copyleft Licenses")
4. Add licenses: GPL-2.0, GPL-3.0, AGPL-3.0
5. Save the group
**Analysis States:**
* **Not Set** - Default state requiring review
* **Exploitable** - Confirmed risk to your application
* **In Triage** - Currently under investigation
* **False Positive** - Doesn't apply to your usage
* **Not Affected** - Your configuration isn't vulnerable
* **Resolved** - Fixed (usually by upgrading)
**To Manage a Vulnerability:**
1. Click the vulnerability in the **Audit Vulnerabilities** tab
2. Review the CVE details, affected versions and remediation advice
3. Select an analysis state from the dropdown
4. Add a comment explaining your decision
5. Click **Save**
### Define Organisational Policies
While vulnerability management handles security threats reactively, policy management takes a proactive approach by defining rules that automatically identify compliance issues.
Navigate to **Policy Management** from the main menu to create policies.
#### Create License Policies
**Block Specific Licenses:**
1. Click **Create Policy**
2. Add a **Condition** and select **License**
3. Choose the specific license to block (e.g., GPL-3.0)
4. Set violation state to **FAIL**
5. Save the policy
**Block License Groups:**
For broader control, create license groups:
1. Go to **License Groups** tab
2. Click **Create License Group**
3. Name it (e.g., "Copyleft Licenses")
4. Add licenses: GPL-2.0, GPL-3.0, AGPL-3.0
5. Save the group
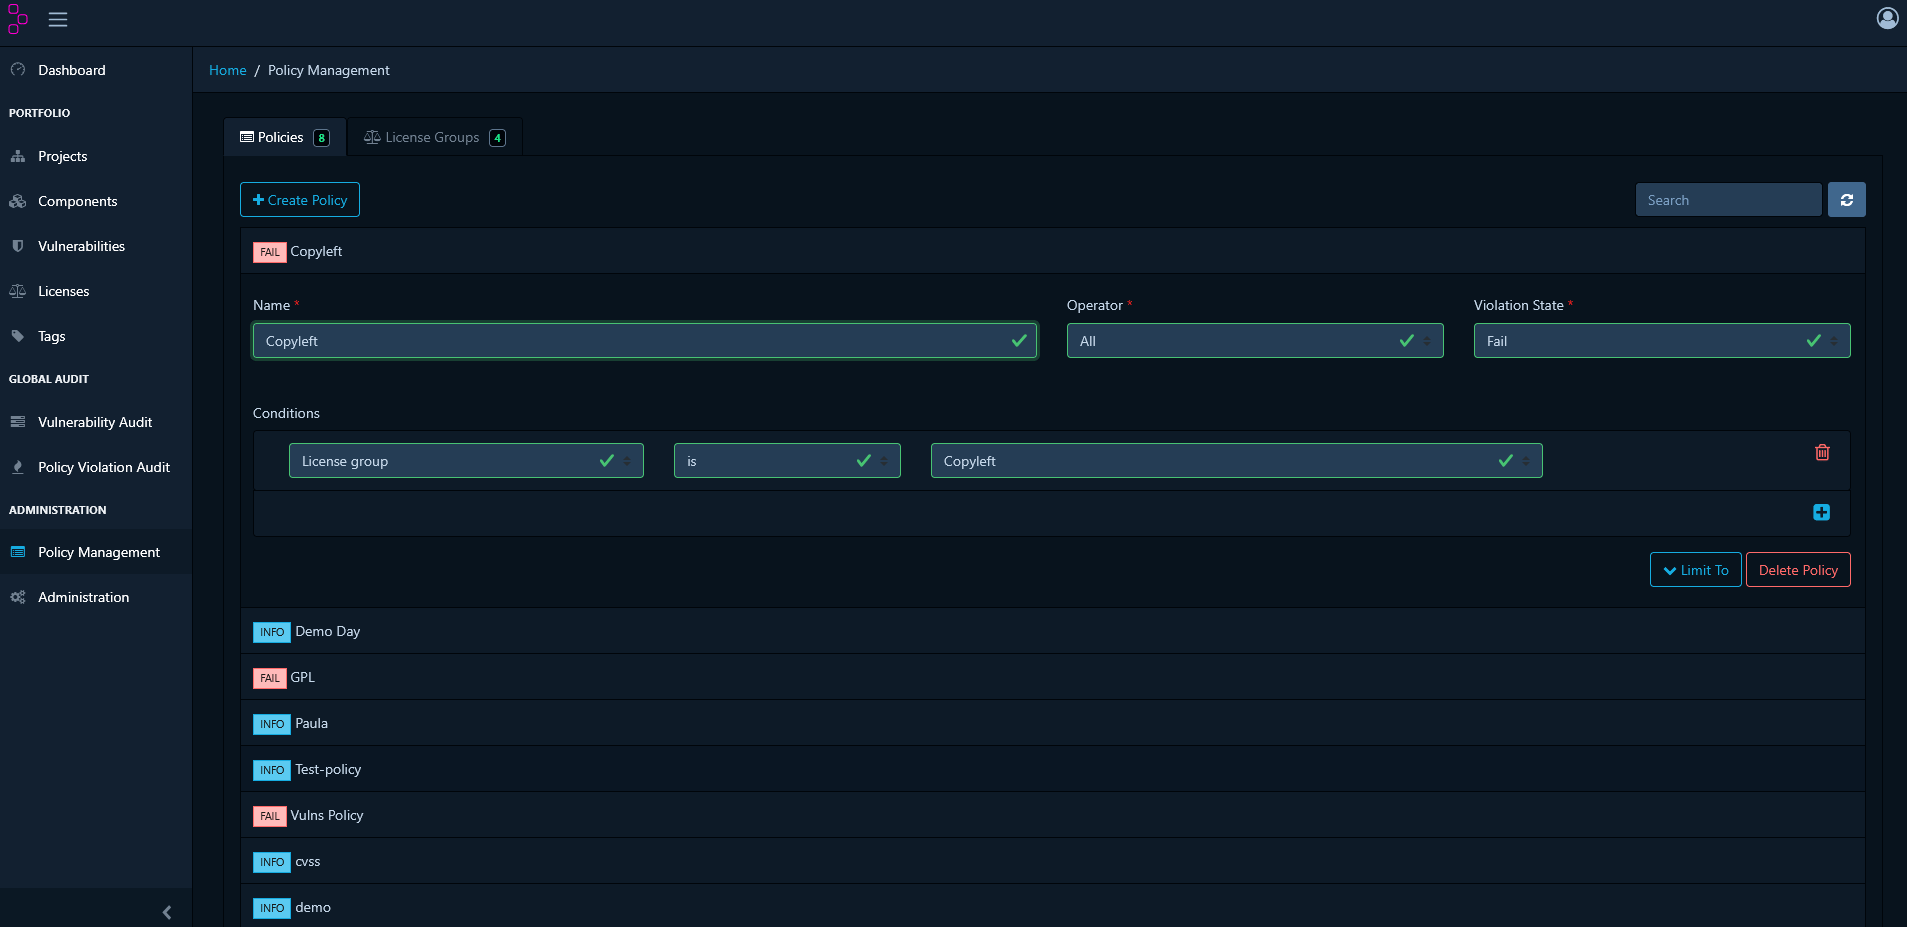
 Then create a policy using the group:
1. **Create Policy** → Add **Condition**
2. Select **License Group**
3. Choose your license group
4. Set violation state
5. Save the policy
Then create a policy using the group:
1. **Create Policy** → Add **Condition**
2. Select **License Group**
3. Choose your license group
4. Set violation state
5. Save the policy
 #### Create Vulnerability Policies
**Flag High-Severity Vulnerabilities:**
1. Click **Create Policy**
2. Add a **Condition** and select **Severity**
3. Select severity levels: CRITICAL, HIGH
4. Set violation state to **FAIL**
5. Save the policy
**Block Specific CVEs:**
1. Click **Create Policy**
2. Add a **Condition** and select **Vulnerability ID**
3. Enter CVE identifier (e.g., CVE-2024-1234)
4. Set violation state to **FAIL**
5. Save the policy
#### Create Component Age Policies
Flag outdated components that may lack security updates:
1. Click **Create Policy**
2. Add a **Condition** and select **Age**
3. Set operator to **greater than**
4. Specify age threshold in days
5. Set violation state to **WARN**
6. Save the policy
### Review Policy Violations
Navigate to your project's **Policy Violations** tab to see all policy breaches:
#### Create Vulnerability Policies
**Flag High-Severity Vulnerabilities:**
1. Click **Create Policy**
2. Add a **Condition** and select **Severity**
3. Select severity levels: CRITICAL, HIGH
4. Set violation state to **FAIL**
5. Save the policy
**Block Specific CVEs:**
1. Click **Create Policy**
2. Add a **Condition** and select **Vulnerability ID**
3. Enter CVE identifier (e.g., CVE-2024-1234)
4. Set violation state to **FAIL**
5. Save the policy
#### Create Component Age Policies
Flag outdated components that may lack security updates:
1. Click **Create Policy**
2. Add a **Condition** and select **Age**
3. Set operator to **greater than**
4. Specify age threshold in days
5. Set violation state to **WARN**
6. Save the policy
### Review Policy Violations
Navigate to your project's **Policy Violations** tab to see all policy breaches:
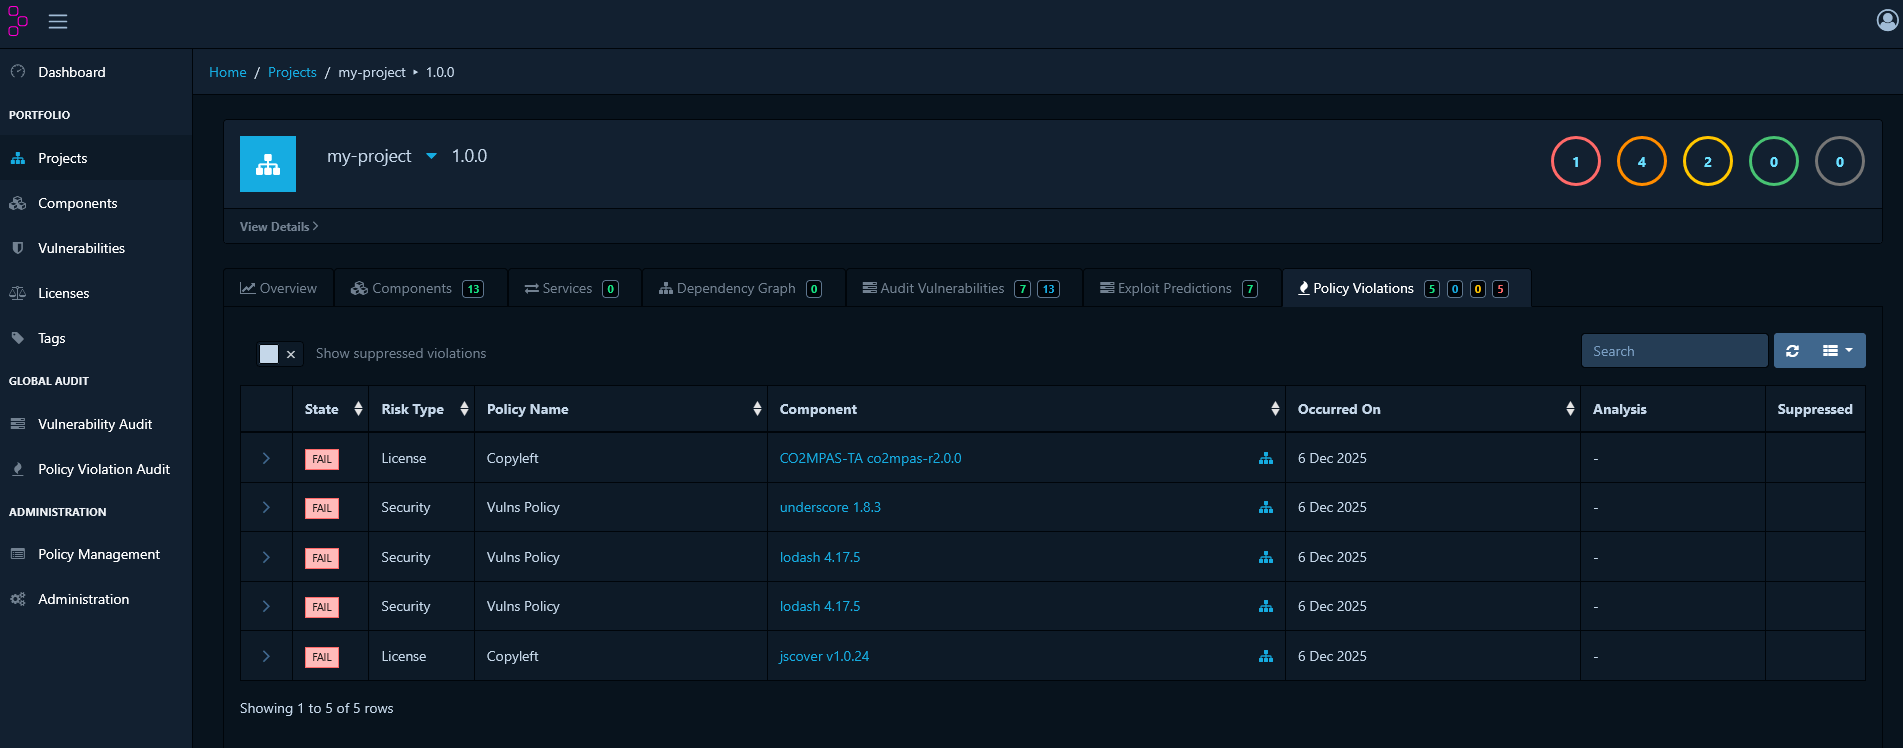 **Violation States:**
* **INFO** - Informational only, doesn't block releases
* **WARN** - Requires review before release
* **FAIL** - Must be resolved before release
### Triage Policy Violations
When a violation is technically accurate but acceptable in your context:
1. Navigate to **Policy Violations** tab
2. Select the violation to triage
3. Click **Analysis**
4. Select an analysis state:
* **Not Set** - No decision made yet
* **Approved** - Reviewed and accepted as known exception
* **Rejected** - Not accepted, requires remediation
5. Add a comment explaining the justification
6. Save your decision
Triaged violations remain visible for audit purposes but no longer block releases when marked as **Approved**.
## What's Next
You now have a repository with pre-commit checks, automated pull-request scanning, and a live Dependency-Track dashboard enforcing your license and vulnerability policy. From here:
* See [Improving Scan Accuracy](/en/latest/poc/evaluation/improving-scan-accuracy) to reduce false positives and get more accurate results, worth doing early, since the `bom.include` rules you already wrote for Declare Components double as scan context.
* Add [Advanced Analysis](/en/latest/poc/evaluation/advanced-analysis) to also evaluate encryption detection and query the vulnerability/cryptography APIs directly.
* See [Continuous Monitoring](/en/latest/poc/evaluation/continuous-monitoring) for OSS Review Toolkit as an alternative compliance-automation path.
* See the full [SCANOSS Settings file reference](/en/latest/getting-started/declaring-components) for everything `scanoss.json` can configure beyond `bom.include`.
**Violation States:**
* **INFO** - Informational only, doesn't block releases
* **WARN** - Requires review before release
* **FAIL** - Must be resolved before release
### Triage Policy Violations
When a violation is technically accurate but acceptable in your context:
1. Navigate to **Policy Violations** tab
2. Select the violation to triage
3. Click **Analysis**
4. Select an analysis state:
* **Not Set** - No decision made yet
* **Approved** - Reviewed and accepted as known exception
* **Rejected** - Not accepted, requires remediation
5. Add a comment explaining the justification
6. Save your decision
Triaged violations remain visible for audit purposes but no longer block releases when marked as **Approved**.
## What's Next
You now have a repository with pre-commit checks, automated pull-request scanning, and a live Dependency-Track dashboard enforcing your license and vulnerability policy. From here:
* See [Improving Scan Accuracy](/en/latest/poc/evaluation/improving-scan-accuracy) to reduce false positives and get more accurate results, worth doing early, since the `bom.include` rules you already wrote for Declare Components double as scan context.
* Add [Advanced Analysis](/en/latest/poc/evaluation/advanced-analysis) to also evaluate encryption detection and query the vulnerability/cryptography APIs directly.
* See [Continuous Monitoring](/en/latest/poc/evaluation/continuous-monitoring) for OSS Review Toolkit as an alternative compliance-automation path.
* See the full [SCANOSS Settings file reference](/en/latest/getting-started/declaring-components) for everything `scanoss.json` can configure beyond `bom.include`.