What is Dependency-Track?
Dependency-Track is a Component Analysis platform that enables organisations to identify and reduce risk in the software supply chain. It provides continuous monitoring of your Software Bill of Materials (SBOM) for vulnerabilities, licence risks, and policy violations.Why Integrate with SCANOSS?
SCANOSS and Dependency-Track work together to provide a comprehensive software composition analysis workflow:- SCANOSS scans your codebase to identify all open-source components and generates a Software Bill of Materials (SBOM)
- Dependency-Track continuously monitors those components for vulnerabilities, licence risks, and policy violations
How It Works
The SCANOSS and Dependency-Track integration follows this workflow:- Code Commit: Developer pushes code or creates a pull request
- SCANOSS Scan: GitHub Actions triggers a SCANOSS scan
- SBOM Generation: SCANOSS generates a CycloneDX SBOM
- Upload to Dependency-Track: The SBOM is automatically uploaded to Dependency-Track
- Vulnerability Analysis: Dependency-Track analyses components against configured vulnerability databases
- Policy Evaluation: Defined policies are evaluated against the uploaded SBOM
- Feedback: Results are reported back to the pull request or build pipeline
Prerequisites
Before setting up the integration, ensure you have:- A running Dependency-Track instance (self-hosted or cloud)
- A GitHub repository with GitHub Actions enabled
- A Dependency-Track API key (from Administration → Access Management → Teams → API Keys)
- The base URL for your Dependency-Track instance
- A SCANOSS API key
GitHub Secrets Configuration
To securely store your API keys and configuration, add them as GitHub repository secrets.Navigate to Repository Secrets
- Go to your GitHub repository.
- Click Settings → Secrets and variables → Actions.
- Click New repository secret.
Add Required Secrets
Add each of the following secrets:| Secret Name | Description | Example |
|---|---|---|
DT_API_KEY | Dependency Track API key | abc123... |
DT_SERVER_URL | Dependency Track base URL | https://your-dependencytrack-url.com |
SCANOSS_API_KEY | SCANOSS API key | xyz789... |
GitHub Actions Workflow
Create Workflow Directory
If the.github/workflows directory does not already exist in your repository,
create it now:
Create Workflow File
Create a workflow file at.github/workflows/scanoss.yml.
This workflow uses the
SCANOSS Code Scan GitHub Action to
analyse your repository, generate licence and dependency insights, and upload the
results to Dependency-Track for continuous monitoring.
Add the following configuration to your workflow file:
Make sure you’re using the latest version of the SCANOSS Code Scan Action.
Commit and Push Workflow
Once you have created the workflow file, commit and push it to your repository:Monitoring Workflow Execution
View Workflow Runs
- Go to your GitHub repository.
- Click the Actions tab.
- Select the SCANOSS with Dependency-Track workflow.
- View the list of workflow runs.
Understanding the Pipeline
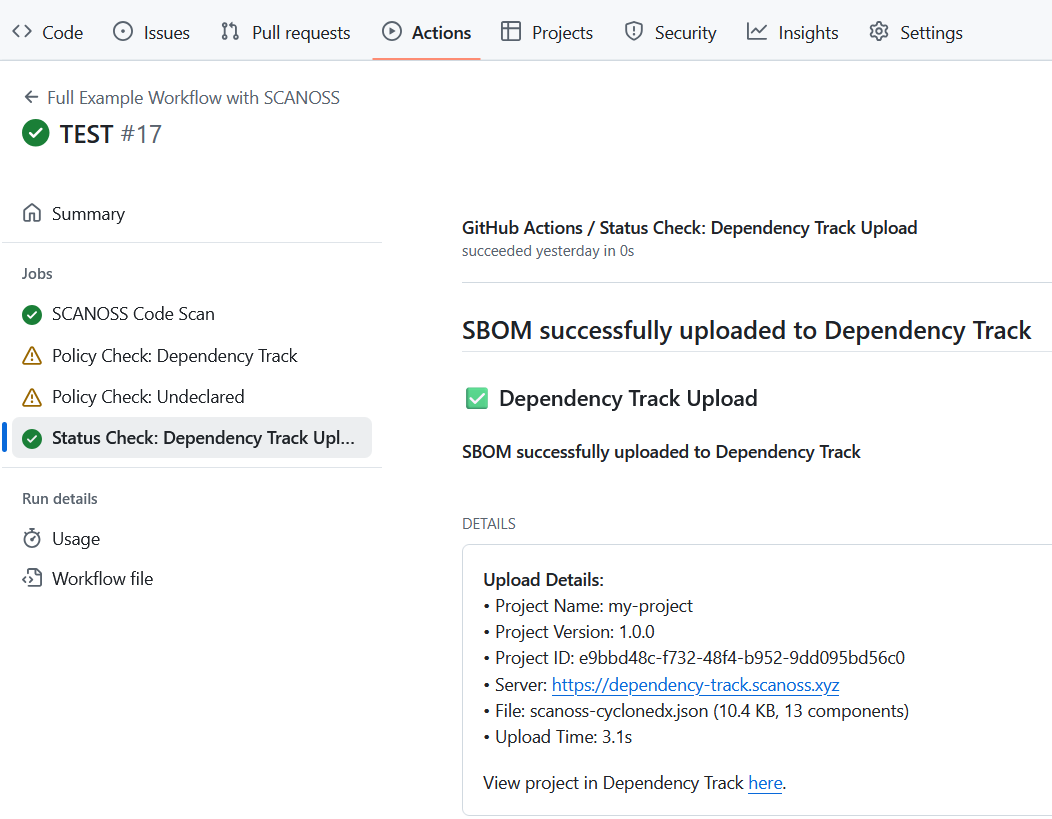
The summary page is divided into several sections that give an overview of the workflow’s results. The Scan Report displays a breakdown of all detected licenses, visualised as a pie chart and detailed in a table showing each license name, whether it’s copyleft and a reference URL. Policies summarise the results of various compliance checks, with the option to view more details for each policy. Details show whether the scan results were successfully uploaded to Dependency-Track, including a direct link to the corresponding project. Annotations capture any errors, warnings, or notices generated during the workflow, providing context for issues like failed commit comments or flagged code snippets. Artifacts list all files produced during the run, such as reports, policy results and SBOM exports, which can be downloaded for further review and analysis.Accessing Dependency Track
Open Your Project
Once the scan completes and results are uploaded to Dependency Track:- Go to the workflow run summary.
- Find the Details section.
- Click the View Project link.
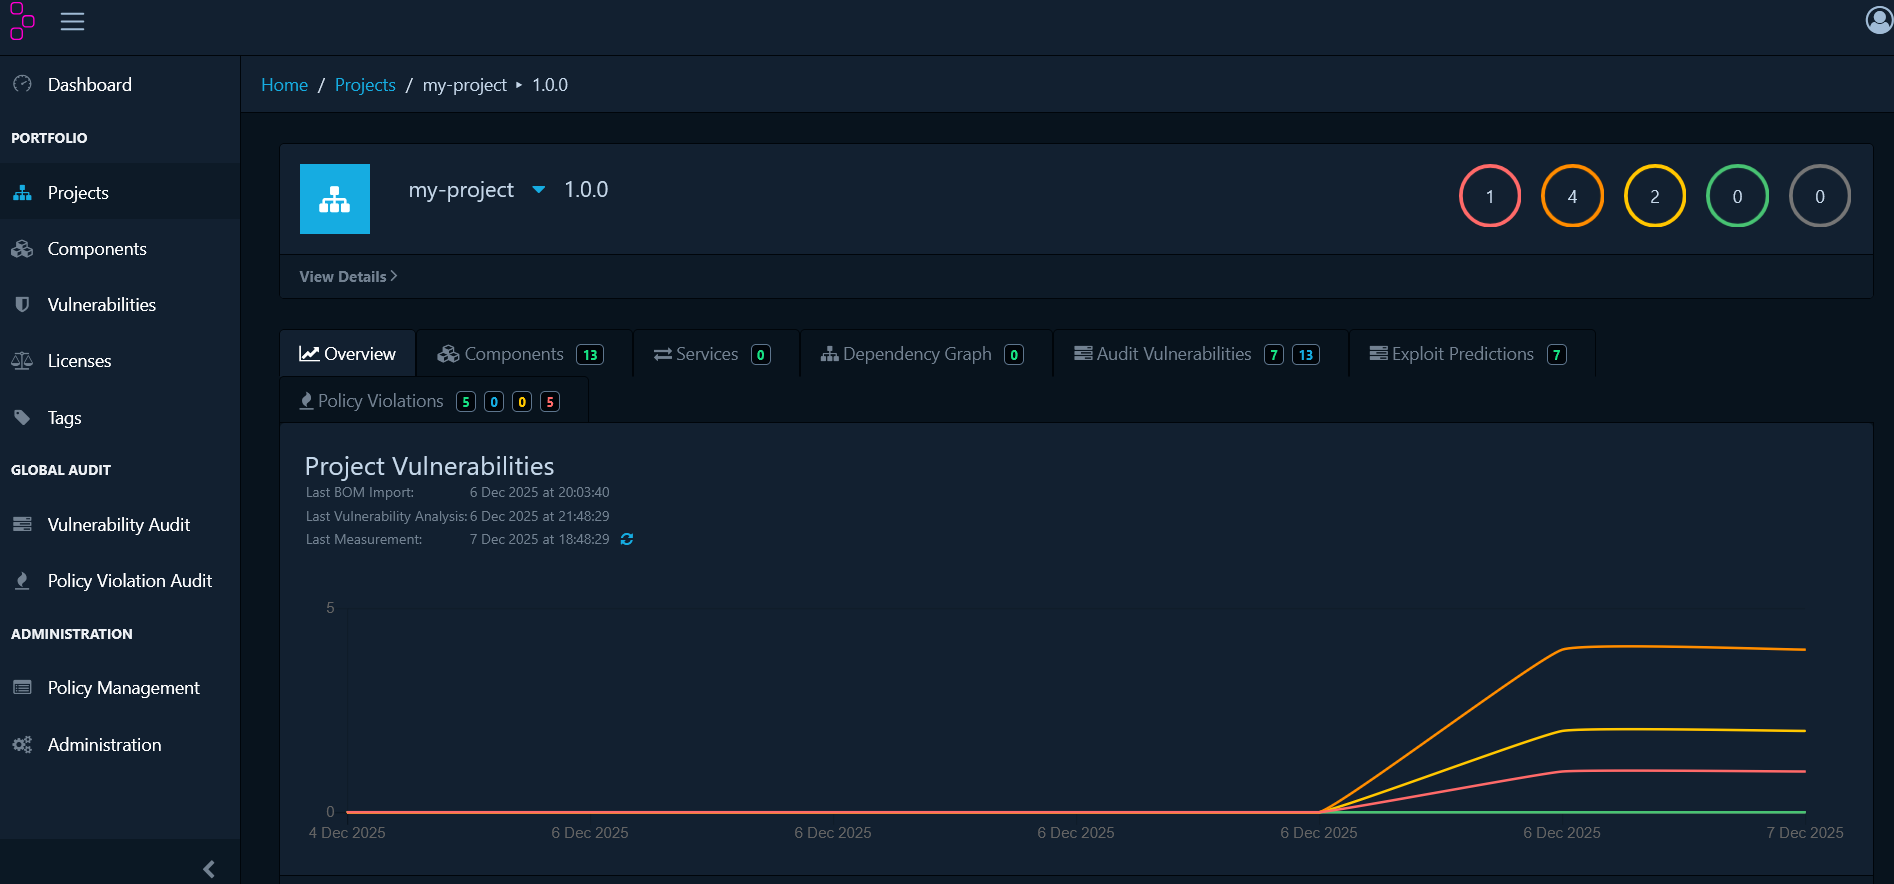
Components
The Components tab displays all open-source components detected in your project. This view helps you:- Understand which dependencies your project uses
- Identify risky or outdated software components
- Review the full inventory of third-party code in your application
Dependency Graph
The Dependency Graph tab visualises how your dependencies relate to each other. This is particularly useful for understanding:- Which components depend on a vulnerable package
- The impact of upgrading or removing a dependency
- Your project’s dependency hierarchy and transitive dependencies
Audit Vulnerabilities
The Audit Vulnerabilities tab lists all software components with known security vulnerabilities. This is where you’ll begin the remediation process for security risks in your project.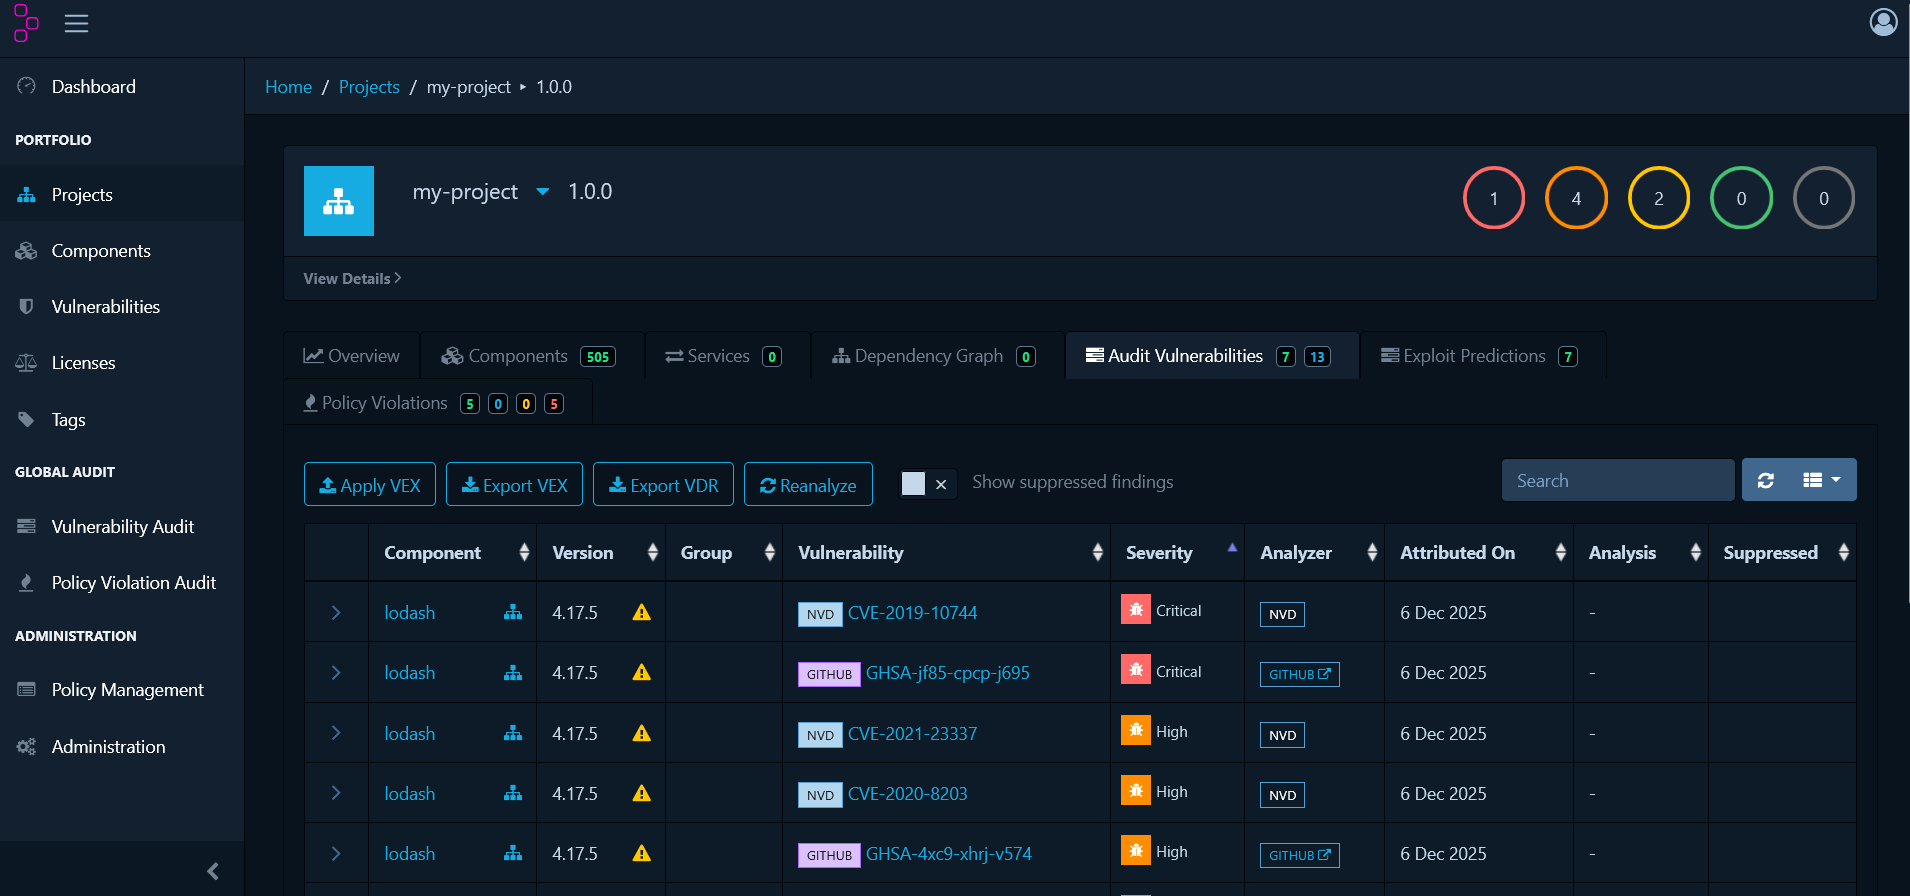
| Column | Description |
|---|---|
| Component | Package or library name |
| Version | Specific version used in your project |
| Group | Namespace or organisation for the component |
| Vulnerability | CVE, GHSA, or other vulnerability identifier |
| Severity | Impact level: CRITICAL, HIGH, MEDIUM, LOW |
| Analyzer | Source reporting the vulnerability |
| Attributed On | Date the vulnerability was linked to the component in your project |
| Analysis | Review status |
| Suppressed | Indicates the vulnerability has been marked as a false positive or intentionally ignored |
Working with Security and Compliance Findings
Now that you understand how to view your project’s data in Dependency-Track, let’s explore how to take action on findings. Dependency-Track provides two complementary approaches: Managing Vulnerabilities allows you to assess individual security threats and determine their actual risk to your application. Policy Management enables you to define organisational rules that automatically flag components violating your compliance standards.Managing Vulnerabilities
When you discover vulnerabilities in the Audit Vulnerabilities tab, each one requires review to determine its actual risk to your application. Click on any vulnerability to open its details panel and assign an analysis state: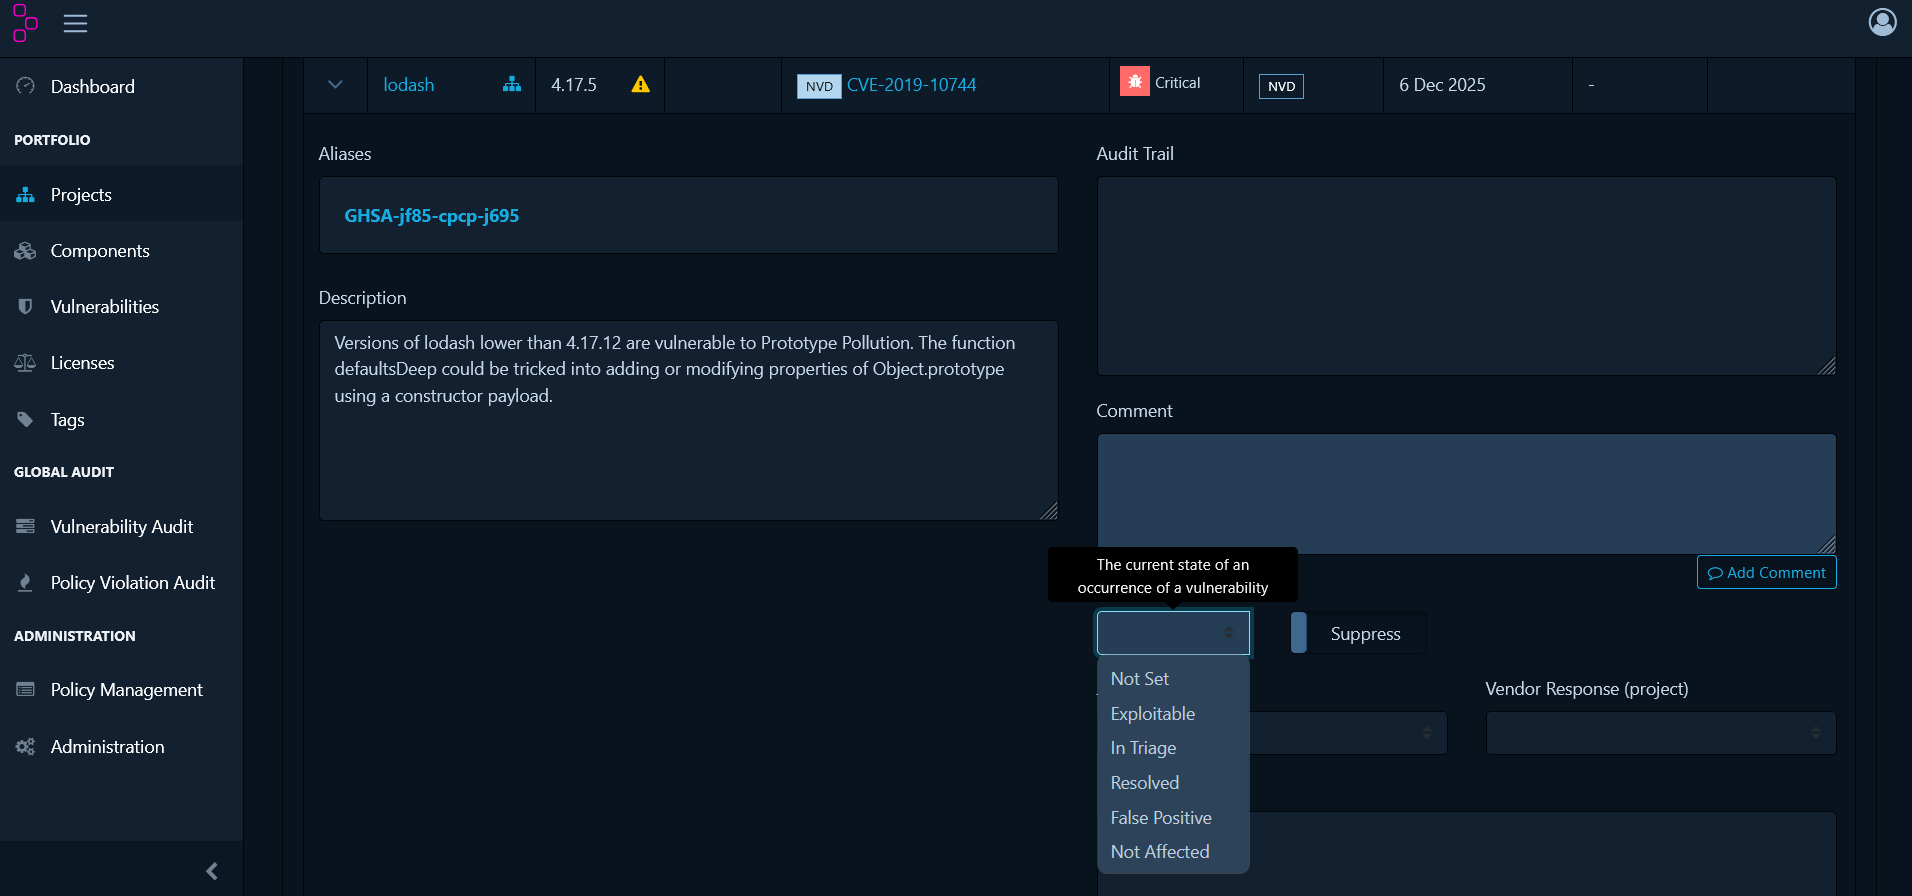
- Not Set - Default state when a vulnerability is first discovered and needs review.
- Exploitable - The vulnerability is confirmed and poses a real risk to your application.
- In Triage - Currently being investigated to determine if it’s exploitable.
- False Positive - The vulnerability doesn’t actually apply to how you’re using the component.
- Not Affected - Your specific usage or configuration isn’t vulnerable to this issue.
- Resolved - The vulnerability has been fixed (usually by upgrading the component).
Policy Management
While vulnerability management handles security threats as they’re discovered, policy management takes a proactive approach by defining rules that automatically identify compliance issues. This section covers how to create and enforce policies for license compliance, security thresholds, and component maintenance.Understanding Violation States
Before creating policies, it’s important to understand how Dependency-Track classifies policy violations. There are three violation states that determine the severity and required action:- INFO - Informational only. Tracks policy matches for visibility without blocking development or release.
- WARN - Warning level. Flags concerns that require review before release but allows development to continue.
- FAIL - Critical violation. Indicates a policy breach that must be resolved before release, though development work can continue.
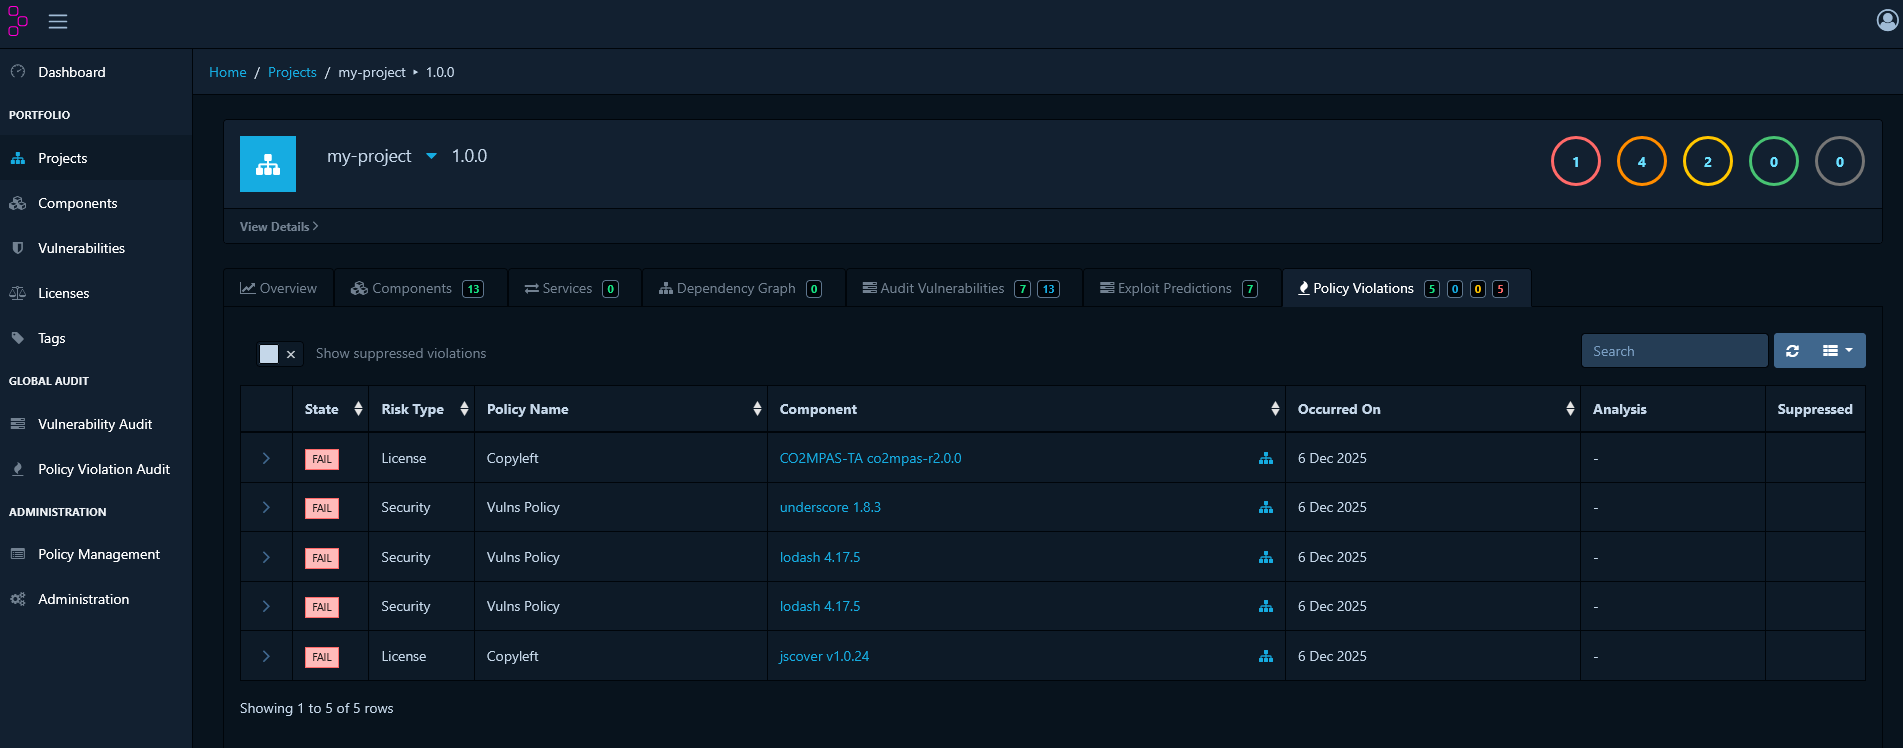
License Policies
License policies help you maintain compliance with your organization’s open-source licensing requirements. You can create policies to monitor and control which licenses are acceptable in your projects.Viewing License Policy Violations
To check for components that violate license policies, navigate to the Policy Violations tab. This dashboard provides a consolidated view of all breaches across your organization.Creating Policies for Specific Licenses
You can create a policy to flag a single license. This is useful for restricting or monitoring specific licenses that conflict with your organization’s requirements.- Navigate to Policy Management and click Create Policy.
- Add a Condition and select License as the type.
- Choose the specific license that will trigger the policy.
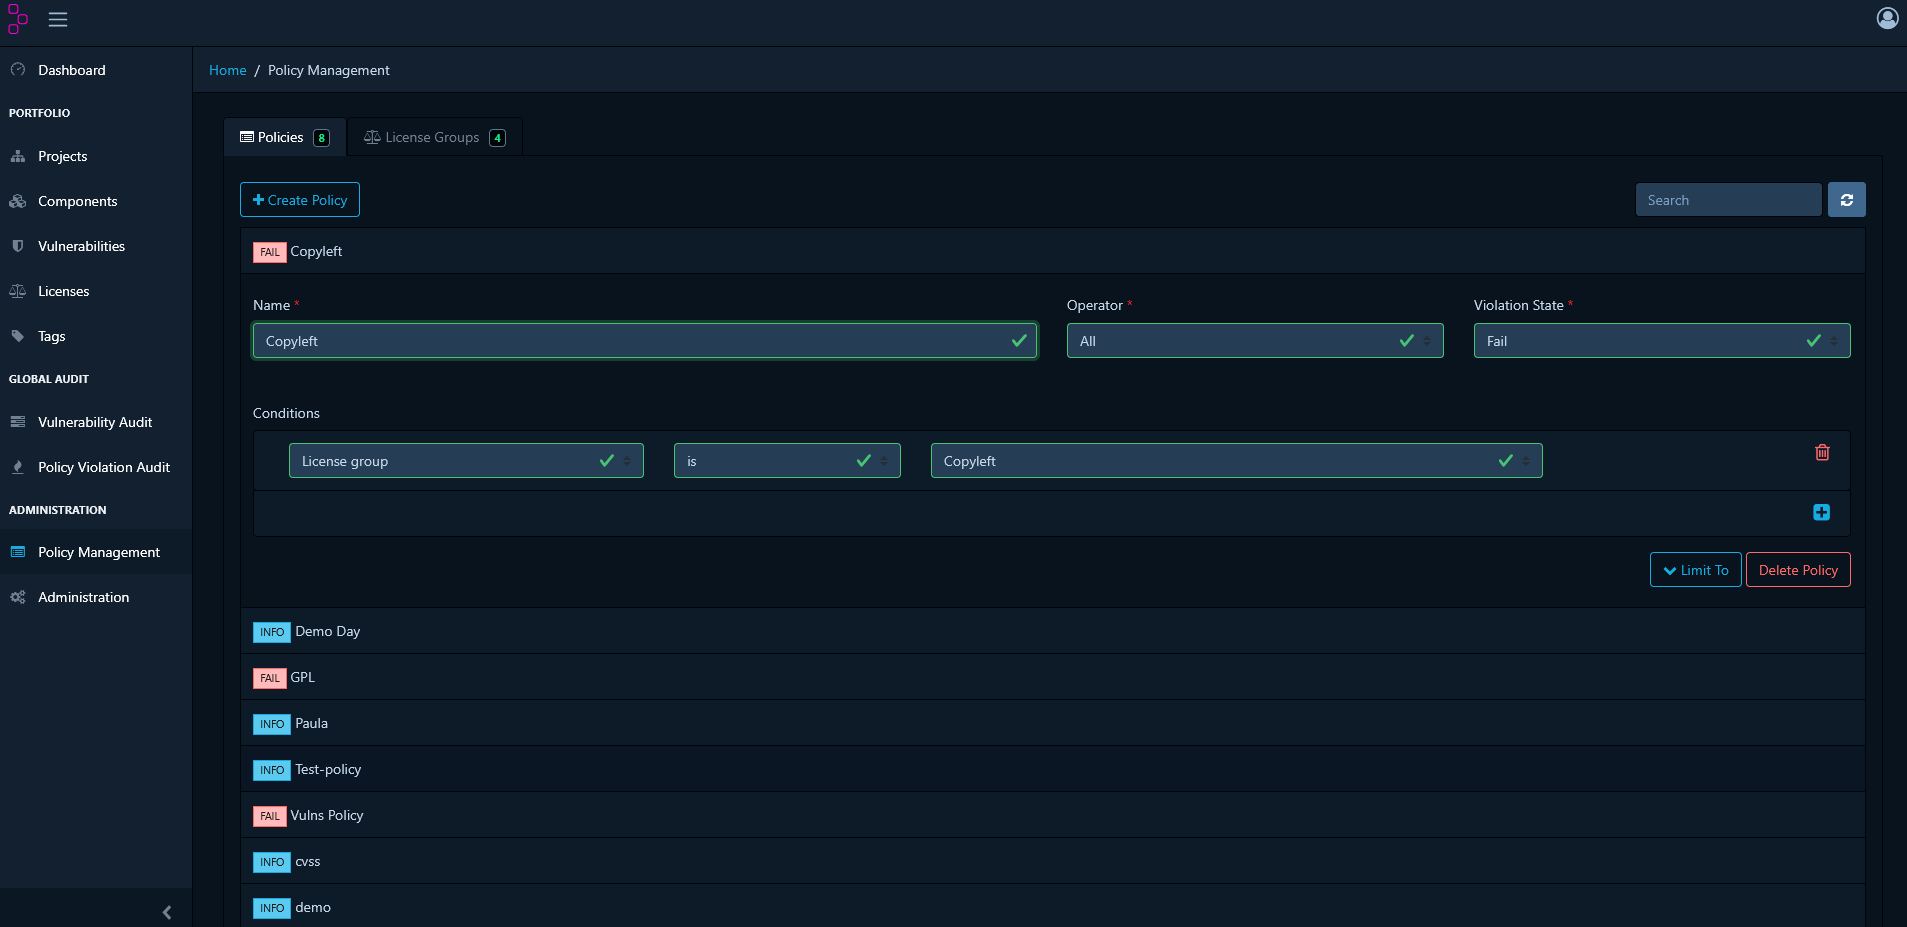
Creating Policies with License Groups
For broader control, you can group multiple licenses and apply a single policy to them. This simplifies management across your organisation and makes it easier to enforce consistent standards. Create a License Group- In Policy Management, go to the License Groups tab.
- Click Create License Group.
- Provide a name and add the desired licenses to the group.
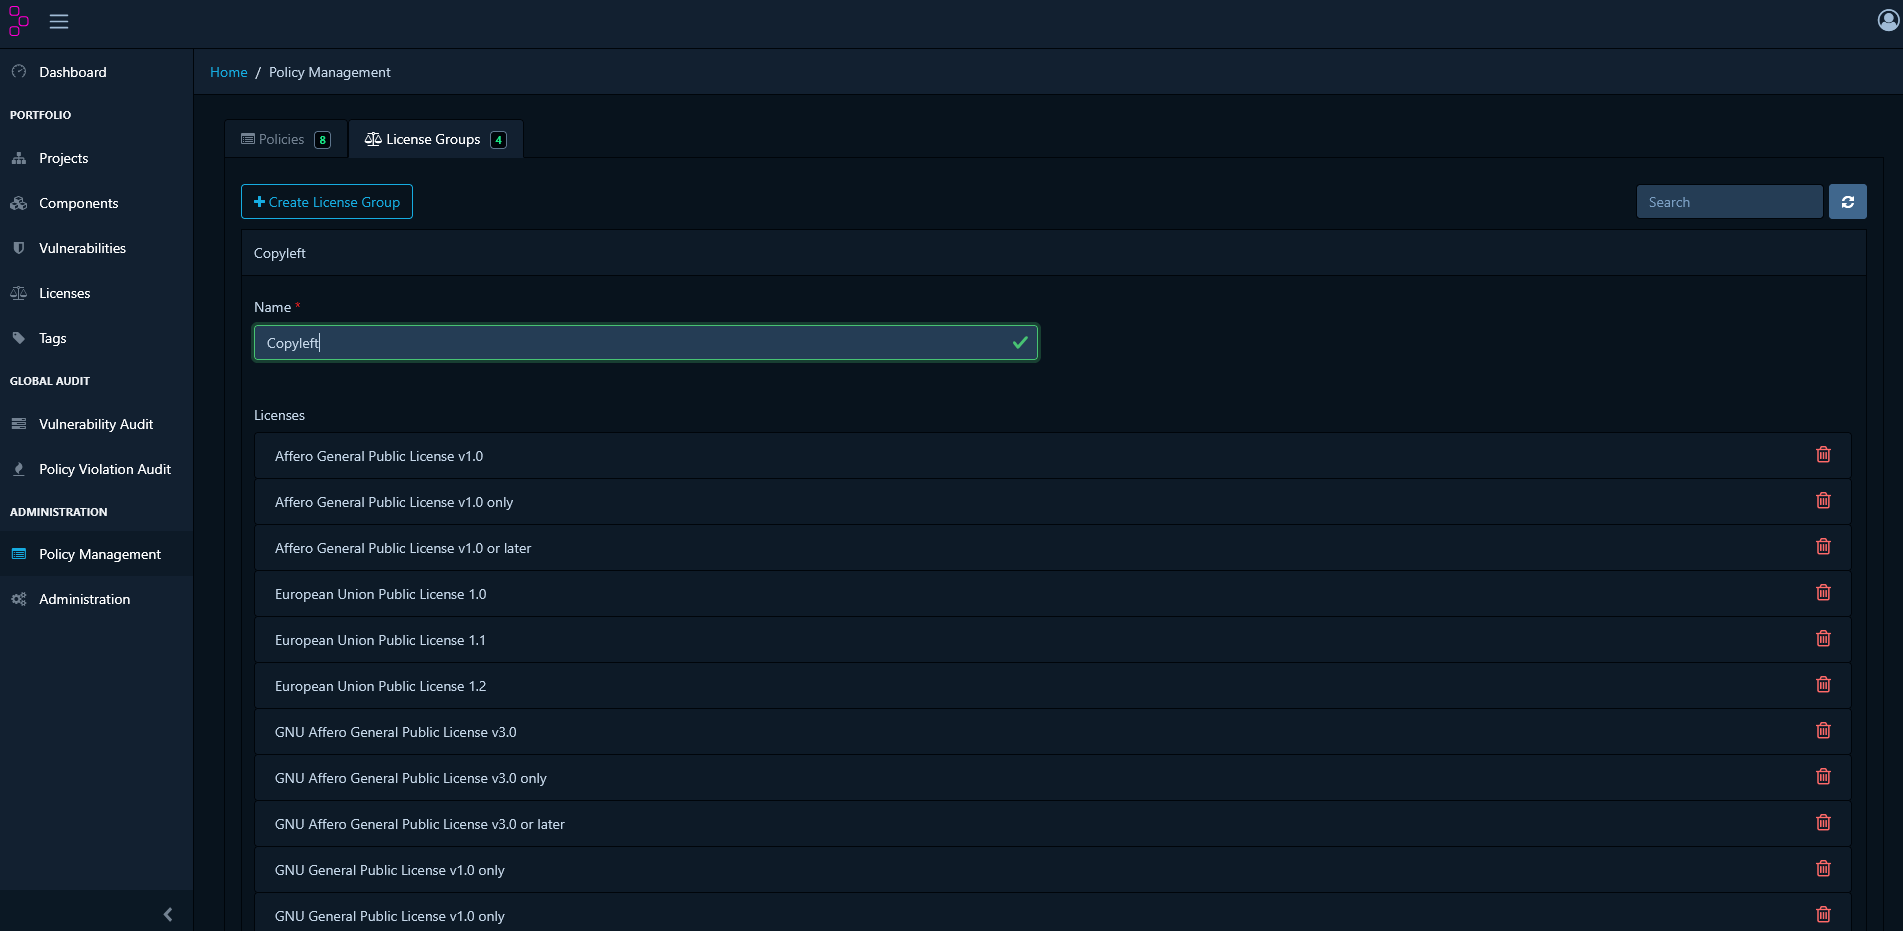
- Return to Policy Management and Create Policy.
- Add a Condition and select License Group as the type.
- Choose the license group you created.
Vulnerability Policies
In addition to manually reviewing vulnerabilities, you can create automated policies that flag components based on their security risk. This ensures that high-severity vulnerabilities are immediately visible and can even block releases if needed.Creating Policies Based on Vulnerability Severity
You can create policies that trigger based on the severity of a vulnerability (e.g., Critical, High, Medium, Low). This is ideal for automatically flagging components with high-severity vulnerabilities.- Go to Policy Management and click Create Policy.
- Add a Condition and select Severity as the type.
- Select the severity levels that will trigger the policy.
- Choose the appropriate violation state (INFO, WARN, or FAIL) based on your risk tolerance.
Creating Policies for Specific CVEs
You can also target specific vulnerabilities by their CVE identifier. This is useful for blocking or tracking known vulnerabilities that pose a significant risk to your organization, regardless of their general severity rating.- Go to Policy Management and click Create Policy.
- Add a Condition and select Vulnerability ID as the type.
- Enter the CVE identifier (e.g., CVE-2024-1234).
- Set the violation state based on the criticality of this specific vulnerability to your organization.
Component Age Policies
Component age policies help you maintain a healthy, up-to-date dependency footprint. Outdated components may no longer receive security updates, lack modern features, or violate organisational guidelines for technology freshness.Creating a Component Age Policy
Here’s how to create a policy that flags components older than a specified age:- Navigate to Policy Management: From the main menu, go to Policy Management.
- Create a New Policy: Click the Create Policy button.
-
Define the Policy Condition:
- Add a Condition and select Age from the dropdown menu.
- Set the operator to greater than.
- Specify the age threshold in days (e.g., 730 days for components older than 2 years).
- Set the Violation Type: Choose a violation type, such as Info, Warn, or Fail depending on the desired severity.
- Save the Policy: Save the policy to begin tracking component age across your projects.
Policy Triage
After establishing policies, you’ll inevitably encounter situations where a violation is technically accurate but acceptable in your specific context. Policy triage allows you to override policy violations on a case-by-case basis while maintaining an audit trail. To triage a policy violation:- Navigate to your project’s Policy Violations tab.
- Select the violation you want to triage.
- Click the Analyse or Audit button.
-
Select an analysis state:
- Not Set - No triage decision has been made yet
- Approved - The violation is reviewed and accepted as a known exception
- Rejected - The violation is not accepted and must be remediated
- Add a Comment explaining the triage decision and justification for future reference.