Workflow Overview
Workflow Process
- This workflow begins when a developer attempts to commit code to the repository. The commit operation automatically triggers the SCANOSS pre-commit hook, ensuring that SCANOSS checks are performed before code leaves the developer workstation.
- The SCANOSS pre-commit hook performs a scan of the repository contents and evaluates whether all detected open source components have been properly declared.
- When the scan identifies undeclared components, SCANOSS provides feedback describing the findings.
- After reviewing the scan output, developers must declare any missing components.
- Following component declaration, the developer performs another commit. This commit re-triggers the SCANOSS pre-commit hook, allowing the updated declarations to be validated.
- When the pre-commit scan passes successfully, the code can be pushed to the remote repository.
- A repository push triggers the SCANOSS GitHub Actions workflow.
- Following workflow execution, results are analysed within Dependency Track and evaluated against organisational policy requirements.
- Once all policy checks have passed, the pull request is eligible for merge.
Prerequisites
Before you begin, ensure you have:- Python 3.9 or later
- Git installed and configured
- GitHub repository with Actions enabled and workflow permissions configured
- SCANOSS API key for enterprise features
- Dependency Track API Key and URL
Setup Pre-Commit Hooks
SCANOSS Pre-Commit Hooks ensures that before you push any code to your repository, SCANOSS automatically checks for undeclared open source components. This shift-left approach helps you catch compliance issues early in the development process, before code reaches your team or production.Install Pre-Commit Framework
Open your terminal or command prompt and install the pre-commit framework:Configure the Hook
Navigate to your project root directory and create a new file named.pre-commit-config.yaml.
Add the following configuration to the file:
Install the Hook
In your terminal, while still in your project directory, run:.git/hooks directory. Once installed, the hook runs automatically before every git commit.
You should see output like:
Configure Environment Variables
Open your IDE or text editor and create a new file named.env in your project root directory.
Add your configuration:
Configure .gitignore
Before committing, you need to configure your.gitignore file to exclude SCANOSS generated files from version control.
Open your .gitignore file (or create one if it doesn’t exist) in your project root and add:
.gitignore file in your project root directory.
Commit Changes
Now test the hook to ensure it’s working correctly. Stage your files:Undeclared Components
If undeclared components are found, the commit will be blocked and you’ll see a summary table in your terminal:.scanoss/results.json in your project directory.
To resolve this:
The commit is blocked until you review the findings and declare the components. Follow the same workflow mentioned earlier:
-
Review the results: The detailed findings are in
.scanoss/results.jsonSee Understanding the Results to understand what each field means - Declare the components: Follow the Declare Components section to properly declare the detected components
-
Check in scanoss.json: After updating
scanoss.jsonwith your component declarations, stage the file: -
Retry your commit: Now retry the commit with your updated declarations:
Understanding the Results
After running a scan, SCANOSS generates aresults.json file containing all detected open source code in your project. The scan results are stored inside your project folder in a hidden directory named .scanoss. Look for the file:
- component: Name of the detected open source component
- file: The file in your project where open source code was detected
- file_hash: Unique identifier for the exact file content
- id: Match type - how the code was detected:
snippet- Part of a file matches known open source codefile- An entire file matches a known component
- matched: Similarity percentage
- lines: Line range in your file where the match was found
- oss_lines: Corresponding line range in the original open source component
- status: Current state of the finding:
pending- Newly detected, needs your reviewidentified- Properly documented in yourscanoss.json
- vendor: Component maintainer or organisation
- version: Detected version
- latest: Most recent available version
- url: Repository URL
- purl: Package URL
- release_date: When this version was released
- name: License identifier
- copyleft: Whether derivative works must use the same license
- patent_hints: Whether license contains patent clauses
- source: Where license was detected:
component_declared- From the component’s metadatafile_spdx_tag- From SPDX tags in the filelicense_file- From a LICENSE filefile_header- From file header comments
- incompatible_with: Licenses that conflict with this one
- url: Link to SPDX license definition
- checklist_url: Link to OSADL compliance checklist
- copyrights: Copyright statements found in the code
- cryptography: Cryptographic algorithms detected
- dependencies: Dependencies declared in the component
- health: Repository health metrics
- quality: Code quality scores
- vulnerabilities: Known CVEs affecting this component
"status": "pending" requires a decision. Review the match and decide:
- Include it in your
scanoss.jsonto declare intentional use - Dismiss it if it’s a false positive or your own code
- Replace it if the license is incompatible with your project
Declare Components
After reviewing the scan results, you need to review and declare any detected components that have not yet been identified. Component declaration can be performed using either SCANOSS-PY or SCANOSS-CC.SCANOSS-PY
To declare components using SCANOSS-PY, you must first install it. Follow the steps below in your terminal or command prompt. Standard Installation:scanoss.json:
scanoss.json file in your project root directory (the same directory that was scanned). This configuration file controls scanning behavior and manages component declarations, and must be created manually.
Add a self section to the scanoss.json file to include relevant project information. You can also expand the bom.include entries by adding comments for clarity.
You can view a sample scanoss.json schema using the following link.
scanoss.json settings:
SCANOSS-CC
To declare components using SCANOSS-CC, you must also have SCANOSS-PY installed, as it is a required dependency for SCANOSS-CC to function. Open your terminal (macOS/Linux) or PowerShell (Windows), then run the command appropriate for your operating system. macOS / Linux:.scanoss/results.json in the current directory.
Launch SCANOSS-CC to review results and make decisions interactively:
- Review Results: View side-by-side code comparisons showing your code matched against the detected open source component
- Make Decisions: Use the action icons at the top of the dashboard to:
- Include: Accept and declare the component as an intentional dependency
- Dismiss: Mark as false positive or your own code
- Replace: Flag for replacement with alternative code or different license
- Restore: Undo a previous decision and return the finding to a pending state
- Save Changes: Your decisions are saved to
scanoss.jsonat your project root. Future scans will remember these decisions.
Commit Changes
Now run the hook to verify that all components have been successfully declared.GitHub Actions Workflow
GitHub Actions provides automated workflows that run on specific events like pushes and pull requests. We’ll create a workflow that scans your code on every change.Create Workflow Directory
GitHub Actions expects workflow files to be stored in a specific location within your project. In the root of your project, create a folder named.github and inside it, create another folder called workflows.
Create the Workflow File
Create a file namedscanoss.yml in the .github/workflows directory with the following configuration. The SCANOSS Code Scan Action enhances your software development process by automatically scanning your code for security vulnerabilities and license compliance using configurable policies.
- Runs on pull requests to the
mainbranch - Performs a full scan of your repository
- Sends SBOM to Dependency Track for ongoing monitoring
- Validates copyleft, undeclared components, and Dependency Track policies
Understanding Workflow Triggers
The workflow file above useson: pull_request: branches: [main] to determine when SCANOSS runs. GitHub Actions workflows can be triggered by various events.
Understanding Compliance Policies
The workflow file usespolicies: undeclared,copyleft, depTrack to enforce compliance rules. SCANOSS can enforce these policies to fail your workflow when issues are detected:
undeclared- Fails if open source components aren’t declared inscanoss.jsoncopyleft- Fails if copyleft-licensed components are detecteddepTrack- This policy integrates with Dependency Track to check for security vulnerabilities, license violations, and policy compliance
Configure GitHub Secrets
Now that you’ve configured the GitHub workflow file in your project, navigate to your GitHub repository and add the required secrets. Settings → Secrets and variables → Actions Click New repository secret and add each of the following:| Secret Name | Description | Example |
|---|---|---|
DT_API_KEY | Dependency Track API key | abc123… |
DT_SERVER_URL | Dependency Track base URL | https://your-dependencytrack-url.com |
SCANOSS_API_KEY | SCANOSS API key | xyz789… |
Trigger Your First Workflow Run
Now that you’ve created your workflow file, let’s push and trigger the scan.Create a Pull Request
- Go to your GitHub repository
- You should see a prompt to “Compare & pull request” for your branch
- Click “Compare & pull request”
- Review the changes and click “Create pull request”
Monitor the Workflow Execution
Once you create the pull request, GitHub Actions will automatically trigger your workflow:- In your pull request, click the “Checks” tab
- You should see your “SCANOSS Scan” workflow running
- Click on the workflow to see real-time progress
- Wait for the workflow to complete
Review Pipeline Summary
After the workflow completes, navigate to the Summary page to review results.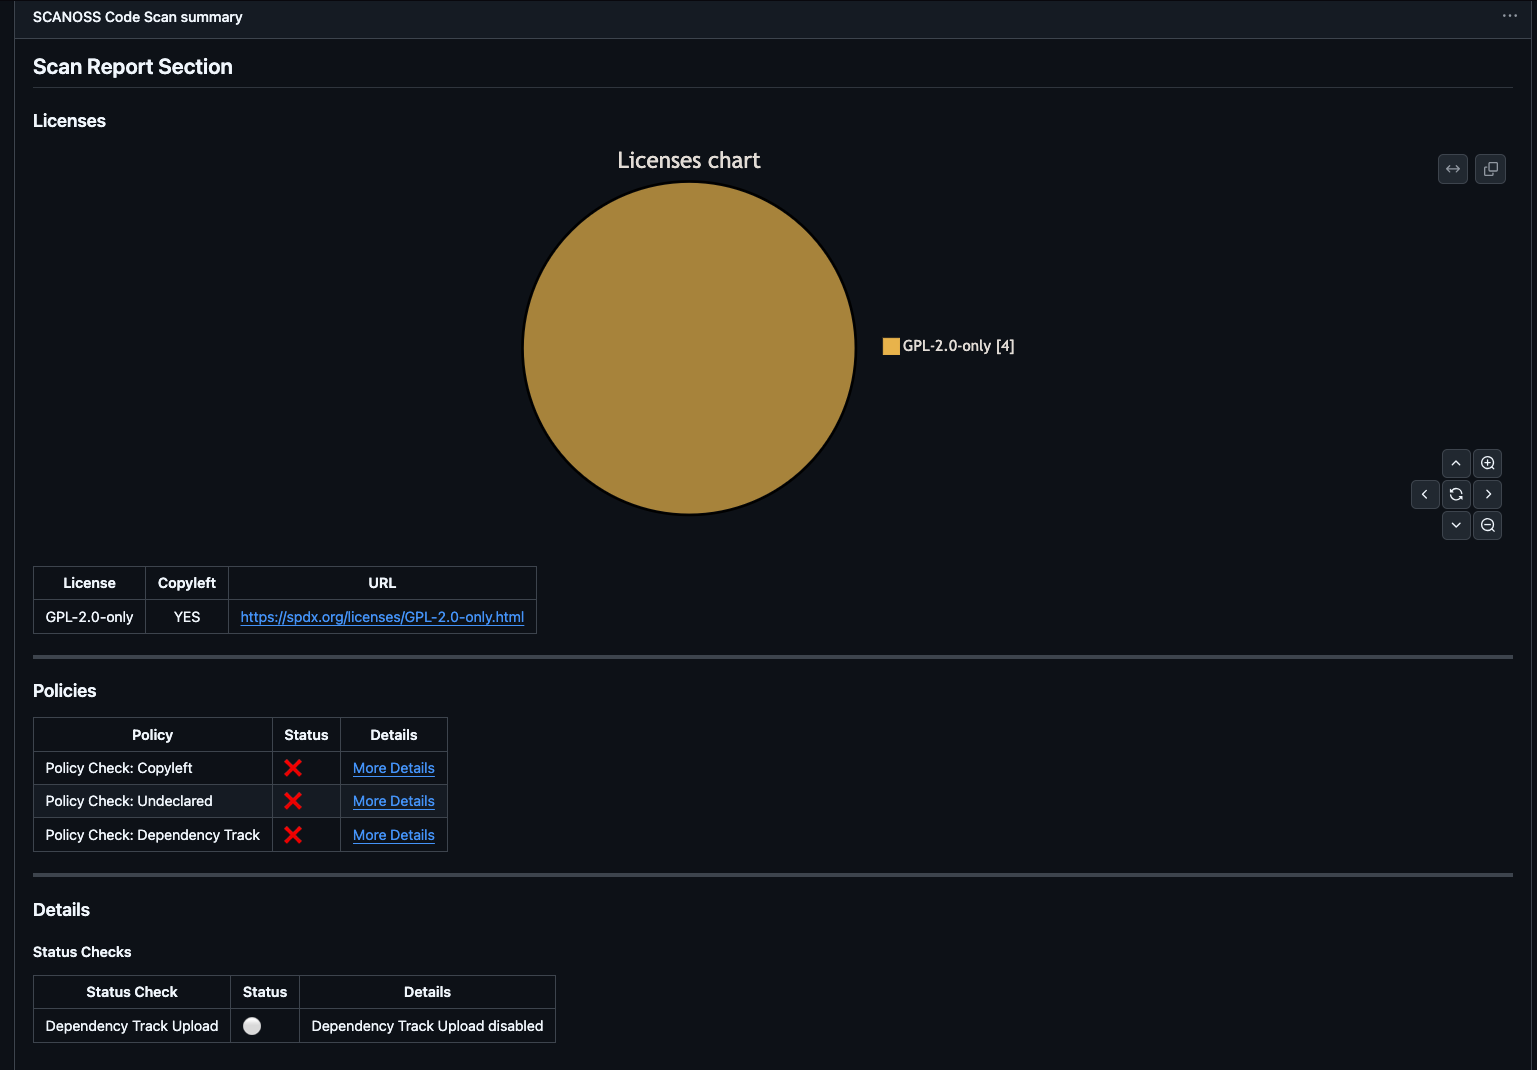
- Scan Report: License distribution pie chart and detailed license table
- Policies: Compliance check results (copyleft, undeclared, Dependency Track)
- Details: Upload status with direct link to Dependency Track project
- Artifacts: Downloadable reports, SBOMs and policy results
Access Dependency Track Dashboard
Once the scan uploads to Dependency Track, access the full dashboard for deeper analysis. In the pipeline summary’s Details section, click the View Project link to open your project in Dependency Track.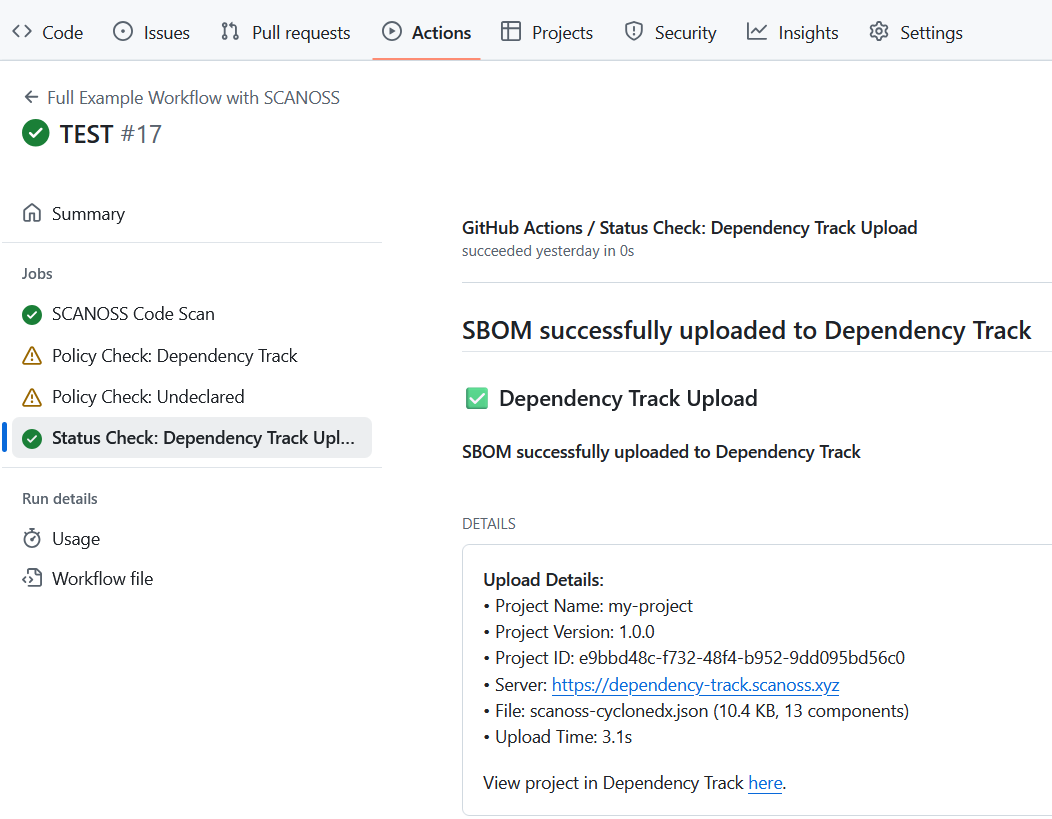

Explore Dashboard Sections
The Dependency Track dashboard provides several key views for managing your open-source dependencies:- Components: Complete inventory of detected components with their licenses, versions, and risk scores
- Dependency Graph: Visual representation of direct and transitive dependency relationships
- Audit Vulnerabilities: List of all components with known security vulnerabilities, organized by severity
Manage Vulnerabilities
Click on any vulnerability to open its details panel and assess its actual risk.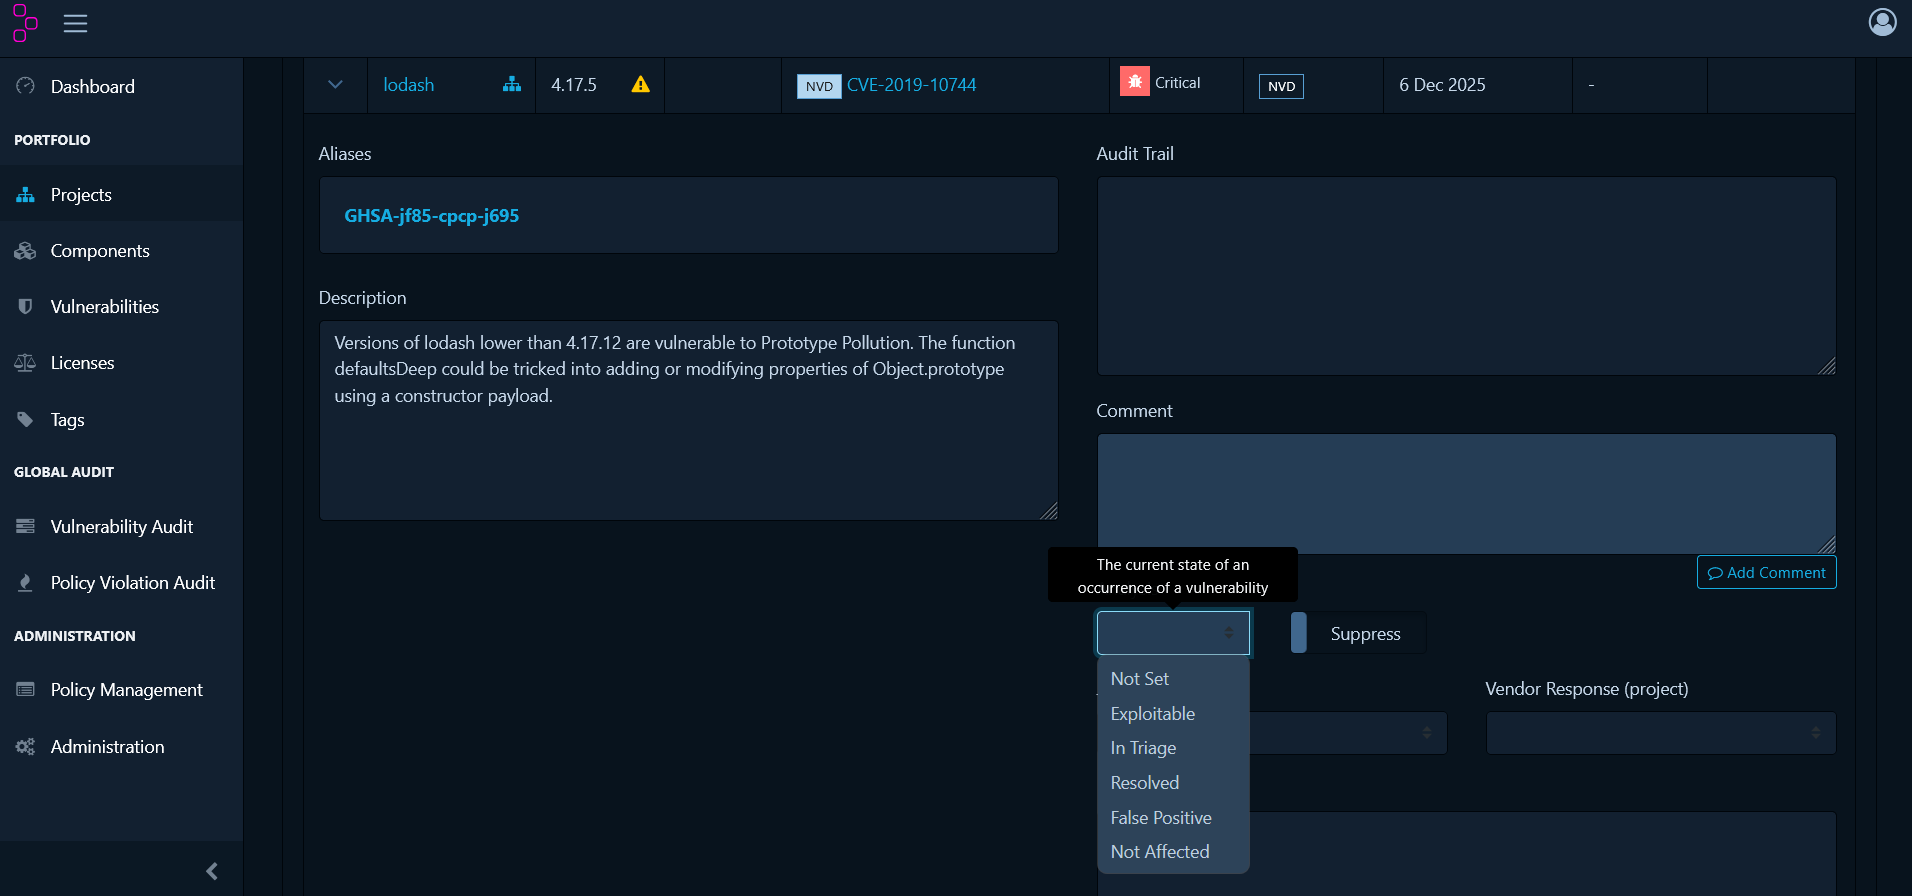
- Not Set - Default state requiring review
- Exploitable - Confirmed risk to your application
- In Triage - Currently under investigation
- False Positive - Doesn’t apply to your usage
- Not Affected - Your configuration isn’t vulnerable
- Resolved - Fixed (usually by upgrading)
- Click the vulnerability in the Audit Vulnerabilities tab
- Review the CVE details, affected versions and remediation advice
- Select an analysis state from the dropdown
- Add a comment explaining your decision
- Click Save
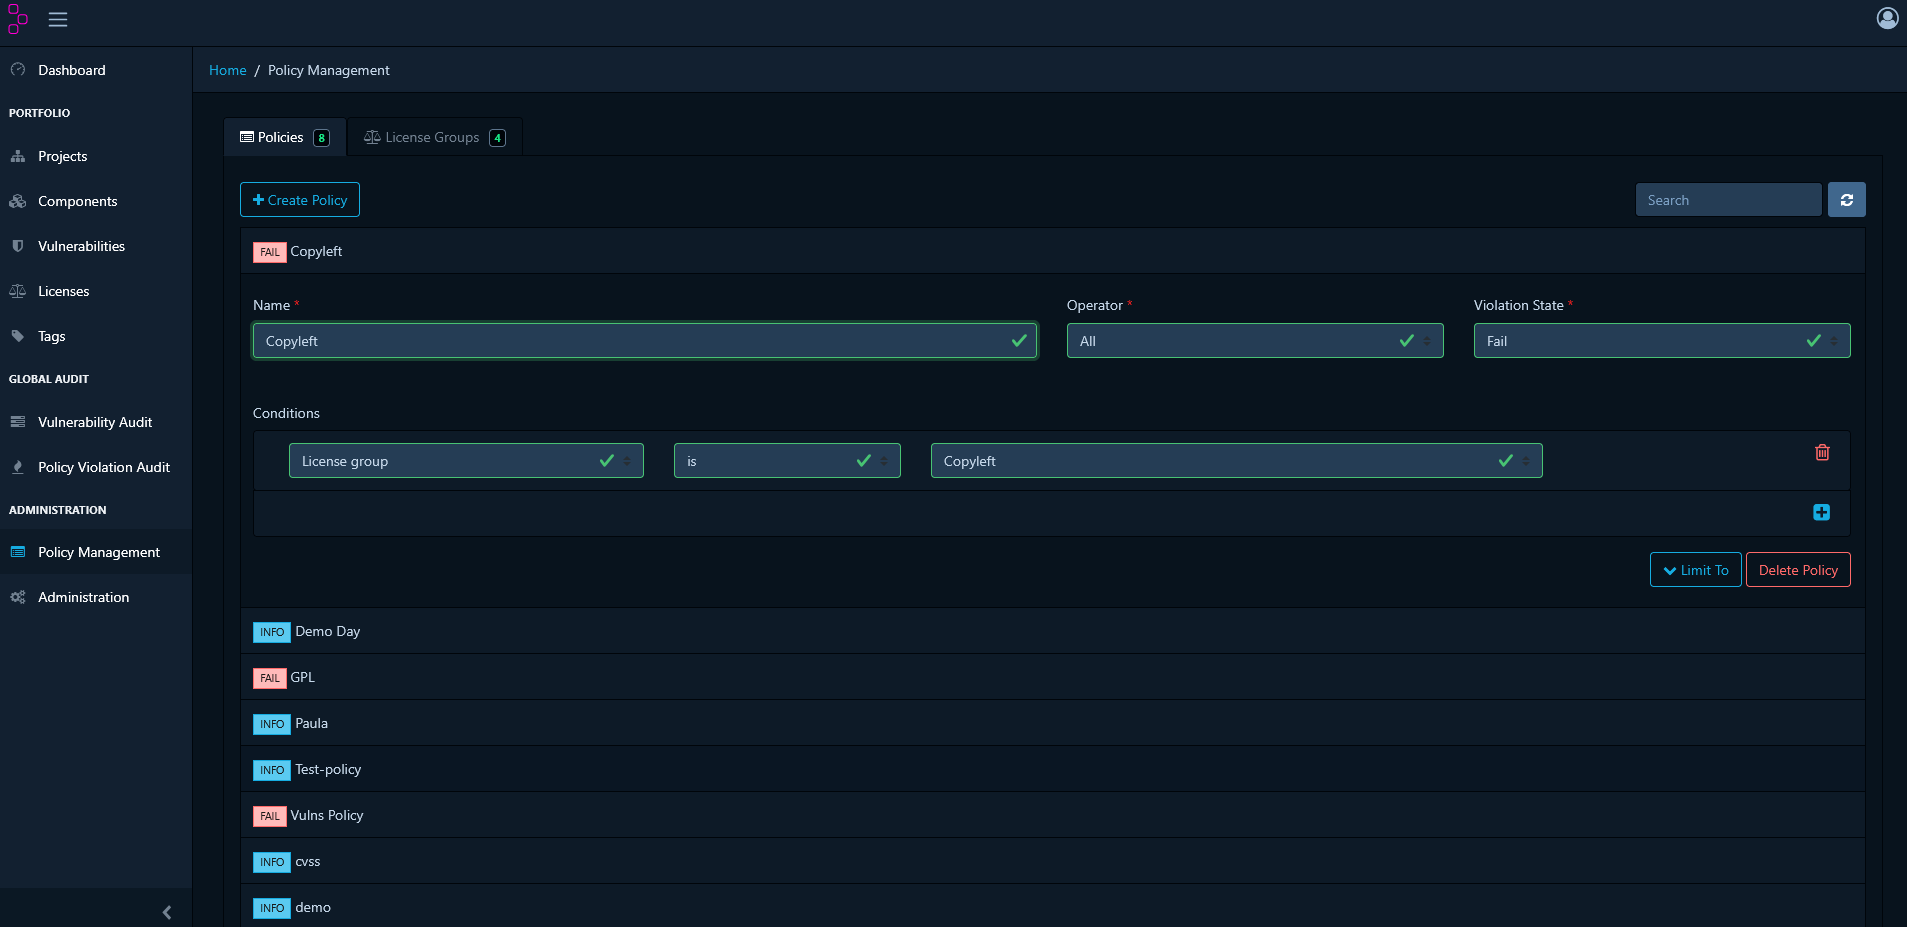
Define Organisational Policies
While vulnerability management handles security threats reactively, policy management takes a proactive approach by defining rules that automatically identify compliance issues. Navigate to Policy Management from the main menu to create policies.Create License Policies
Block Specific Licenses:- Click Create Policy
- Add a Condition and select License
- Choose the specific license to block (e.g., GPL-3.0)
- Set violation state to FAIL
- Save the policy
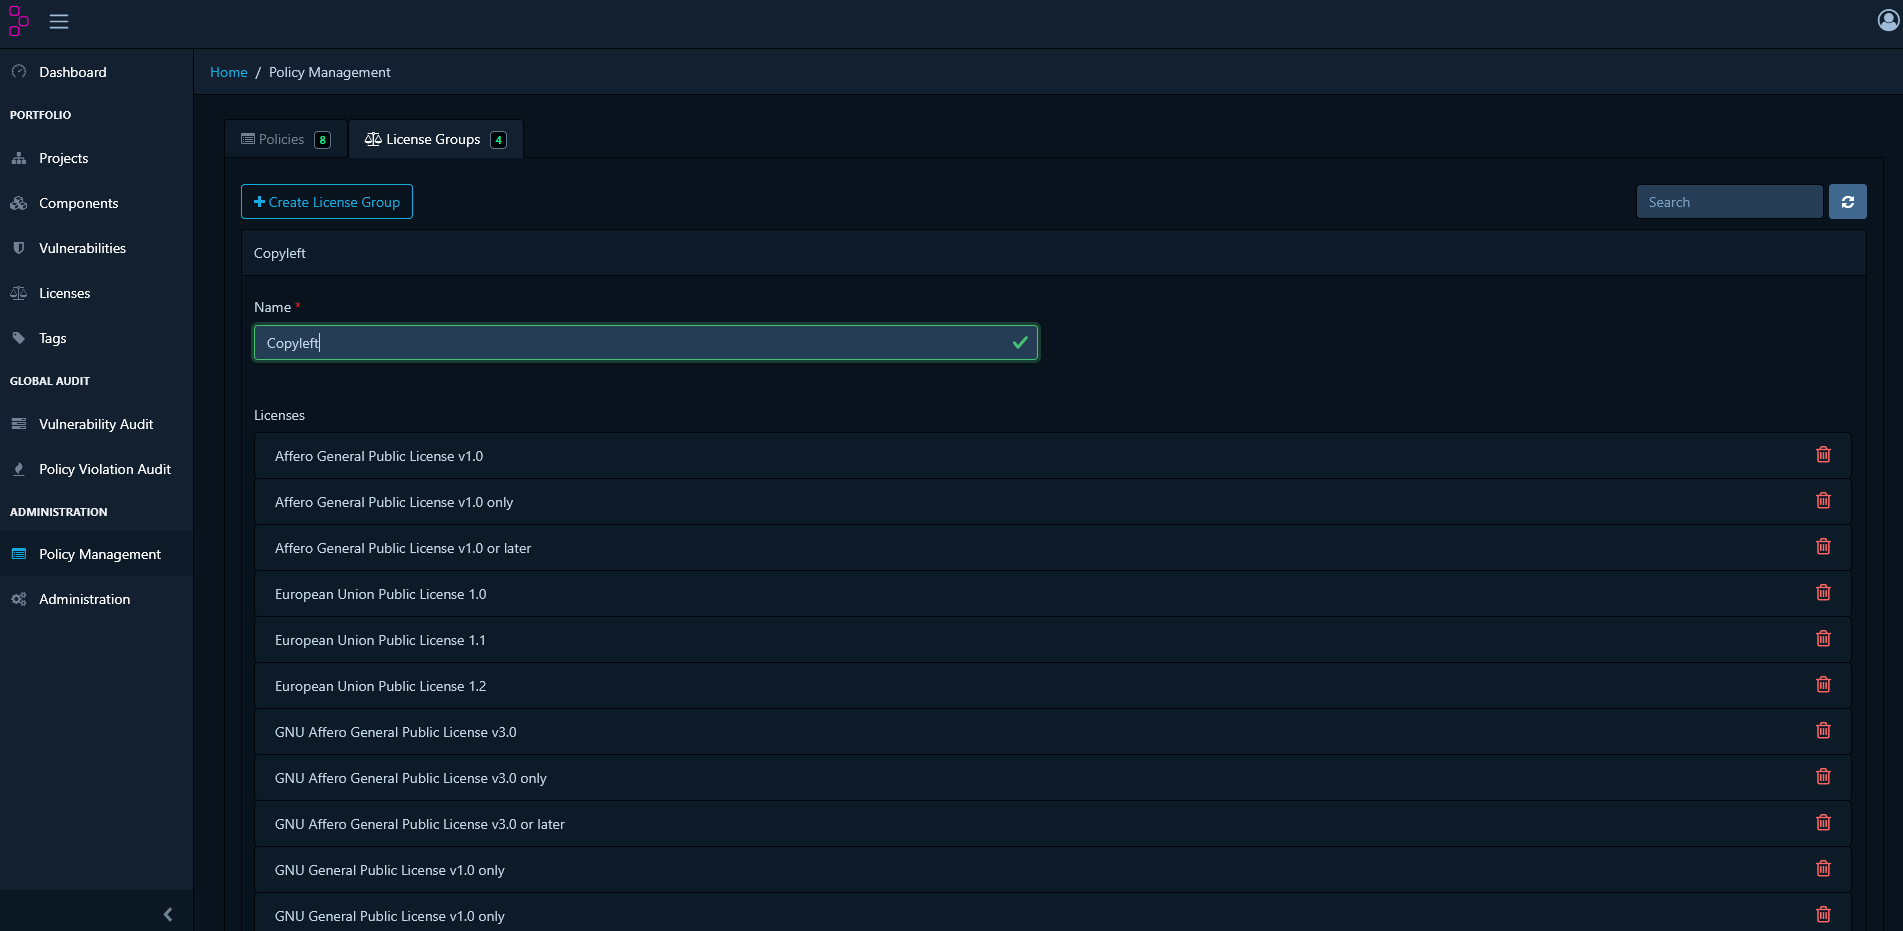
- Go to License Groups tab
- Click Create License Group
- Name it (e.g., “Copyleft Licenses”)
- Add licenses: GPL-2.0, GPL-3.0, AGPL-3.0
- Save the group
- Create Policy → Add Condition
- Select License Group
- Choose your license group
- Set violation state
- Save the policy
Create Vulnerability Policies
Flag High-Severity Vulnerabilities:- Click Create Policy
- Add a Condition and select Severity
- Select severity levels: CRITICAL, HIGH
- Set violation state to FAIL
- Save the policy
- Click Create Policy
- Add a Condition and select Vulnerability ID
- Enter CVE identifier (e.g., CVE-2024-1234)
- Set violation state to FAIL
- Save the policy
Create Component Age Policies
Flag outdated components that may lack security updates:- Click Create Policy
- Add a Condition and select Age
- Set operator to greater than
- Specify age threshold in days
- Set violation state to WARN
- Save the policy
Review Policy Violations
Navigate to your project’s Policy Violations tab to see all policy breaches: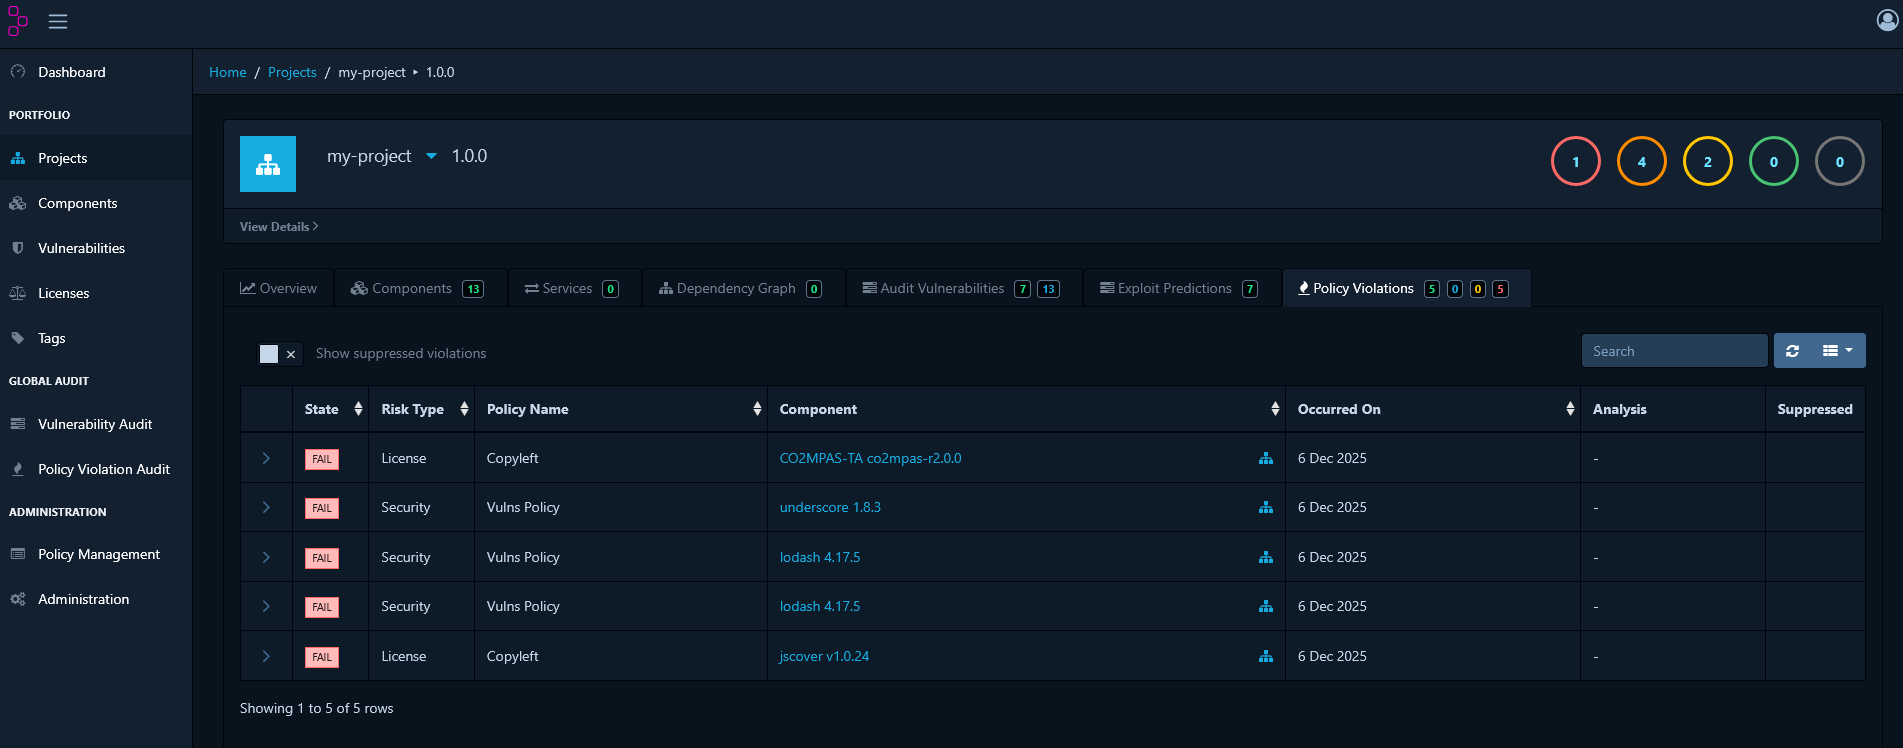
- INFO - Informational only, doesn’t block releases
- WARN - Requires review before release
- FAIL - Must be resolved before release
Triage Policy Violations
When a violation is technically accurate but acceptable in your context:- Navigate to Policy Violations tab
- Select the violation to triage
- Click Analysis
- Select an analysis state:
- Not Set - No decision made yet
- Approved - Reviewed and accepted as known exception
- Rejected - Not accepted, requires remediation
- Add a comment explaining the justification
- Save your decision