Exploring the Dashboard
After your Software Bill of Materials (SBOM) is uploaded to Dependency Track, you can explore various views to understand your project’s composition and risks.Components Tab
The Components tab displays all open-source components detected in your project. This view helps you:- Understand which dependencies your project uses
- Identify risky or outdated software components
- Review the full inventory of third-party code in your application
- Component Name: The package or library name
- Version: The specific version used in your project
- License: The licence under which the component is distributed
- Risk Score: An automated assessment of the component’s risk level, calculated from vulnerability severity and component age
- Vulnerabilities: Number of known vulnerabilities affecting the component
Dependency Graph
The Dependency Graph tab visualises how your dependencies relate to each other. This is particularly useful for understanding:- Which components depend on a vulnerable package
- The impact of upgrading or removing a dependency
- Your project’s dependency hierarchy and transitive dependencies
- Visual Hierarchy: Distinguish direct from transitive dependencies
- Interactive Navigation: Click on components to explore relationships
- Impact Analysis: Understand the cascading effects of changes
Audit Vulnerabilities
The Audit Vulnerabilities tab lists all software components with known security vulnerabilities. This is where you will begin the remediation process for security risks in your project.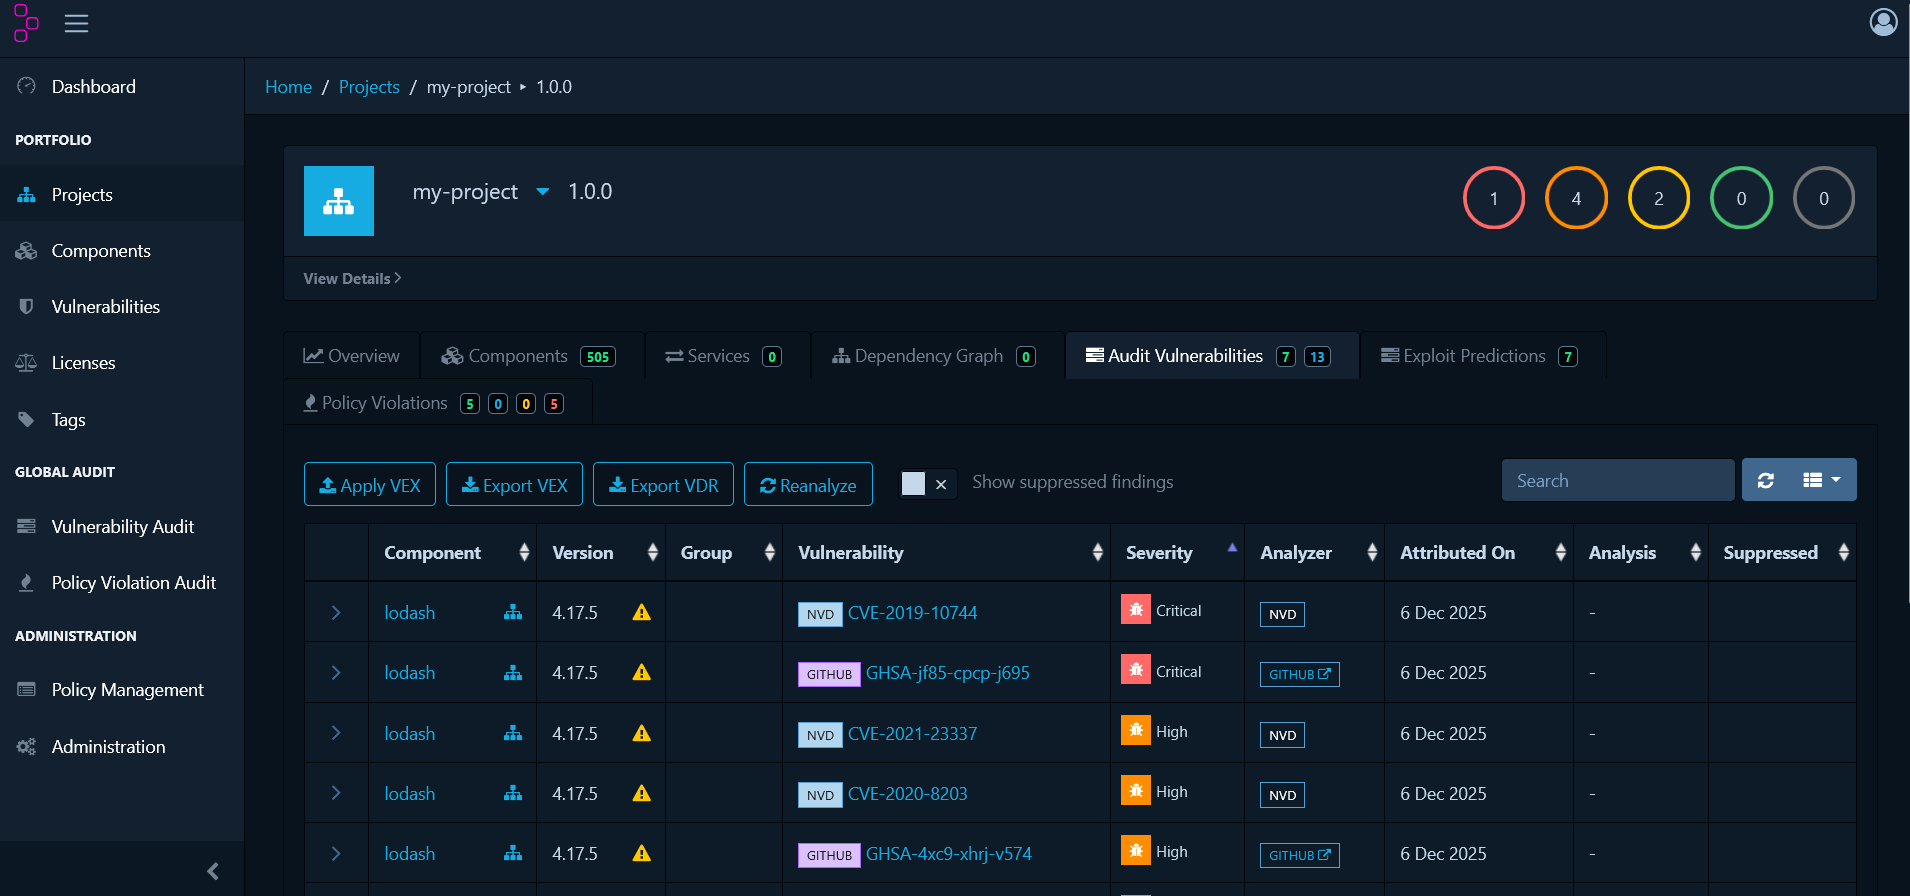
| Column | Description |
|---|---|
| Component | Package or library name |
| Version | Specific version used in your project |
| Group | Namespace or organisation for the component |
| Vulnerability | CVE, GitHub Security Advisory (GHSA), or other vulnerability identifier |
| Severity | Impact level: CRITICAL, HIGH, MEDIUM, LOW |
| Analyzer | The vulnerability source that reported this finding (e.g. NVD, OSS Index, GitHub Advisories) |
| Attributed On | Date the vulnerability association was recorded in Dependency Track |
| Analysis | Current review status |
| Suppressed | Indicates the vulnerability has been marked as a false positive or intentionally ignored |
Managing Vulnerabilities
When you discover vulnerabilities in the Audit Vulnerabilities tab, each one requires review to determine its actual risk to your application.Assessing Vulnerabilities
Click on any vulnerability to open its details panel: The details panel shows:
- CVE Identifier: The unique vulnerability identifier
- Description: Detailed information about the vulnerability
- CVSS Score: Common Vulnerability Scoring System rating
- Affected Versions: Which versions of the component are vulnerable
- Remediation: Recommended fixes, typically upgrade instructions
- References: Links to additional information
Analysis States
Assign an analysis state to document your assessment:- Not Set — Default state when a vulnerability is first discovered and requires review
- Exploitable — The vulnerability is confirmed and poses a real risk to your application
- In Triage — Currently being investigated to determine whether it is exploitable
- False Positive — The vulnerability does not apply to how the component is used in this project
- Not Affected — Your specific usage or configuration is not vulnerable to this issue
- Resolved — The vulnerability has been fixed, typically by upgrading the component
How to Analyse a Vulnerability
- Click the vulnerability in the Audit Vulnerabilities tab
- Review the CVE details, affected versions, and remediation guidance
- Assess whether the vulnerability affects your specific implementation
- Select an analysis state from the dropdown
- Add a comment explaining your decision
- Click Save
Example: Triaging a False Positive
Scenario: Your project useslodash@4.17.15, which has CVE-2020-8203, but the
vulnerable defaultsDeep function is not used.
Steps:
- Open the vulnerability for CVE-2020-8203
- Review the description and confirm it affects
defaultsDeep - Verify your codebase does not call
defaultsDeep - Set the analysis state to False Positive
- Add comment: “The vulnerable
defaultsDeepfunction is not used in this project. Verified via code search.” - Save the analysis
Policy Management
Whilst vulnerability management addresses security threats as they are discovered, policy management takes a proactive approach by defining rules that automatically identify compliance issues.Understanding Violation States
Before creating policies, understand how Dependency Track classifies policy violations:- INFO — Informational only. Tracks policy matches for visibility without blocking development or release
- WARN — Warning level. Flags concerns that require review before release but allows development to continue
- FAIL — Critical violation. Indicates a policy breach that must be resolved before release
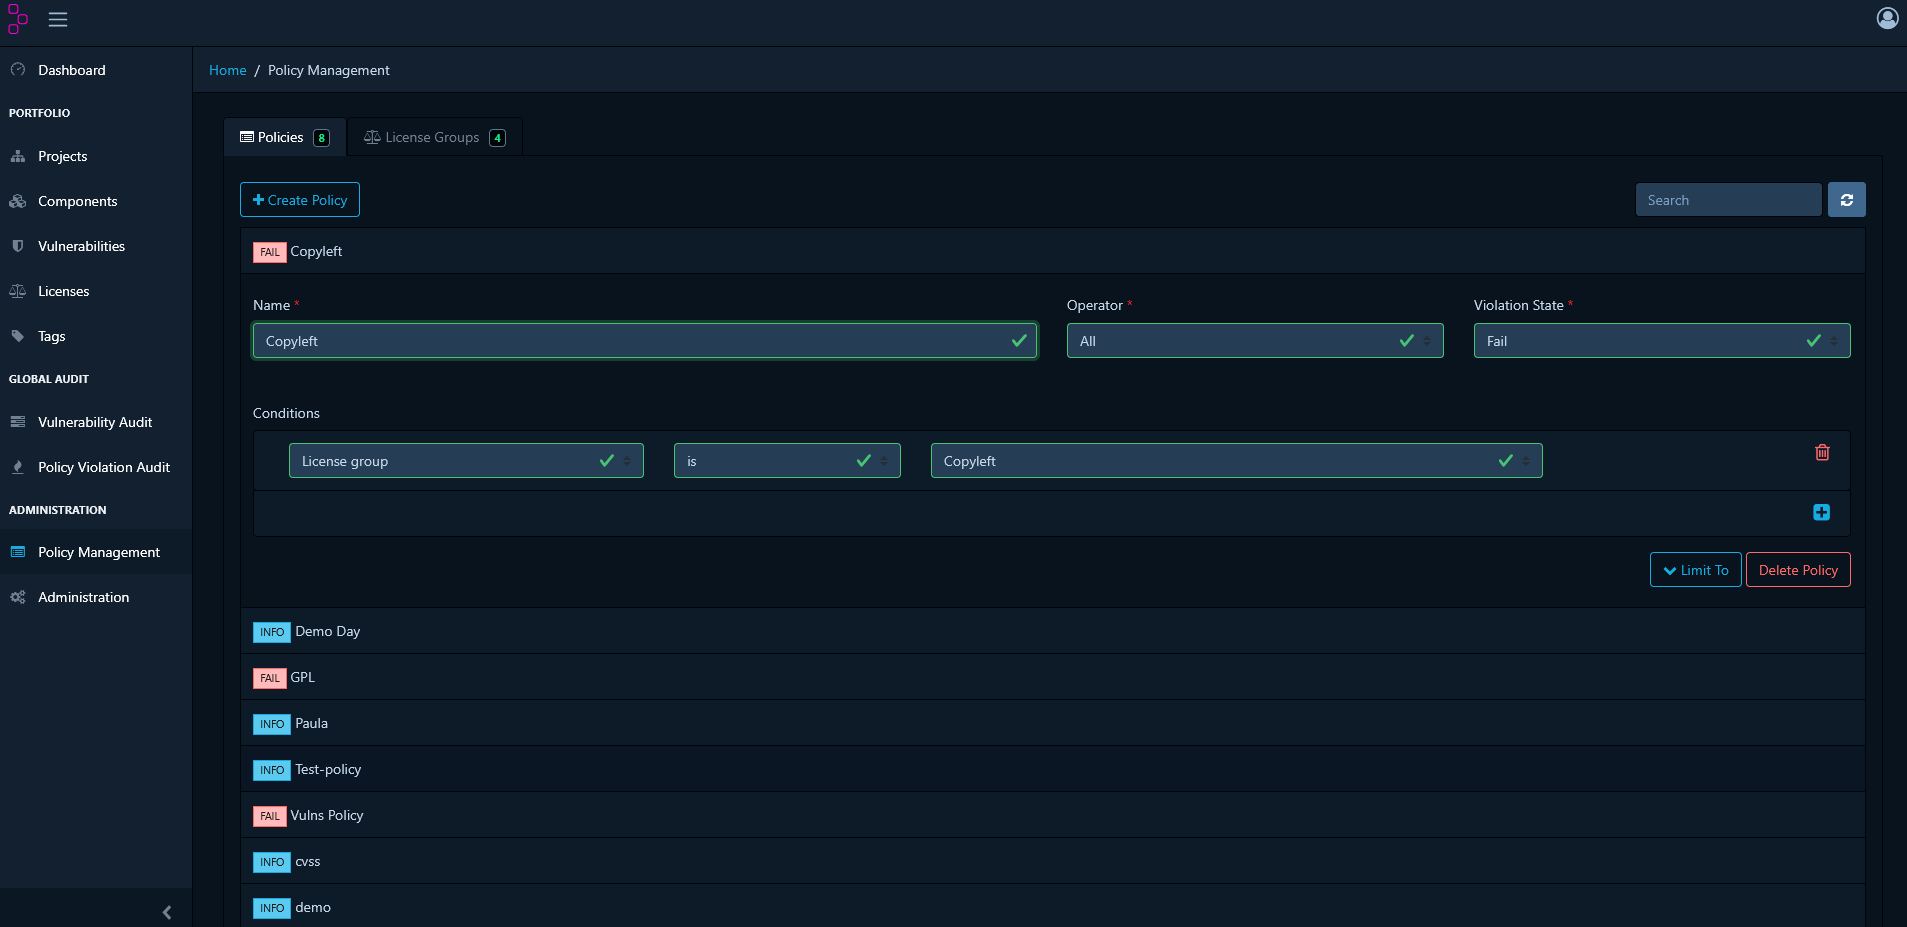
Creating Licence Policies
Licence policies help you maintain compliance with your organisation’s open-source licensing requirements.Block a Specific Licence
Use Case: Your organisation prohibits GPL-3.0 due to copyleft requirements. Steps:- Navigate to Policy Management and click Create Policy
- Name the policy: “Block GPL-3.0”
- Add a Condition and select License as the type
- Choose GPL-3.0 from the licence list
- Set the violation state to FAIL
- Add a description: “GPL-3.0 is prohibited due to copyleft restrictions”
- Save the policy
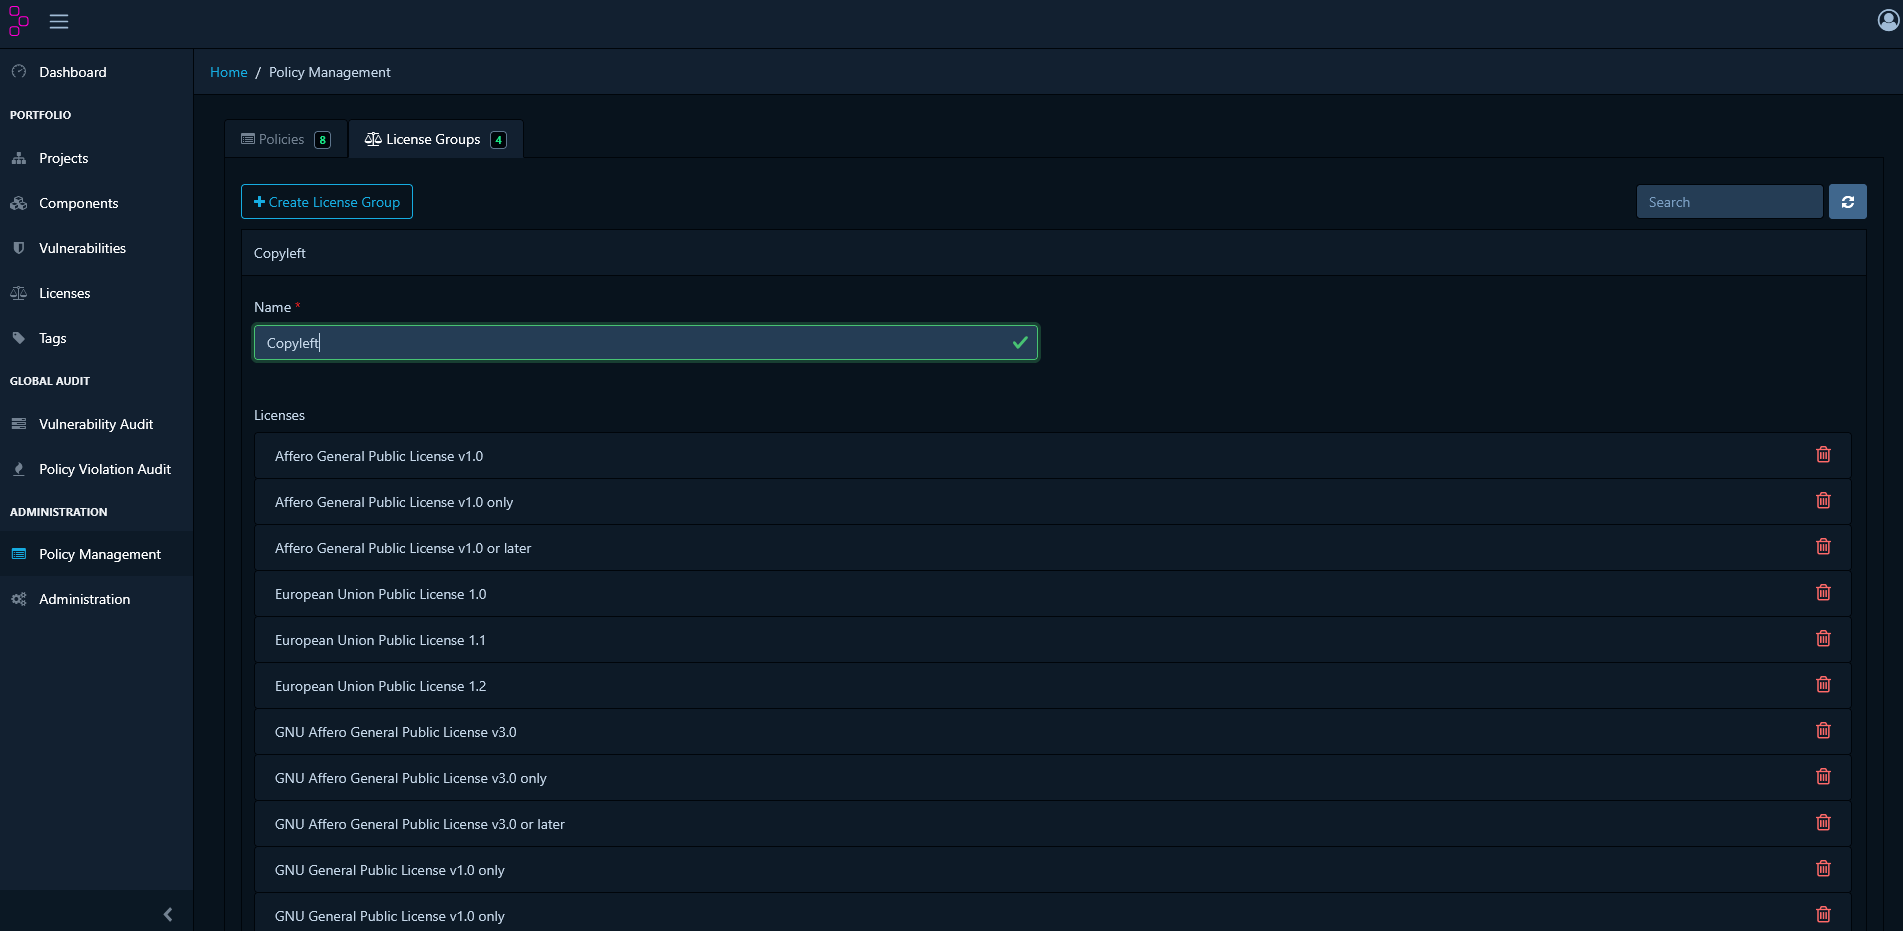
Block Multiple Licences Using Licence Groups
Use Case: Your organisation prohibits all copyleft licences. Step 1: Create a Licence Group- In Policy Management, go to the License Groups tab
- Click Create License Group
- Name it: “Copyleft Licenses”
- Add the following licences:
- GPL-2.0
- GPL-3.0
- LGPL-2.1
- LGPL-3.0
- AGPL-3.0
- Save the group
- Return to Policy Management and click Create Policy
- Name the policy: “Block Copyleft Licenses”
- Add a Condition and select License Group as the type
- Choose the “Copyleft Licenses” group
- Set the violation state to FAIL
- Add a description: “All copyleft licences are prohibited”
- Save the policy
Creating Vulnerability Policies
In addition to manually reviewing vulnerabilities, you can create automated policies that flag components based on their security risk.Flag High-Severity Vulnerabilities
Use Case: Automatically block releases containing critical or high-severity vulnerabilities. Steps:- Go to Policy Management and click Create Policy
- Name the policy: “Block Critical and High Vulnerabilities”
- Add a Condition and select Severity as the type
- Select severity levels: CRITICAL and HIGH
- Set the violation state to FAIL
- Add a description: “Components with critical or high vulnerabilities must be remediated before release”
- Save the policy
Block Specific CVEs
Use Case: Your security team has identified CVE-2024-1234 as a critical threat to your infrastructure. Steps:- Go to Policy Management and click Create Policy
- Name the policy: “Block CVE-2024-1234”
- Add a Condition and select Vulnerability ID as the type
- Enter CVE-2024-1234 in the field
- Set the violation state to FAIL
- Add a description: “CVE-2024-1234 poses a critical threat to this infrastructure and must be remediated before release”
- Save the policy
Creating Component Age Policies
Component age policies help you maintain an up-to-date and well-maintained set of dependencies.Flag Outdated Components
Use Case: Identify components older than two years that may no longer receive security updates. Steps:- Navigate to Policy Management and click Create Policy
- Name the policy: “Warn on Components Older Than 2 Years”
- Add a Condition and select Age from the dropdown
- Set the operator to greater than
- Specify 730 days (2 years)
- Set the violation state to WARN
- Add a description: “Components older than 2 years should be evaluated for updates”
- Save the policy
Example: Comprehensive Policy Set
The following is a complete policy set for a typical organisation:Licence Policies
- Block Strong Copyleft (FAIL) — GPL-3.0, AGPL-3.0
- Warn on Weak Copyleft (WARN) — LGPL-2.1, LGPL-3.0
- Info on Permissive (INFO) — MIT, Apache-2.0, BSD-*
Vulnerability Policies
- Block Critical Vulnerabilities (FAIL) — Severity: CRITICAL
- Block High Vulnerabilities (FAIL) — Severity: HIGH
- Warn on Medium Vulnerabilities (WARN) — Severity: MEDIUM
Component Health Policies
- Warn on Old Components (WARN) — Age > 730 days
- Info on Unlicensed Components (INFO) — No licence declared
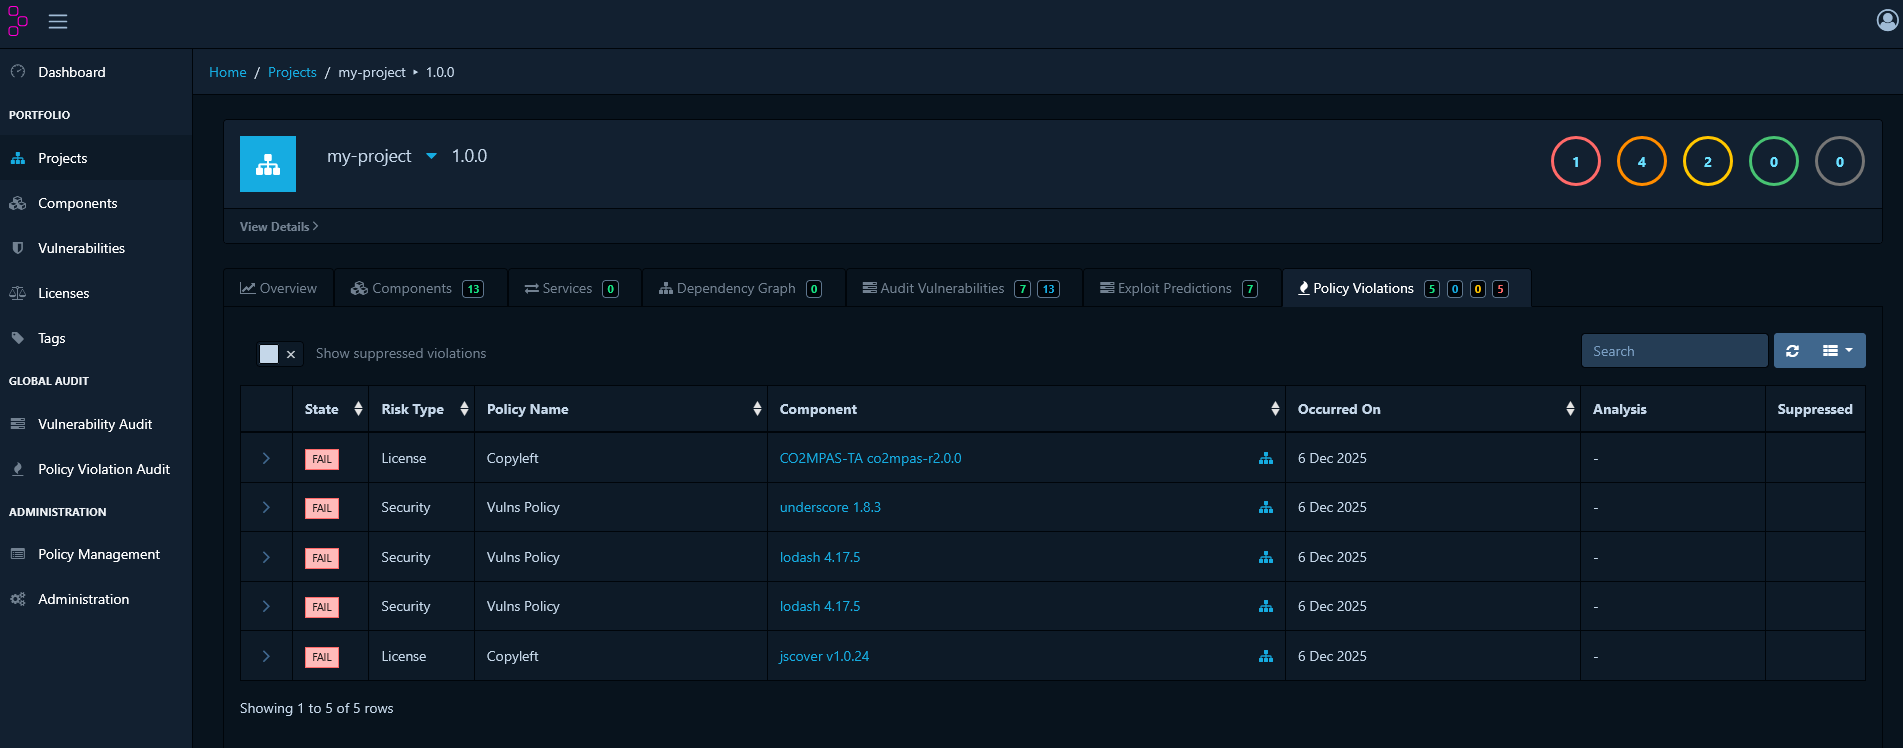
Reviewing Policy Violations
Navigate to your project’s Policy Violations tab to see all policy breaches.Violation Details
Each violation entry shows:- Policy Name: Which policy was violated
- Component: The affected component
- Condition: What triggered the violation
- State: INFO, WARN, or FAIL
- Timestamp: When the violation was detected
Filtering Violations
Use filters to focus on specific types:- Filter by violation state (INFO, WARN, FAIL)
- Filter by policy name
- Filter by component
- Search by text
Policy Violation Review
After establishing policies, you may encounter violations that are technically accurate but acceptable within your specific context.When to Review a Violation
Review a violation when:- The component is essential and has no suitable alternative
- The vulnerability does not apply to your usage
- A waiver has been granted by the security or legal team
- The issue is scheduled for remediation in a future release
How to Review a Violation
- Navigate to your project’s Policy Violations tab
- Select the violation you want to review
- Click the Analyze button
- Select a review state:
- Not Set — No review decision has been made
- Approved — The violation has been reviewed and accepted as a known exception
- Rejected — The violation is not accepted and must be remediated
- Add a Comment explaining the decision and justification
- Click Save
Example: Approving a Licence Exception
Scenario: Your project uses a component with a GPL-2.0 licence, but a commercial licence agreement is in place. Steps:- Navigate to the Policy Violations tab
- Locate the GPL-2.0 violation
- Click Analyze
- Set the state to Approved
- Add comment: “Commercial licence agreement in place with vendor. See legal ticket #12345. Approved by Legal on 2024-01-15.”
- Save the decision
Best Practices
Vulnerability Management
- Prioritise by Severity: Address Critical and High vulnerabilities first
- Assess Context: Not all vulnerabilities affect all implementations
- Document Decisions: Always add comments explaining your analysis
- Regular Reviews: Schedule periodic reviews of vulnerabilities in the “In Triage” state
- Track Remediation: Link vulnerabilities to remediation tickets or pull requests
Policy Management
- Start Simple: Begin with a small number of critical policies and expand over time
- Use Groups: Licence and component groups make policy management scalable
- Balance Strictness: Use INFO and WARN for monitoring; use FAIL for critical requirements
- Version Control: Document policy changes and the rationale behind them
- Team Alignment: Ensure development, security, and legal teams agree on policies
Violation Review Process
- Require Justification: Always document why a violation is approved
- Time-Limited Approvals: Set expiration dates for temporary waivers
- Escalation Path: Define who can approve different types of violations
- Audit Trail: Maintain a complete history of all review decisions
- Regular Reviews: Periodically re-evaluate approved violations to confirm they remain valid
Reporting and Metrics
Viewing Project Metrics
The project dashboard provides key metrics:- Total Components: Number of dependencies in your project
- Vulnerable Components: Components with known vulnerabilities
- Policy Violations: Active policy breaches
- Risk Score: Overall project risk assessment
- Inherited Risk Score: Risk inherited from transitive dependencies
Exporting Reports
To generate a report:- Go to your project in Dependency Track
- Click the Reports or Export button
- Select a report format:
- PDF: Human-readable compliance report
- CSV: Data export for further analysis
- CycloneDX / SPDX: SBOM formats
Portfolio Metrics
The portfolio view provides the following metrics across all projects:- Trends in vulnerability counts over time
- Policy compliance rates by project
- Mean time to remediation
- Risk scores by project or portfolio
Troubleshooting
Vulnerabilities Not Appearing
Problem: A scan completes but no vulnerabilities are shown. Solution:- Verify that vulnerability sources are enabled in Dependency Track
- Check that NVD mirroring is up to date
- Ensure components are correctly matched using valid Package URL (PURL) format
- Refresh vulnerability data: Administration → Vulnerability Sources
Policy Not Triggering
Problem: Components violate a policy but no violations appear. Solution:- Verify the policy is enabled
- Check that policy conditions match the component attributes
- Ensure the policy is scoped to the project via tags or project groups
- Review the policy operator (equals, contains, greater than, etc.)
Excessive False Positives
Problem: Too many vulnerabilities are appearing as false positives. Solution:- Use analysis states to document and track false positives
- Suppress at the component level to apply the suppression across multiple projects
- Configure vulnerability sources to exclude low-quality feeds
- Consider using Vulnerability Exploitability eXchange (VEX) documents to formally assert which vulnerabilities do not affect your product
Next Steps
To build on the workflows described in this guide:- Establish Workflows: Define your team’s process for vulnerability triage
- Automate: Integrate with your CI/CD pipeline for continuous monitoring
- Expand Coverage: Add further projects to Dependency Track
- Customise Policies: Extend policies to cover your organisation’s specific licensing, security, and compliance requirements
- Monitor Trends: Use metrics to track improvement over time