Resources
Always refer to the SCANOSS GitHub Repository for the most up-to-date version numbers and configuration parameters, as these may change with new releases.
Prerequisites
Before you begin, ensure you have:- An existing GitHub repository
- A valid SCANOSS API key
How It Works
The following diagrams illustrate how SCANOSS integrates into a GitHub Actions CI/CD pipeline, covering both success and failure scenarios.CI/CD Pipeline Sequence Flow
The diagram below shows the complete flow when SCANOSS is integrated into your GitHub Actions workflow, including both success and failure scenarios.
Developer Workflow Overview
The diagram below shows a typical developer workflow when using SCANOSS within a pull request cycle.
Configuration
Navigate to your GitHub repository and add the following secret: Settings → Secrets and variables → Actions| Variable Name | Description | Value |
|---|---|---|
| SCANOSS_API_KEY | SCANOSS API key | xyz789… |
Full Scan on Pull Requests
Create a workflow file at.github/workflows/scanoss.yml and configure it to run SCANOSS:
Action Input Parameters
The SCANOSS GitHub Action accepts the following input parameters to customise scanning behaviour.| Parameter | Description | Required | Default |
|---|---|---|---|
| policies | Comma-separated list of active policies (copyleft, undeclared, depTrack) | Optional | — |
| api.url | SCANOSS API URL. Omit when using the SaaS endpoint. | Optional | https://api.osskb.org/scan/direct |
| api.key | SCANOSS API key | Optional | — |
| scanossSettings | Enable use of a settings file for scanning | Optional | true |
| settingsFilepath | Path to the SCANOSS settings file | Optional | scanoss.json |
| scanMode | Scan type: delta (changed files only) or full (entire repository) | Optional | full |
| deptrack.upload | Enable automatic upload to Dependency Track | Optional | false |
| deptrack.url | Dependency Track instance URL | Required* | — |
| deptrack.apikey | Dependency Track API key | Required* | — |
| deptrack.projectname | Dependency Track project name. Created automatically if it does not exist. | Optional | — |
| deptrack.projectversion | Dependency Track project version | Optional | — |
deptrack.upload is set to true.
Action Output Parameters
The action produces the following outputs, which can be referenced in subsequent workflow steps or reporting tools.| Parameter | Description |
|---|---|
| result-filepath | Path to the generated scan results file |
| stdout-scan-command | Raw command output from the scanner |
Policy Checks
The SCANOSS Code Scan Action supports the following configurable policy checks, which are enforced automatically during CI runs:-
Copyleft (copyleft or cpl) – Detects Copyleft-licensed components or snippets. If found, the pull request is rejected. The default Copyleft license list is defined in the SCANOSS configuration. The copyleft determination is performed by scanoss.py (
scanoss-py inspect copyleft), which uses the OSADL copyleft checklist as the default list. Both strong (Yes) and weak/restricted (Yes (restricted)) copyleft entries are treated as copyleft, and this includes-or-latervariants (e.g.GPL-2.0-or-later,AGPL-3.0-or-later). The default list can be customized with thelicenses.copyleft.include,licenses.copyleft.exclude, andlicenses.copyleft.explicitinputs. -
Undeclared (
undeclaredorund) — Compares detected components against those declared inscanoss.json(configurable viasettingsFilepath). Pull requests fail if undeclared components are found. -
Dependency Track (
depTrackordt) — Integrates with Dependency Track to check for vulnerabilities, licence violations, and compliance issues. Requires alldeptrack.*parameters to be configured.
copyleft policy is enabled, the workflow will fail if any copyleft-licensed
components are detected in the scan results.
Delta Scan on Pull Requests
Use delta scan mode to scan only the files changed in a pull request. This avoids re-scanning the entire repository on each run.
Note: Setting fetch-depth: 0 is required. Without the full commit history, the action
cannot determine which files have changed and the delta scan will not function correctly.
Understanding the Scan Summary
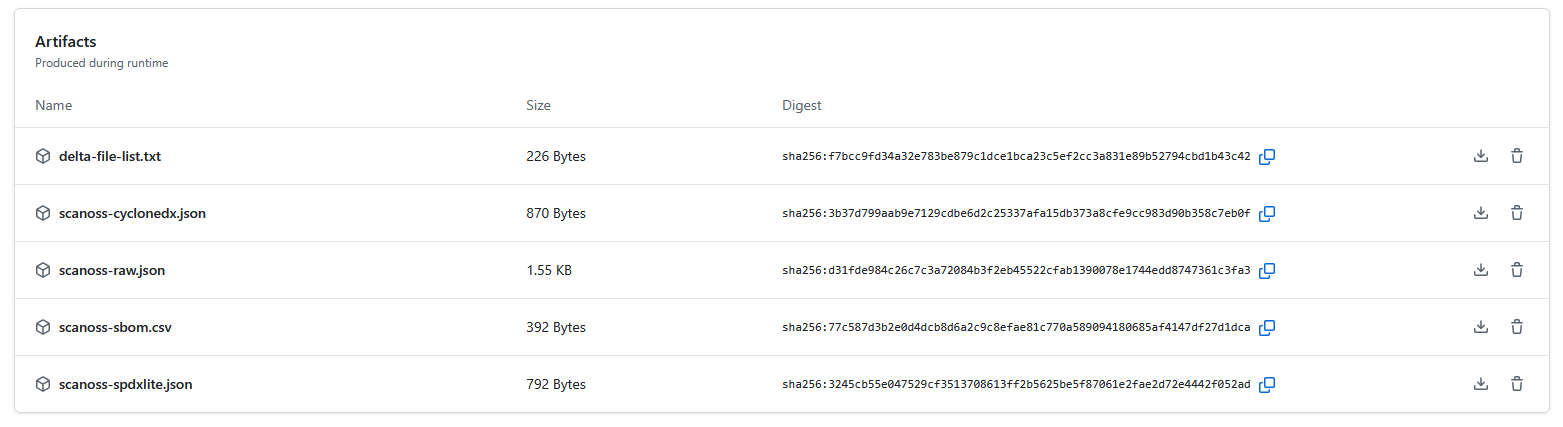
After a successful scan, GitHub Actions displays a summary of the results in the workflow run view. The summary includes:- Scan Report — Lists all detected licences, policy evaluation results, and the status of any configured integrations.
- Downloadable Artefacts — Includes SBOM files and detailed scan data. These can be used with external compliance and vulnerability management tools.
Simplified CI/CD Pipeline Sequence Flow
The diagram below shows a streamlined view of the workflow for a successful scan.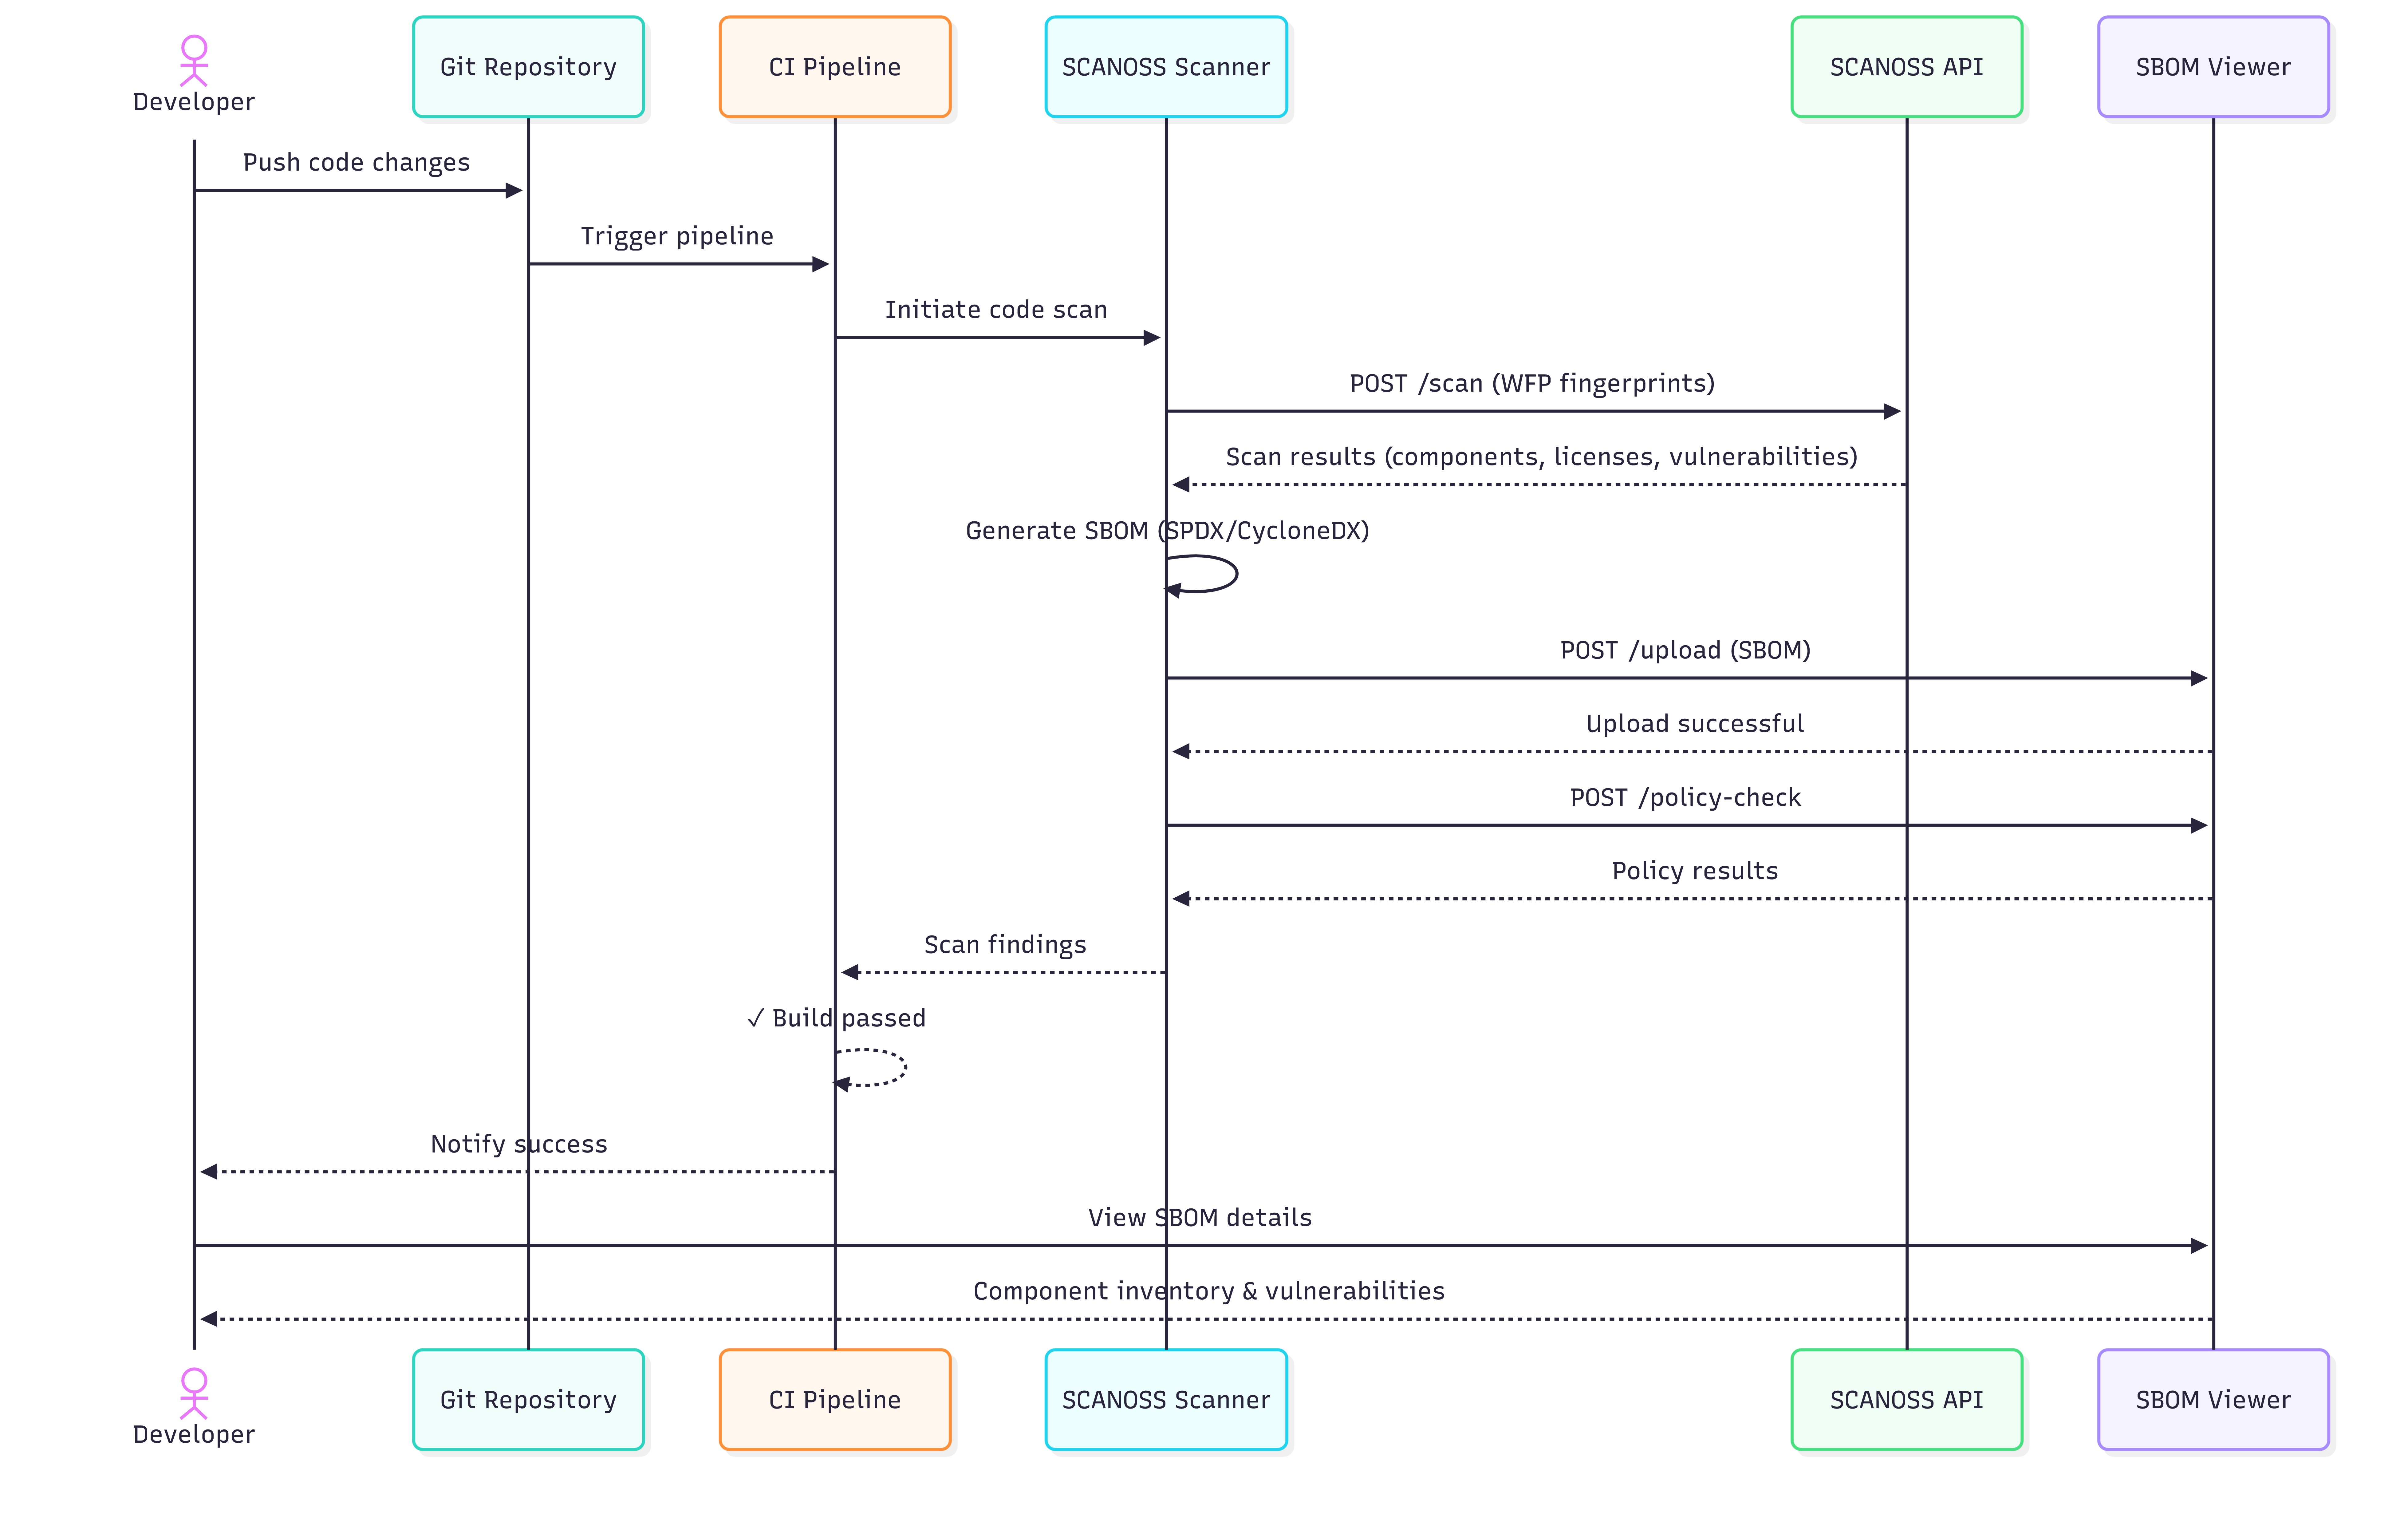
Managing Components with scanoss.json
Thescanoss.json file manages your project’s Software Bill of Materials (SBOM). It allows
you to declare approved components, record triage decisions, and customise scan behaviour to
enforce your organisation’s policies.
This section covers how to set up and use scanoss.json in a GitHub Actions workflow.
Recommended .gitignore Configuration
When working with SCANOSS in your repository, add the following entries to your.gitignore:
scanoss.json file must be committed to Git and must not be added to
.gitignore. It contains your component declarations and governance decisions, which should be
version-controlled and shared across your team.
Exclude from Git:
*.wfp— Winnowing fingerprint files generated during local scans.scanoss/— Local cache directory created by SCANOSS tools
scanoss.json— Your project’s SBOM declarations and scan settings
File Structure and Location
Placescanoss.json in the root of your repository so that the SCANOSS action can detect it
automatically.
scanoss.json and integrates with Dependency Track:
Step-by-Step Guide to Populating scanoss.json
Follow these steps to create and populate your component declarations.Step 1: Run an Initial Scan
Run the workflow without ascanoss.json file. The initial scan will identify all components
present in your repository and report them as undeclared.
Step 2: Review Scan Results
Once the workflow completes, navigate to the run in the Actions tab of your repository.- Review the Annotations on the summary page for an overview of component violations.
- Download the
scanoss-raw.json.zipartefact, which contains the detailed SBOM data.
Step 3: Extract Component PURLs
Unzip the artefact and use a command-line tool such asjq to extract a unique list of Package
URLs (PURLs) from the scanoss-raw.json file.
Tip: jq is a command-line JSON processor useful for scripting and automation.
Installation instructions are available at jqlang.github.io/jq.
Step 4: Create Your scanoss.json File
Create ascanoss.json file in your repository root. Use the PURLs from the previous step to
populate the bom.include section. Include comments to record the approval rationale for each
component.
- bom.include — Lists all approved components. The scan validates detected components against this list.
- bom.remove — Specifies components that must not be present. The scan will flag any matches.
- settings.scan.ignore — Defines file or directory paths to exclude from the scan.
Step 5: Commit and Push
Addscanoss.json to Git and push. This will trigger the workflow.
Step 6: Verify the Results
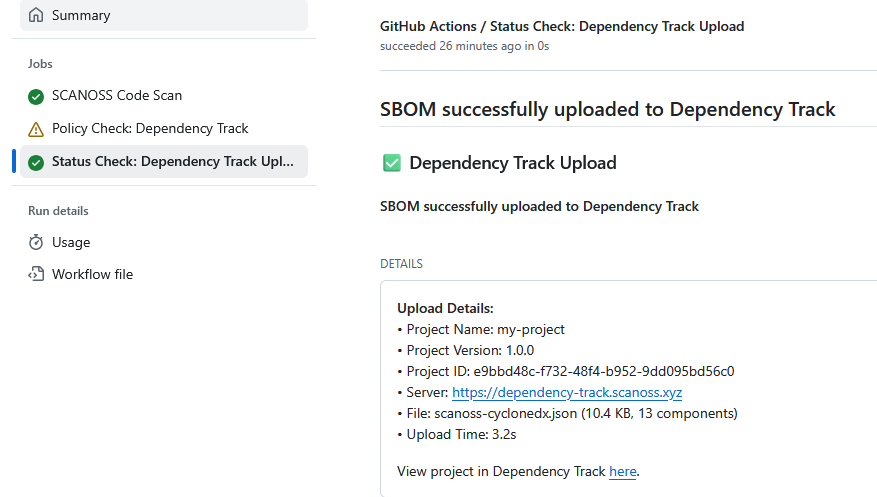
After the workflow run completes, check the job logs for the Run SCANOSS Code Scan step. The output should confirm that all components are declared and no undeclared components remain.SBOM Export to Dependency Track
The SCANOSS GitHub Action can be configured to automatically export your SBOM to Dependency Track for vulnerability and licence management. Add the following Dependency Track configuration to the SCANOSS step in your workflow file (.github/workflows/scanoss.yml):
Troubleshooting
gRPC errors (403) when using older action versions
Symptom: The workflow fails with 403 errors during decoration service calls (dependencies, vulnerabilities, etc.). Cause: The gRPC endpoints have been decommissioned. All API communication now goes through REST.gha-code-scan v1.5.0 and earlier shipped with scanoss-py v1.46.0, which still used
gRPC for some service calls, this causes 403 errors against the current API.
Fix: Update your workflow to use gha-code-scan v1.6.2 or later, which bundles
scanoss-py v1.52.1 (REST-only):