

- The project needs at least one completed scan. See Your first scan.
- To record decisions, you need a role that can triage, such as Operator or Admin. Viewers can move through findings but can’t decide them. See Team & roles.
The Review Workspace
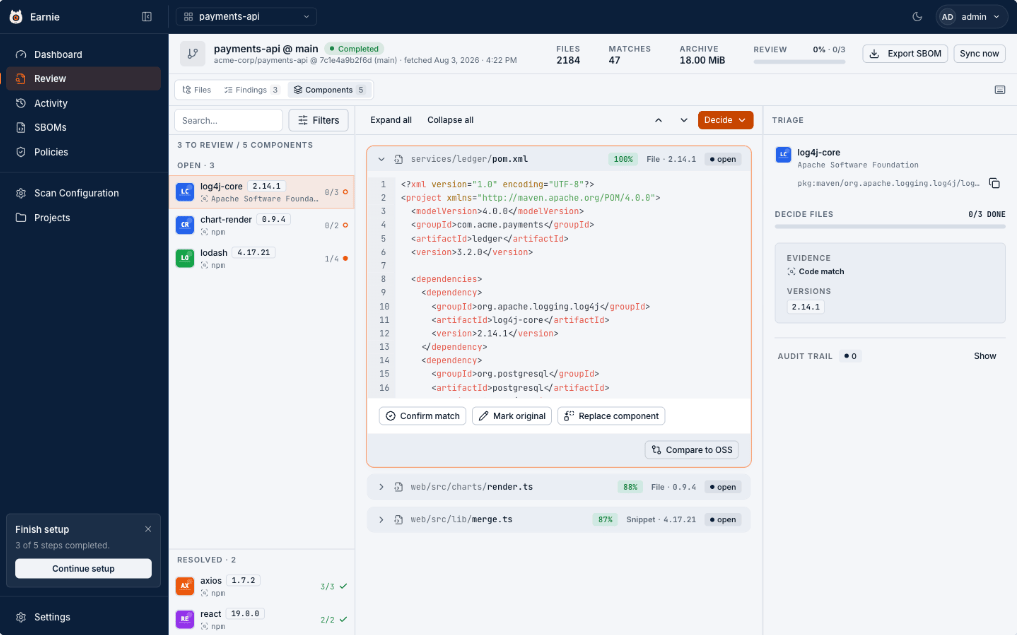
- What to review, on the left, lists the findings.
- The evidence, in the middle, shows the matched source code.
- The record, on the right, shows the component’s details and your decision.
Three ways to work
The toggle at the top switches how the backlog is organised:
Start in Components to clear volume, and switch to Files when you need to see a match in context.
When every finding is resolved, the Findings queue still lists the resolved files. Select one to see its evidence and decision.
A filter always applies to findings, so it carries across all three views. Files and Findings keep the files that hold a matching finding, and Components keeps the components that hold one.
Searching, filtering, and what the counts mean
Searching
The search box matches file name, file path, component PURL (the package’s standard identifier), and finding title. For a cryptographic finding it also matches the algorithm, somd5 finds an MD5 hash even when the rule that detected it never names MD5.
It matches letters in order, not as a single block, so lgn finds login.go.
- The box shows your typing at once. The list updates only when you pause, and shows Searching… until it does. This way the list never shows results for a query you’re still typing.
- Clearing the box takes effect at once.
Filtering
+ Filter opens the filter menu on Views, a set of one-click presets built from your project’s data: Weak crypto, Quantum vulnerable, Reachable crypto, Copyleft, Has CVEs, and Snippet matches. Earnie offers a view only when the project has matching data. Selecting a view replaces your current filter, and selecting the active view again clears it. Below Views are the filter dimensions, grouped by where the fact comes from:
You can also filter cryptographic findings from newer scans by these dimensions:
- Route evidence shows how strong the best call path to the finding is: Direct calls, Dispatch only, or Name match only. See How strong the path is.
- No known callers is Yes when every path starts in code that nothing in your application calls.
- Dependency applies to cryptography found in your dependencies. It’s Direct when your project declares the library, and Transitive when the library arrives through another dependency.
Filters are stored in the page’s address. A link you share opens with the
same filters applied, and reloading the page keeps them. The one exception is
Components’ own Status (Open, Resolved, Inventory), which belongs to
that view and never appears in the link.
Reading the counts
Every header names its unit, because the numbers count different things and you can’t add or subtract one from another:- Components are packages. Review groups hold findings that belong to no component.
3 components · 1 review groupis two separate counts, never a total of four. - Files are the rows of the Findings queue. Findings are what those rows contain.
116 files · 323 findingsis not a discrepancy.
1 matching component of 3. The full total stays in the header when a filter is on.
Reviewing an earlier run
You can open the Review Workspace from a past run in Scan history. When you do, you stay on that run:- The bar at the top names the run and marks it Selected run.
- The run stays in the address bar, so Back, Forward, and a shared link all open the same run.
- Current review, beside it, returns you to the project’s current review.
Switching projects
When you switch project from the switcher at the top left, you stay on the same kind of page if it exists in the other project. Review stays Review, and Scan history stays Scan history. If the page showed one specific item, such as a run, a policy, or a Self-check, you land on the new project’s list of those items. Earnie never carries an identifier from one project into another. A run opened under the wrong project reports itself as not found, instead of showing another project’s numbers under this project’s name.Reviewing a component
In Components mode, the left-hand list shows one row per component. Each row has its name, the number of versions matched (for example2 versions), the vendor or package ecosystem (such as npm), and how many of its findings are decided, for example 0/113.
Selecting a component opens its findings in the middle panel and its details on the right.
The middle panel
The toolbar above the list has Expand loaded and Collapse all, which open or close the file cards, and Bulk decide, which decides every open file at once. See Deciding a whole component at once. Most components show a single list of matched files, which are your own source files that match the package’s published code. Each file is a card showing:- the file path, for example
flash/PooledSocket.as - the match percentage (100% for a whole-file match, lower for a snippet)
- the match type (File or Snippet) and the matched version
- the file’s state, such as open
1), Mark original (2), and Replace component (3). Compare to OSS shows your file beside the published open-source version, where that version is available. You decide each matched file on its own.
Extra sections for some components
Some components also have declared dependencies or cryptography. Only then does the middle panel add a labelled section for each, with a heading and a count:
The matched files list has no heading. If a component has no declared dependency or cryptography, as is common for a package matched only by file, you see the list of files and nothing else. Earnie never shows an empty section. A crypto-only package, for instance, shows no Declared section and no matched files.
INVENTORY shows whatever data is available: names, types, primitives, PQC (post-quantum cryptography) status, reachability counts, and expandable lists of source files. Earnie doesn’t infer missing metadata.
Even when collapsed, the Inventory header says how many of the dependency’s findings are reachable from your application, and lists the first three reachable ones under it. Expanding it shows Findings in this dependency, one verdict at a time (Reachable, Unknown, or Unreachable), each with its count.
Each row names the algorithm, the file and line inside the dependency, and how many call paths the scanner found. On newer scans it also shows how strong the best path is. When a verdict’s findings differ in strength, a second row of buttons filters them by strength. Selecting a row opens that finding in the triage panel for reading, where View call trace shows how your application reaches it. You decide a dependency’s cryptography once, for the whole package, from the component.
If you dismiss the declared dependency, or mark it original, Earnie removes its embedded cryptography from your CBOM (cryptography bill of materials) and posture the next time they’re read. This never changes the underlying findings. They stay open, in case you accept the dependency again later.
The right-hand panel
The Triage panel on the right shows the component’s state (for example Open), then its name, vendor, and package identifier (PURL), followed by groups of details. A group appears only when there’s data for it:
Below the groups, Detected shows when the finding was detected, by which scanner (for example
scanoss-go), and in which scan.
The panel opens on this component summary. Earnie expands the first open card in the middle panel, but the right-hand panel stays on the summary until you pick a card. Clicking a card, or moving to one with j or k, switches the panel to that finding. Press Esc, or close the card, to return to the component summary. A link that already names a finding opens on that finding.
The two counts measure different things. The count on the component’s
row, such as
0/113, answers “is this specific package fully decided?”. It
never includes a dependency’s embedded Inventory, because there’s nothing
there to decide. The Review counter answers “how much of this scan’s
reviewable work is done?”, so the two numbers don’t have to match.Reading the evidence
The source panel
The middle panel shows the matched source, with the match percentage: 100% for a whole-file match, lower for a snippet.- The selected match is highlighted in its family colour, green for open source and red for cryptography, so you work on one match at a time.
- Other matches in the same file keep a coloured rail in the gutter, and the rest of the file isn’t highlighted.
- Hovering over another match previews it, but only when that match doesn’t already cover your selection.
- When a file holds several matches, opening it selects the first one by line. The toolbar list names each finding, with a small family icon after the name.
The component panel
The right-hand panel identifies the component (name, vendor, and package identifier), with its licence, known vulnerabilities, and how far behind the current release it is.Cryptographic findings
A cryptographic finding highlights the exact lines where an algorithm is used, in the same source panel as an open-source match. What the finding names depends on where the cryptography is:- Inside a dependency, it names that package.
- In your own code that calls a known cryptography library, it names that library.
- In plain standard-library usage, it names no package.
Starting from the Algorithms page
Where Cryptography is enabled, a project’s sidebar also has an Algorithms page. It lists every cryptographic algorithm detected in the project, one row per algorithm. Each row shows the algorithm’s key size, its Quantum status (Vulnerable, Unassessed, or Safe), its severity, how many assets and files use it (including how many uses sit inside dependencies), its open findings, and the libraries that provide it. Search by algorithm, family, or library, and narrow the list by primitive, quantum status, or severity, or with Weak only. Select a row to open the Review Workspace filtered to that algorithm, with the first file that implements it already open. An algorithm found only inside dependencies opens in Components mode instead, because there’s no file of yours to show. Use the page to answer “where do we use RSA?” or “what here isn’t quantum-safe?” before you work through individual findings.The evidence card
The right-hand evidence card groups its facts by the kind of asset: algorithm, key material, certificate, or protocol. It shows only the facts that kind of asset has. An algorithm asset shows primitive, mode, padding, and key size, for instance. A fact the asset doesn’t have gets no row, instead of an empty one.- A protocol asset’s title comes from the protocol’s own name, so an SSLv3 finding reads SSL 3.0, not “TLS 3.0”.
- What provides the cryptography (the library, API, and provider) sits in its own Implementation group.
- When the scanner didn’t name an algorithm, the card names the matched API or the asset type, never an internal rule ID.
- When the finding also names a package, the card adds the licence, known vulnerabilities, and how far behind the current release it is, the same groups as for open source.
Reachability
The evidence card has a reachability pill, with one line explaining it. Reachability tells you whether your application can run the code in question:
A project with no lockfile or build file isn’t Unknown for that reason alone. Earnie then traces reachability through the project’s own source code.
Not reached is not the same as not used. The trace is static analysis,
which reads the code without running it. It can’t follow code reached through
reflection, dynamic dispatch, or configuration, and some languages have no
call-graph support at all. In those cases Earnie says Unknown instead of
guessing. Treat a reachable finding as more urgent, but never treat an
unreachable one as harmless.
How strong the path is
Some calls on a path are less certain than others. When your code calls a method through an interface, the scanner can’t always tell which class receives the call, so it follows every class that could. Newer scans say how strong the best path to a finding is, under the verdict in the triage panel and at the top of the call trace:
A finding can also say Reached only from code with no known callers. This means every path starts at a function that nothing in your application calls, such as a command-line tool, a test helper, or code that only reflection reaches. The finding stays Reachable, because that function may run, but nothing shows that it does. Older scans show neither wording.
How your application depends on the library
On newer scans, the triage panel of a dependency finding says under the verdict whether the library is a Direct dependency (your project declares it) or a Transitive dependency (it arrives through another one). It also shows the shortest chain of declarations that brings the library in, such asApp → tika-parsers 1.28.5 → bcprov-jdk15on 1.70. A library the scanner read without its source is marked (no source).
This chain isn’t the same as the libraries a call trace passes through. The trace follows calls, which can go through libraries that declare nothing about this one. To stop shipping the library, change the declaration the panel names. To stop reaching its code, change the calls the trace shows.
An assessed, reachable finding whose severity sits one level above its curated base severity shows a severity escalation row under the reachability pill, explaining why. The row appears only for that exact combination: assessed, reachable, and exactly one level up. An unassessed or unreached finding, or one already at its base severity, shows no such row.
The call trace
When there’s a path, the branch icon on the evidence card (View call trace) opens Call trace, which lists the retained paths, entry point first.- The first path is expanded and the rest are collapsed.
- Earnie keeps the shortest distinct paths, not everything the scanner walked. When it kept fewer paths than the scanner found, the panel says so at the top, for example
Truncated: 128 paths found, 20 shown.On newer scans the count is of distinct routes. When the scanner itself exported fewer paths than it found, the note says how many it kept, as inTruncated: 40 paths found, 4 kept by the scan, 1 shown.
main, or a framework entry point such as a request handler, a scheduled job, a message listener, or a method a framework calls through an interface. It can also be a function that nothing in the application calls, often a tool, a test helper, or code called by reflection. Or it can be the point where the trace stopped at the depth limit, which means the path is cut and its real start lies further up.
Paths through dependencies. A path can start in your code and end in a library your code never calls directly. Above the frames, each path lists the libraries it passes through, in call order, such as App → tika-core 1.28.5 → … → bcprov-jdk15on 1.70. Each frame inside a library is labelled with that library and version, and a line marks each crossing, such as Leaves application code, calls into tika-core 1.28.5. Frames in your own code have a hollow marker, and frames in a library have a filled one.
For new scans, each hop (each step in the path) shows a short, syntax-highlighted excerpt of the scanned source around the call. Selecting the excerpt opens that file and line in the middle panel, without changing the finding you’re reviewing.
The last card in the path shows the cryptographic call itself. The highlighted call and the matched API sit beside statements built from the scanner’s recorded argument evidence, such as algorithm resolved statically to "SHA-256".
- A parameter without a proven value says
not statically resolved. - A hop whose archived source is no longer available says
Archived source unavailable for this frame, and shows a compact function-and-file row instead of an empty excerpt. - A library frame’s source isn’t part of your scanned files, so it never opens a file. It says Source is inside
<library>, not in the scanned files, and shows the file and line within that library as plain text. The exception is the crypto call itself. When the scan cached the dependency’s source (Maven and Gradle today), Earnie shows its excerpt. Paths recorded before Earnie kept each frame’s library say so. Rescan to see which library each frame belongs to.
Findings inside a dependency
When a finding sits inside a dependency, its code lives in that package’s own source, which isn’t among your scanned files. What you see depends on what Earnie could resolve during the scan:- The package’s source was resolved. Earnie shows the real file, opened at the line where the algorithm is used, in the same source panel as your own code. Today this works for Java projects built with Maven or Gradle.
- Only the matched line is available. The panel shows that single line, syntax highlighted, with its real line number in the gutter.
- Nothing is available. The panel says Code not available, instead of showing what looks like an empty file.
Where the severity comes from
Earnie rates the severity of cryptographic findings from curated datasets that ship with Earnie. The datasets are tables of algorithms, protocols, and key material with their risk levels. Earnie publishes the datasets at Settings → Crypto Assessment. The page shows what each dataset contains, not the assessment of any one finding. It has one table, with one row per family:- Scope switches between Algorithms, Key material, and Protocols.
- Search finds a family, an alternative name, or a protocol.
- Show narrows the table to High severity, Quantum-vulnerable, or Export-controlled rows.
- Each row gives its Base severity, its Post-quantum verdict (for algorithm families), and its Export threshold.
Where a published document sets a migration deadline for an algorithm family,
such as the 2030 retirement of the classical public-key families, the panel
adds a Migration horizon 2030 marker: “Migrate before 2030, a published
deadline, not a risk level; this finding’s severity is unchanged by it.” A
deadline is not a severity. RSA-2048 is Low today and also has a date to
migrate by. Earnie reports both, and the deadline doesn’t change the
severity. Use the deadline to plan migration work, not to decide findings.
Making a decision
Select Decide and pick the answer that’s true. Earnie moves you to the next open finding after each decision, and every decision offers Undo. Hover over an option to see its effect on the gate before you choose.Open-source matches
Declared dependencies
For a declared dependency, the choice is Accept into SBOM (1) or Dismiss (2). When the component has nothing else left open, Earnie moves you to the next open component.
Cryptographic findings
All three decisions close the finding and keep its row, so an accepted risk stays visible in the list. Whether the algorithm is reachable may change what you decide, but never which decisions you’re offered.
There is no “Fixed” for cryptography. You record a fix by removing the
weak algorithm and re-scanning. The next run reports it as gone and keeps your
decision history. Earnie can verify that from the scan, instead of relying on
your word.
AI model findings
Where AI provenance is enabled, a model file gets its own decisions, separate from a usage finding:
An AI usage finding is code that calls an AI service or SDK, not a model file. You decide it separately: Confirm AI usage, Not AI usage, or Approve AI usage.
You can’t apply a model-finding decision to a usage finding, or the reverse. Earnie refuses the mismatch instead of recording a decision that doesn’t fit the evidence.
Deciding a pull request’s own findings
A pull request can introduce a finding that has no counterpart yet on the project’s default branch. You can still resolve or reopen that finding from the pull request’s own Review Workspace. Until the change merges there’s no standing finding to attach the decision to, so Earnie records it as Applies on merge. The finding shows as decided in that pull request’s view right away, including for its gate. Once the same code reaches the default branch, Earnie applies the original decision, and any Policy Approval requested against it, to the project’s real findings. Assign, Suppress, and saving a correction to Scan Configuration aren’t available for these findings until they exist as standing findings after merge. Bulk decide skips them too, so you decide them one at a time.Deciding a whole component at once
In Components mode, Bulk decide applies a decision to every open file for that component. With the keyboard,Shift+1 confirms all and Shift+2 marks all as original. On a large first triage, this saves the most time.
Saving a correction for future scans
When you replace a component, you can also tick Also apply to future matches of that package in this project. Earnie saves the correction to the project’s Scan Configuration, and future scans apply it without asking you again.Component overrides
A component override settles a package’s findings automatically on every scan, so you don’t have to decide them again. Each override names a package, optionally limited to a path, and one decision:
Earnie reads overrides from three places:
- The project’s Scan Configuration, for example a correction saved with Also apply to future matches.
- The repository’s
scanoss.jsonfile:bom.remove,bom.replace, andbom.include(Confirm as declared). Earnie also acceptsbom.identifyas another name forbom.include. Earnie reads this file but never writes to it. See Declaring components for the file format. - The organisation’s Scan Configuration.
Existing
bom.include entries now take effect. If your repository’s
scanoss.json already lists bom.include or bom.identify entries, Earnie
applies them from the next scan. A path ending in /, such as "src/",
also matches now.When overrides overlap
When more than one override names the same package, Earnie applies them in this order, and the first one to claim a path wins:- By source, from most to least specific: the project, then
scanoss.json, then the organisation. - Within one source, remove, then replace, then include.
How a decision moves the Dashboard
False positive and Accepted risk take the finding out of these Cryptography Dashboard numbers:- the reachable-and-weak headline
- the post-quantum migration counts
- the algorithm ranking
Confirm usage works differently. It does not reduce those counts.
Confirming that an algorithm is in use confirms that the risk is real, so
Earnie keeps the finding in those counts. The merge gate counts it either
way. The card shows how many findings you’ve confirmed, so your work is
visible and the risk stays counted.
Deciding a finding doesn’t shrink your inventory. The counts that
describe how much cryptography is in the product ignore your decisions:
total findings, distinct assets, the reachability split, first-party versus
dependency, and the asset-type breakdown. Confirming or accepting an
algorithm doesn’t remove it from the build, so it doesn’t remove it from the
inventory. Only the counts of work left to do respond to triage.Export readiness is a third case. It measures the evidence you hold for what
you ship, and deciding a finding never turns it green by itself. A false
positive drops out, because it wasn’t cryptography. An accepted risk and a
confirmed usage are both still in your CBOM, and you still need to gather
export evidence for them.
The audit trail
Earnie writes every action to the finding’s Audit trail: what was decided, by whom, when, and what the state was before. Use this record to show later why a decision was made.Keyboard shortcuts
Press? anywhere in the Review Workspace to open the Keyboard shortcuts panel, which lists the shortcuts for the mode you’re in.
Shortcuts do nothing while you’re typing in a field. Decision keys appear only for roles that can record decisions.
Components mode
Findings and Files modes
The Dashboard has keys of its own, but only while Customise is on. Focus a
card’s move handle, then use
← / → to move it one place, Home / End to
move it to the start or end, and, on a wide window, Shift+← / Shift+→ to
resize it. See Making the canvas your
own.Finding states
Each finding shows its state:
In the Files tree, each file’s marker groups these into three statuses: pending review (needs you), identified (decided), and marked as original (your own code).